Amateur Rhododendron Propagation Techniques: Part 2
John G. Lofthouse, Vancouver, B.C.
In this second article, the propagation of rhododendrons by cuttings and grafting will be discussed. Mrs. Berry's article "We've Gone To Seed," (April 15/6 issue) showed the interest members have in this phase of growing rhododendrons. I am sure the serious hobbyist will find the methods of propagation, herein described, equally interesting and rewarding.
Under artificial illumination, conditions of light, temperature, heat and humidity are almost ideal. Plants grow continuously and fast, making propagation much easier. As most of the described methods apply to growing under this light source, some modification of culture will be necessary if tried under greenhouse or outside conditions.
Cuttings Versus Grafting
It is generally conceded that plants grown from cuttings are superior to grafted plants. While this is generally so, there are, however, some exceptions. Some species lack vigor on their own roots, others require certain soil conditions. Often these will do better grafted to other more suitable understock.
But there are other advantages too, to each method of propagation. Your choice will probably be governed by the goal you have in mind. Listed below are some of the comparisons.
- Cuttings make a plant that usually is mechanically stronger (no graft breakage).
- The plant is devoid of suckers. Grafted plants often send these up below the graft, and if not removed, they will eventually produce flowers common to the understock.
- In some areas, grafted plants are susceptible to Rhododendron wilt, especially if grafted to R. ponticum . Using other suitable understock would probably reduce this fungus infection.
- Cuttings can usually be struck only from the late summer to early winter. Grafting however, can be done at any time of the year, under fluorescent lights, on actively growing under stock. The big advantage here, is that if you are given a scion of a select plant you admire in bloom, it can be grafted to understock in the spring. When "grown on," this can be struck as a cutting later, if desired.
- Some cuttings, particularly of the big leafed sorts, are extremely difficult to root. However, most can be propagated comparatively easily by grafts.
- Some cuttings take a relatively long time to bloom. However, a graft on a mature bush may bloom the next year after grafting. This method is used to get new hybrids to bloom earlier, thus giving the hybridizer a quicker evaluation of his results. It also allows him to use this plant for further crossing if desired. The time saved is considerable.
These are some comparisons of the two major methods of vegetative propagation. I am sure the value of knowing the techniques of both will be invaluable.
In grafting, the use of suitable understock is very important. Some species and hybrids do much better on some understocks than others. I am sure the failure and the bad reputation of grafted plants is more often due to incompatible understock than any other reason. For example I am very fond of yellow rhododendrons, and we know that in the British Isles, among the finest yellows are
R. lacteum
and its hybrids (one being 'Mariloo'). I have tried these on their own roots, and grafted to 'Naomi' seedlings (a successful method with many other species and hybrids). They have grown in some cases, but usually poorly. This spring I tried again. but this time using our native
R. macrophyllum
. Both
R. lacteum
and 'Mariloo', responded as if by magic. The grafts united and broke dormant buds within three weeks. They are now growing vigorously. It is too early to judge their future at this stage, but the plants look very promising. This might be the answer to their poor regard in this area. Propagation From Cuttings
As the methods employed in propagation from cuttings are comparatively simple, they will be discussed first. First select suitable stock, generally in the late summer or early fall. Pinching out the centre bud after the first growth of spring, results in many laterals forming during summer. These are generally good cutting material after maturing later in the season. Material for cuttings should be more on the lean side, rather than fat or succulent. Cut these lateral branches off at the point of origination, otherwise, ugly stumps are left which die back to the originating point anyway. The terminal 4 or 5 leaves are left on, all other leaves cut off, cleanly with a sharp razor blade and the stem shortened to approximately 2½ to 3". The remaining leaves, if particularly long, may be shortened up to ½ their length if necessary.
Wash the cuttings free of soil, insects, scale, etc. Wounding the stem results in better root formation. This is accomplished by removing a thin strip of bark for a distance of approximately 1½" from the base with a sharp razor blade. Cut down to the wood but no further. Dip the base of the cutting, including all of the wounded portion in a strong rooting powder, such as Rootone 10 or 'Seradix' B 3.
These can be inserted directly into the rooting medium if desired. After the described hormone treatment, better results are obtained if the cuttings are carefully wrapped at the base in damp absorbent cotton and placed in polyethylene hags sprayed lightly inside with cold water. The bags are closed and the cuttings left in a cool place for 24 hours. The cuttings benefit by this treatment, absorbing moisture and more of the hormones than if placed in the rooting medium in a somewhat wilted condition.
The Rooting Medium
The rooting medium and containers should be prepared 24 hours before insertion of the cuttings. I use equal quantities of pre-dampened sphagnum moss (Western Canadian Peat or equivalent) and perlite. The containers can be plant bands, as mentioned in part one of this article, clean 6"-8" Azalea pots, or clean flats, if large quantities of cuttings are to be struck. Water these completely 24 hours before using. Leave to drain, as excess standing water at the base of cuttings causes rot. top of containers should be covered with glass or polyethylene during this interval. After 24 hours, cuttings can be taken from the polyethylene, absorbent cotton removed, re-dipped in hormone powder, and placed in the rooting medium to a depth of ¼" from the lowest leaf stalk. Firm lightly, do not re-water. Leaves of adjacent plants should not touch. Cover with the polyethylene leaving about 3" or 4" above the leaves. The plant bands and pots can be covered with polyethylene refrigerator bags or the covers from 12" LP records. The larger plant flats should have wire forms made to support the covering, cut from polyethylene sheets, and fitted to retain the high humidity necessary in the early stages of rooting. Avoid disturbing the cuttings.
These containers are then placed under the lights approximately 3"-6" from the top of the covering. After about 7 to 10 clays, freshen the air by punching several ½" holes in the polyethylene ,just. above the top of the containers. This is important. The humidity is very little affected, the young plants root easier, and chances of rot are reduced. During the rooting period keep medium damp, not soggy and wet. Remove any fallen leaves or cuttings that look unhealthy.
Time of root formation varies according to species or variety. New sustained growth generally indicates root formation, but do not remove at this stage. Leave approximately 6 weeks longer and then gently remove. If well rooted. transfer into a soil similar to that described in part one of this article, and grow on. Culture is then similar to that described for rhododendron seedlings.
|
|
|
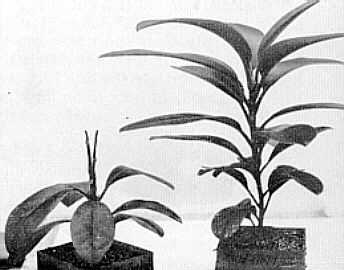
Fig. 32. Understock 7½ months from seed.
Plants were the same size before the one on the left was topped and cut preparatory to grafting. Photos by John G Lofthouse |
Fig. 33. Scion and understock
cut as described in text, before fitting and tying with grafting rubber. |
Propagation By Grafting
Many grafting methods are used. Space does not permit a full account of all methods. Consult the many available publications covering this subject for further information. I use most often a modified cleft graft, and this method will now be described. Seedling understock, described in part one of this article, is grown on until a diameter of 3/16" or ¼" is obtained about 3/5 the way up the stem. This size is obtained in about 8 months under artificial light, if seedlings have been growing vigorously. The top of the understock should be removed at this point. The stem is soft, young and succulent. Lower, it is thin and hard, and the graft is not usually so successful. Remove the leaves for a distance of 1½" down from the top, with a sharp razor blade cutting the leaf stalks flush with the stem.
Now with a thin sharp razor blade, split the stem down the exact center for 1¼". Starting at the right edge of the top of the understock make another cut diagonally down the stem to meet the bottom of the first cut at the centre. Do the same starting at the left edge to the bottom centre. This wood when removed, leaves a long V in the top of the understock (see photo) each cut area being roughly parallel to the other.
The scion (the desired cutting to be grafted) is selected and prepared similarly as described earlier in this article for the taking of cuttings. No wounding or hormone treatment is used however. Then it is cut to fit the V in the under stock. The finished cut will look like a long wedge 1-1/4" long. Fit this scion into the V of the under stock. For successful uniting, the cambium layer (approximately the line between bark and wood) of both scion and understock should match and fit closely from top to bottom.
If the scion and understock are approximately the same diameter and age, this will take place at all points on both sides. If they are not, line one side of the cambium layers perfectly; do not worry about the other side. If one side is properly aligned and other factors favorable, the graft will be successful. Now bind fairly firmly with an 1/8" wide cut rubber band. Start at the bottom and proceed to the top. Tuck loose end of band under the last loop. Water soil well and cover plant and container with polyethylene and place under lights.
|
|
|
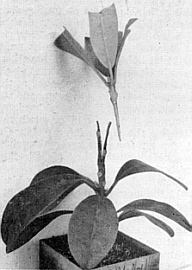
Fig. 34. A plant three weeks after grafting.
Dormant terminal bud breaking and expanding into fast growing leaves indicates a successful graft. Understock a 'Naomi' seedling. Photo by John G. Lofthouse |
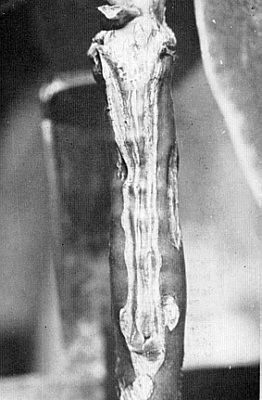
Fig. 35. Close up of cleft graft: dark
tissue from stock, light tissue from scion. Photo by John G. Lofthouse |
If the graft is successful, uniting will be complete in about 4 to 5 weeks. When graft is united, remove polyethylene, then carefully unwind rubber hand. With care, cover graft snugly with plastic electrician's tape. Leave for another 6 to 8 weeks, then remove entirely. Carefully remove all buds on stem below graft, leaves should be left on. Centre bud on scion should be allowed to break naturally. After stem matures, centre bud should be removed to promote branching.
Grafting can be clone under lights at any time of the year. On actively growing understock, the scions can be united at most any stage of development with best results when approximately semi-mature. The above described grafting method can be done outside during the late spring and early summer on potted or soil grown plants. Enclose scion and graft completely with polyethylene and keep absolutely shaded. Hot sun hitting these bags would soon kill the tender scions.
I will, in part three of this article, continue with several little known methods of striking the hard to propagate rhododendrons on their own roots. Hybridizing will also be discussed.