A Modern Method for Propagating Rhododendrons From Seed
Peter G. Jordan
U.S. Public Health Service Hospital Boston, Massachusetts
Because of their wide variety of flower forms, colors, and foliage textures, rhododendrons are among the most interesting plants to propagate. Unlike many flowering shrubs, almost every species presents a distinct appearance. This variation is quite apparent in propagating them from seed, for the results of our work are not fully predictable. We know that seedlings of hybrids and named varieties are often different in appearance from the parents, but those of species rhododendrons also vary in some respects: the flowers of
R. japonicum
, for example, range in color from red to pink to orange in individual seedlings. This quality of variation can stimulate our curiosity more than in vegetative propagation wherein the new plants are certain to be identical to the parent.
Seed propagation of rhododendrons and its resultant variation is instrumental to the breeding of new hybrids. Most of the named cultivated varieties that we know today originated in such intensive hybridization programs as those of Lord Lionel de Rothschild at Exbury, England, or Mr. Charles O. Dexter of Sandwich, Massachusetts. These hybridizers propagated thousands of rhododendrons by seed to improve the flower color, form, or winter hardiness of their plants. Other new varieties have been the products, not of hybridizing programs, but of selection from seed lots: the attractive
R. mucronulatum
, c.v. 'Cornell Pink,' appeared first as a natural variant in a sowing of species seed from Korea at Cornell University in 1946.
1
For the gardener who would earn his merit badge in propagation, the culture of rhododendrons from seed offers a definite challenge, although most of the problems can be resolved with some creative ingenuity. There are, moreover, some distinct practical advantages. First, it is the easiest way to obtain quantities of vigorous plants (as for naturalizing in a wooded area) growing on their own root systems, and hence avoiding the problems of grafted plants. Second, seed propagation offers a fine opportunity to obtain plants, either for use outdoors or in the cool greenhouse, that are not available from local nursery sources. In the Boston area, for example,
R. dauricum
, though quite hardy, is not sold commercially; yet from seed I am raising not only the red-flowered species, but the white form,
R. dauricum
f.
album
, as well. Third, should you find yourself in my position here at the Hospital, that of having no rhododendrons growing on your land to propagate vegetatively, seed propagation has obvious advantages. Finally, the vegetative propagation of rhododendrons, especially of broad leafed varieties, is apt to cannibalize the mother plant, since a stem cutting for rooting or graft scion may require the removal of one of the flower buds, and hence one of next year's flowers. For varieties that are more productive of smaller flowers, of course, this problem lacks the same dimensions.
Despite the desirable qualities of seed propagation the literature about it is quite small. Many advances have recently been made in improved techniques of vegetative propagation, so that many accounts of the subject deal only with asexual methods. The most extensive articles on reproduction by seed are contained in Mr. Bowers'
2
and Mr. Leach's
3
books. A well-illustrated account appears in Mr. Lee's book on azaleas,
4
and shorter descriptions are included in
The Rothschild Rhododendrons
5
and in Mr. Coggeshall's article.
6
The method of propagation employed by Charles O. Dexter, "who was unsurpassed as a propagator of rhododendron seedlings,"
7
was quite topical, and is described by Mr. Bowers.
8
Beginning "as soon as possible after January first," Mr. Dexter used shallow wooden flats with wire mesh covering the bottom, on which he placed a layer of "clean coal cinders or slag" for drainage. Above this he put a mixture of "sifted leafy soil" from his nearby oak woods, a little clean sand and some "granulated German or Dutch peat moss." Sphagnum moss that was ground by "rubbing dried green sphagnum through a wire mesh screen" was sifted over this mixture, and the seeds were sown on top of the sphagnum and partially covered by a light dusting of more ground moss. The flats were watered thoroughly at seeding but sparingly thereafter until germination occurred.
During the thirty years that have passed since Mr. Dexter's death, the sphagnum moss method has been universally advocated for use in seed propagation. It has been so satisfactory that, while innovations were being made in vegetative propagation, the same technique was continually applied to seedling culture. I believe, however, that the sphagnum moss method is very difficult to manage, and in the following account of it I will include not only the instruction of noted authorities, but also practical observations based on my own experience with it.
The Sphagnum Moss Method
Sphagnum moss is a bog plant which, in its dehydrated form, is "relatively sterile, light in weight," capable of holding large amounts of water (up to "20 times its weight") and quite acid, with a pH of about 3.5.
9
The nutritive qualities of the moss are not great, but it possesses a fungistatic quality that helps to prevent 'damping-off' of seedlings: when, due to certain fungi, the little seedlings turn brown or gray, collapse and die. The moss is available either dried whole or milled into a fine powder. Few gardeners today grind their own sphagnum for commercially milled moss is even more readily available than the un-milled long fiber type, and the cost differential is not great. One problem that I have encountered in using milled sphagnum moss is its inconsistency. The moss tends to form tight little balls in the midst of the finer powder which, when wet, become reservoirs of moisture and hence magnets for the little seedlings' roots. At transplanting time, 10 or more seedlings may be found to have their roots in a single one of these balls, and it is almost impossible to separate them. In using milled sphagnum moss, then, it is necessary to watch for these clumps and to break them up by hand whenever possible.
The manner in which the sphagnum moss should be employed has been the subject of some discussion. Mr. Coggeshall suggested in his article that it be spread in a ¼" layer over a mixture of "one part garden loam, one part coarse sand and 2 parts peat moss."
10
In the Rothschild method equal amounts of milled sphagnum and washed sand were combined,
11
while Mr. Leach recommended the use of pure sphagnum moss as a media.
12
used the sphagnum moss alone, for mixing it with sand seemed to have no practical advantage. One of the great problems of sphagnum is its tendency to compact and dry out, but the grains of sand were found to be too small to prevent the compaction while they tended to hasten the drying process. In using Mr. Coggeshall's mixture, it would be well to use sterile loam so as to inhibit the growth of bacterial fungi.
The container is then filled with the media to within ¼" of the top, and thoroughly watered. I used standard 5" x 8" x 2½" plastic seedling trays, but Mr. Leach recommended plastic refrigerated dishes with a cover,
13
in which case it would be necessary to allow more space at the top. Plastic containers are preferable to wooden or clay seed pans for they can be cleaned more thoroughly and will not support the growth of algae or bacteria. I found that the fungistatic quality of the moss itself was not sufficient to control disease problems, so I treated all of the water with a fungicide. I used (and still use) Captan, a whitish powder, because it is economical, easily mixed, and ecologically safe, rather than fungicides that contain mercury or mercury derivatives. I set the trays in a sink or large basin filled to the depth of the trays themselves. The sphagnum moss is very light and will float at first, but after a time the trays gradually sink. This process can be aided by watering from above with a bulb sprayer using some of the treated water. The period required for the water to rise to the surface of the media was at least 4 hours or, more generally, overnight.
The trays are drained for a minimum of 2 hours, until all excess water has run off, and the seeds are sown on the surface of the moss. After seeding, the trays are again watered thoroughly and drained. I found that this second watering was less time-consuming than the first, for the water came to the surface within 30 minutes and the drainage required about the same period.
There has been some controversy over the care of the seeding trays before germination has taken place. Mr. Coggeshall and Mr. Bowers recommended placing the trays in an area with a 60° night temperature to obtain germination in 16 to 20 days,
14
while Mr. Leach suggested a temperature of 75° for germination in about 2 weeks. All the authors favored some degree of darkness or shading: the Rothschild method utilized paper covers for the containers which were not lifted until the cotyledons appeared.
13
Mr. Leach advocated an artificially illuminated case with the lights off. A recommendation has often been made that the containers be covered with a pane of glass or a lid to keep the surface of the media moist, with ventilation being admitted only gradually after germination.
In my own experience, I found that fungus diseases, even though I used pure sphagnum moss in sterile containers, were much more of a difficulty than most authorities seemed to feel them to be. The essential problem of cultivating rhododendrons by seed is not, I believe, that they are inherently demanding or difficult to grow, but simply that their rate of growth is much slower than that of most other plants, and in this respect, the period prior to the first transplanting is the most critical. Once the plants are separated and growing in their own pots, troubles can still appear, but the probability of their growing to mature, flowering, plants is vastly increased. Because of their slow growth rate, it is necessary to keep the little plants in the original seeding media for a much longer period of time than would otherwise be necessary. Compared for example, to a petunia plant which grows from approximately the same size of seed, a rhododendron seedling is ready for its first transplant after a minimum of 1½ months, whereas our petunia can be transplanted within 2 weeks of germination. This means that for the rhododendron all manner of problems, such as fungus diseases and the deterioration of the media, are intensified, while the petunia avoids many of them by its rapid growth that permits prompt transplantation into a different media. One of the greatest problems I experienced with sphagnum moss in rhododendron culture was controlling the relationship between watering and compaction of the media. After germination the surface of the media can be permitted to dry more often, but the media cannot be allowed to dry out completely; some moisture must always be present. As the weeks passed, whether I watered from above or below, the milled sphagnum moss gradually began to settle, under the influence of the water passing through it, until it formed a solid, fibrous, mass in which watering became increasingly critical. If I watered too much, the moss, because of its poor drainage, quickly became covered with a slimy green swamp. I was told that this algae was not harmful to the seedlings, but personally, I never saw a healthy seedling growing in that ooze. On the other hand, if I reduced watering, the now solidified media showed an ability to dry out with alarming speed, swamp and all. The obvious solution was somehow to control the watering with great accuracy so as to avoid both conditions, but this proved to be easier said than done.
With that Scylla and Charybdis somehow passed, another formidable problem appeared at transplanting time: Namely, how could the plants be removed from the media? This was a question which I never succeeded in resolving; for I transplanted hundreds of seedlings, and all, except 2 plants died (and those perished several months later). I was astonished that so many plants could die; after transplanting I tried putting them under a plastic tent where there was a high humidity level. I attempted to transplant them when they were so young that I needed tweezers to pick them up, but all to no avail. I was by no means a novice at seed propagation. I had grown many different species of garden plants, annuals and perennials, using the sphagnum moss method with complete success, but I had never seen anything like this!
I was introduced to the last sphagnum moss problem at pot-washing time, for the containers were full of congealed sphagnum moss residue. I corrected this only by the generous application of a scrubbing brush, for the moss had settled around the lower corners of the pots so as to make its removal quite laborious. I need hardly add that I concluded my first growing season in complete frustration.
Types of Seeding Media
Perhaps it would be well to pause at this point and examine the kinds of media which are available to us for use in the culture of rhododendrons by seed. These could be placed into 4 groups:
(1) Potting soil: this is composed of pulverized mineral matter, sand or clay, combined with some organic material, such as humus. It can be obtained in sterilized form in 25 and 50 lb. bags. Outside soil would meet this definition, but it should not be brought indoors without first being sterilized, which can be done by heating it in the oven to 180°F for 30 minutes, or about the time it takes to bake a potato.
(2) Non-bifrous organic materials: these are wholly organic and include no mineral matter. Humus, which is also sold in 50 lb. bags, and leaf mold, would be classified in this group. There is a finely-ground, sterile leaf mold available +6 which is quite desirable, except for its expense. A 5 lb. bag can be had for almost the same cost as a 50 lb. bag of humus; yet I find it to be valuable when mixed in small amounts into the seeding media.
(3) Fibrous organic materials: including sphagnum moss, peat moss, and various woody substances, such as woodchips or sawdust. A new product of this sort is composted hardwood bark
17
which is of almost the same consistency as humus. All of the media in this group are characterized by an ability to compact and dry out, but they do improve the texture of soil mixtures. I add them in small amounts to soil mixtures intended for plants in small pots, but increase the amount (to as much as 20 per cent) for plants in pots which are larger than 3" in diameter.
(4) Miscellaneous media: sand is wholly mineral matter in the form of tiny rock grains. Clean quartz sand is best for horticultural use. for that from the seashore would contain harmful salts. Sand is heavy; and, because of the small size of the grains, it does not aid greatly in the aeration of other media. Perlite is composed of little whitish pellets which are porous and very light. Because it floats in water and dries out readily, it would be unsatisfactory as a seeding media itself, but it does aerate heavier media more efficiently than does sand. Vermiculite is a form of expanded mica, light in weight and neutral in pH, as is Perlite. The sponge-like kernels can not only absorb large quantities of water, but retain it better than Perlite or sphagnum moss. Like Perlite, vermiculite is sterile.
During the spring after my encounter with the rhododendron seedlings grown in sphagnum moss, I enrolled in the greenhouse gardening course of famed gardener Kathryn Taylor at the In class Mrs. Taylor had us sow some
Aquilegia
seeds in a pot of pure vermiculite, and, although I feared that the tiny black seeds might fall between the kernels of the media and fail to germinate, 1 took the pot home and set it on a bench in the plant solarium. To my surprise, in a few weeks' time, vigorous columbine seedlings appeared.
Here, I thought, might be a solution to the problems of seeding rhododendrons. To explore this idea, I made a test sowing of
R. carolinianum
seed, the finest of all, on ordinary standard grade vermiculite, and sure enough, the seed germinated prolifically. My greatest surprise came, however, at the first transplanting when I saw the size of the root systems. Those of even the smallest plants were at least twice the size of any that I had previously seen. The cause of so many failures in the previous spring was therefore clear: using the sphagnum moss method, I had never been able to transplant the whole plant. Whereas previously hundreds of plants had died after transplanting, every one of the test seedlings not only survived, but grew vigorously after being transplanted. The basis of my modern method of seedling propagation is thus a change in rooting media.
What I am about to describe, then, is a modern method. It is modern because it employs materials and techniques which were not available in Mr. Dexter's time, and which have largely been developed since the sphagnum moss method came into wide usage: materials such as fluorescent plant growth lamps, techniques, that have already been successfully applied in vegetative propagation, but somehow not been universally advocated for seedling culture. But the best attribute of this method, I believe, is simply that it works, and can, with minimum amounts of effort and time, yield healthy, vigorous seedlings.
|
|
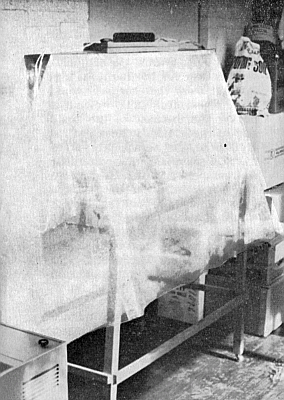
FIG. 47. Rhododendron seedlings being
grown under a plastic sheet in the hospital plant solarium. To reduce the heat inside, the ballast from the fluorescent light fixture has been placed on top of the bench. Photo by Peter G. Jordan |
Modern Method
The foundation of my thought about seed propagation rests on an excellent book by Mrs. Elda Haring.
18
To a great extent, I have studied her methods carefully, improvised on them and adapted them to the specialized demands of rhododendron culture.
The techniques of gathering rhododendron seed from the plants are discussed in the books of Mr. Bowers,
19
Mr. Lee,
20
and Mr. Leach,
21
but high quality seed is available from a number of other sources. The Seed Exchange of the American Rhododendron Society encompasses so many varieties that the catalogue alone is almost worth the membership fee. I have also purchased seed from Mr. H. L. Larson
22
whose list includes many interesting varieties and some which would be more suitable as greenhouse plants for us in the East; and from the F. W. Schumacher Company
23
whose large catalogue has many attractive hybrids and species. The Thompson & Morgan Company
24
offers seed of a number of quite tender species, while the Girard Nurseries
23
sells a limited amount of domestic seed.
Rhododendron seed can easily be stored between sowings. When they arrive in the mail, I put the packets into an air-tight plastic container kept in the refrigerator with the control dial set at a moderate level. The seed is preserved very well in this manner.
R. calendulaceum
seed, as well as
R. atlanticum
and
R. smirnowii
, was sown in November 1972 with a high percentage of germination even though it was collected during the 1970 growing season.
As noted earlier, I recommend plastic containers, and recently I have found 3½" violet pots (measuring 3½" x 2¾") to be quite satisfactory. They are large enough to hold about 50 seedlings and easily fit into a plastic sandwich bag. To accommodate large numbers of seedlings seed trays or even bulb pans might be employed.
After working with the vermiculite media for some time, I found that more vigorous growth and better germination could be obtained by sprinkling a thin layer of milled sphagnum moss on top of the vermiculite. In an experiment, one group of species and hybrid seed was sown on pure vermiculite one month earlier than a second group of similar seeds sown on vermiculite with the moss topping. After three months, the percentage of germination of the pure media group was observed to average 20% below that of the dual media seedlings. Also the size of the seedlings growing in the pure media, although seeded a month earlier, was approximately equal to that of the dual media group, despite the fact that none of the seedlings had received any added fertilizer. Those in the latter group had obviously benefited from the fungi-static and nutritive qualities of the sphagnum moss.
In addition to the topping I further enrich the vermiculite media, for I feel that anything is valuable that accelerates the growth of the seedlings in the critical period prior to the first transplanting. The trick is to add the nutrients without affecting the aeration of the vermiculite. To 3 parts of vermiculite, then, I add one part of sterile, finely milled leaf mold or humus, and then combine them thoroughly. I have found that the best and quickest way of mixing ingredients is to put them in an empty plastic shipping bag and shake it vigorously, for that also helps to break up any clods that may have formed in the materials to be mixed.
I fill the pot with the vermiculite mixture almost to the top, patting the sides to cause the media to settle somewhat, but I avoid pressing it down for that would destroy its looseness. Finally I sift some milled sphagnum moss through my fingers and onto the surface of the vermiculite mixture, being careful to break up any sphagnum clods that might appear. I avoid putting the sphagnum moss layer on top of the mixture too thickly, for then it would cause transplanting problems:
1
/16" is quite sufficient. At this time I make a name tag for the pot, listing the variety and the date of sowing. I have found it convenient to write this information on a small strip of adhesive tape in indelible ink and stick it to the side of the pot. Often I have found it useful to record the same details on strips of colored tape, using a different color for each seed sowing date.
26
Next I measure the correct amount of Captan fungicide into a quart bottle, add water and shake the bottle well until the powder goes into suspension. Setting the pots of media into a shallow tray, I water from above with a bulb sprayer, sucking the treated water from the bottle. In using Captan it will be found that the powder easily precipitates out of suspension in the water, and that it needs to be shaken or stirred fairly often. I water each of the pots thoroughly until the water is seen to be running out of the bottom. Once you are familiar with your containers and the media, you can determine the water content simply by picking one up and judging by its weight. Unlike the hours required to water pure sphagnum moss, the vermiculite mixture can be thoroughly watered within 10 minutes. You may find that the water may carry some of the lower media becomes visible, but this has been found to have no effect on the desirable qualities of the mixture. The pots are then permitted to drain while seed sowing is commenced.
Unlike that of many flowering shrubs, rhododendron seed requires no pretreatment for germination. All of the seed is quite fine, but some seed, such as that of
R. schlippenbachii
or
R. mucronulatum
, is relatively large when compared with that of
R. carolinianum
or
R. micranthum
, which is relatively small. It has been observed that the size of the seed is correlated to the speed of growth, since seedlings of large-seeded varieties can be transplanted for the first time several weeks before the others. The seed is not, however, either the finest which the gardener is apt to encounter (that of some gesneriads is so fine as to be almost invisible) or very difficult to manage. In sowing, the seed is placed on a sheet of writing paper creased into a 'V' shape, and the paper gently tapped with a finger to cause the seed to fall off the end and into the seed tray. Generally the smaller the sheet of paper, the easier this is to accomplish. I use the same procedure with the crease of the glassine envelope in which commercially purchased seed is packaged. Care should be exercised in seeding, for it is easy to seed too thickly. To distribute the seeds, the end of the paper should be moved around about 2" above the surface of the media while gently tapping it. It is well to do this in strong light so that you can see where the seed falls: if a number of seeds are found to be clustered in one spot (as often happens if the surface of the media is not smooth) the point of a sharp lead pencil can be used to thin them out.
After seeding, I water the pots once again from above with the treated water. If the media was thoroughly watered the first time, seepage from the bottom should be observed quite promptly, and I set the pots aside to drain. When, after about 15 minutes, all of the excess water has run off, I put the pots into clear plastic bags and fold the opening of the bag beneath the pot. As I noted earlier, the 3½" violet pots fit into sandwich bags, but there are larger bags available which could be used for other containers. The undersurface of the plastic cover should not rest on the seeding media. You will find that, after the second day, condensation will form inside the plastic bag, and the weight of these water droplets will tend to pull the plastic downwards. With a larger container this can be counteracted by putting a plastic planting label vertically into the center of the tray at planting time to support the plastic, but with the violet pots I find that it is not necessary. In both cases, I check the seeding pots every other clay and gently shake the plastic cover to make the heaviest drops run off to the perimeter of the tray.
Contrary to former practice, the pots are never put into darkness or given a translucent covering. Using fluorescent plant growth lamps, the seeding trays are placed 6" to 10" directly beneath the tubes, and kept at room temperature (about 72°), but they might, as an alternative, be put in an east or west window where they would receive full light until germination. In this way I find that I achieve germination of some species within five days, but that all require considerably less time than that cited for any of the darkness methods. The seedlings receive ample light from the moment the first leaves appear, which leads to healthy growth and stocky seedlings. The germination of the seed may also be aided by the ultra-violet light of the plant growth lamps, but I have not been able to conduct any definitive experiments that demonstrate this conclusively.
After 10 days I remove the plastic bags, for I find that if they are kept on the pots for a longer period of time, a fungus begins to appear on the surface of the media in the form of cottony strands. This is not serious, however, for when the bags are promptly removed it quickly disappears. If some seeds have not germinated during the 10 day period, they will soon come along, but generally some seeds in each pot will be observed to be sprouting. Mr. Leach
27
noted that seeds of some tropical species required an extended period of time before germination occurred. Using the same method as I described for more hardy species, I found that
R. burmanicum
germinated quite freely within 10 days.
It is during the period after germination that the superiority of the vermiculite media becomes apparent, for it deteriorates very slowly, and because of its granular form it permits an increased air circulation that retards algae formation even under the bright lights. Watering is thus much less critical than with the pure sphagnum moss. After removing the bags the surface of the media is apt to be quite moist, so I wait a day before watering for the first time since seeding day. I find it unnecessary to use treated water after germination and the removal of the plastic bags, so with untreated water I moisten the media whenever the surface seems dry.
In the solarium the seedlings receive both full sun from October to April and artificial light from the fluorescent plant growth lamps, which, in winter, are lit from 2 p.m. to midnight. In regulating the amount of light which the plants receive, it would be well to experiment with your own conditions, since full sun for us here in Massachusetts would likely be quite different from that in South Carolina or northern Michigan. The best guide is the color of the foliage. A pale yellow hue (all other factors being equal) is apt to be symptomatic of too much light, but if the newest leaves are a dark, rather than a light, green and the plant seems to be growing sluggishly, it may be due to insufficient light. I believe that certain species prefer more light than others. I have, on one of the solarium benches, plants of
R. mucronulatum
which have sent up shoots to within an inch of the fluorescent tubes with little or no leaf yellowing, yet seedlings of
R. carolinianum
, growing in the same media, have exhibited yellowed foliage 10" to 12" below the lights. When moved off to a corner of the bench, the yellowness disappeared, and the plants resumed normal growth.
In the plant solarium I fertilize with a dilute solution of liquid fertilizer, such as 'Miracid',
28
about once each week: although when we experience prolonged periods of dark, cloudy weather, particularly in the winter, I avoid fertilizing and water sparingly; even under the lights. Since the plants are put into a rich soil mixture, their need for fertilizer is not great, and my plants have grown well despite long periods without added nutrients.
In spite of my desire to move the small plants along as fast as possible, I have found it a mistake to transplant when they are too small. The goal during this period after germination should be to get them off to a healthy start and to keep them growing actively without any retardations, such as premature transplanting. I wait until they are 3/8" to 1/2" in height before making the first transplant, for smaller seedlings often experience an aftershock period which hinders their growth. Even if one or two seedlings in a tray grow to transplanting size faster than the others, I wait until they are all approaching the minimum size before moving them.
At the first transplanting I put the seedlings into 2¼" plastic pots. Peat pots are also satisfactory for they come in strips, each of which might be planted with a separate species for easy identification. However, the original cost of the peat pots is about 30 percent greater than the plastic ones, and they can't be scrubbed out and reused.
I have found that a mixed media is best for seedlings because, while only certain tropical species are actually epiphytic, the roots of all rhododendrons prefer an aerated, well drained, soil. No seedlings can be expected to thrive in soggy soil (often covered with moss) for root rots and other fungus diseases will soon appear. To achieve the best aeration and avoid compaction, I am presently using a formula of 30 percent humus, 30 percent potting soil, 20 percent vermiculite, 10 percent Perlite and 10 percent fibrous organic matter. In this way I keep the proportion of the two materials that are most apt to dry out, the Perlite and the fibrous matter, rather low, but I include enough vermiculite and Perlite to achieve good aeration.
In transplanting I mix the media in advance, than holding a pot of seedlings over a basin I invert the pot with the palm of my hand over the top, give the bottom a rap with my other hand to dislodge the media, slip off the pot and set the media top-side up in the basin. Unlike the pure sphagnum moss media, the vermiculite slips out of the pot quite easily, without leaving any residue behind.
You will find that, unlike those of many other plants, rhododendron roots have hardly any tensile strength. They are thread-like white strands that must be handled with care. It is not possible to simply pick up the seedling by its foliage and pull it out of the media without incurring heavy loss of roots. My method is to use the point of a screwdriver or plant label to probe in the media, gently separating it and freeing the plants. During this process I periodically spray the media with water to keep the exposed roots moist. If the roots of several plants are found to be entwined they can often be loosened by holding them under a gently running tepid water faucet.
With a spoon I fill each pot about three-quarters full with media, then insert the seedling, holding it now by its foliage since it is free of the seedling media. I add the remaining media around it filling the pot almost to the top, so that the seedling is set into the soil at about the same level that it occupied in the seeding media. This can be done while holding the pot over a basin of prepared media so that any excess is not lost. I press down the soil around the base of the seedling so that it is planted moderately firmly, after which I water the little pots thoroughly. Often I set the freshly transplanted pots in one of the light tables covered by a plastic sheet to give the plants a fairly high level of humidity for at least several days afterwards.
At this time I give each seedling an acquisition number and write it in indelible ink on a piece of tape attached to the side of the pot, or on a plant label. I record the number in a small notebook together with the name of the species or hybrid, the source of the seed, year of collection, dates of seeding and transplanting, the types of media in which it was grown, and the height at transplanting. The numbers are arranged in the Arnold Arboretum method, with that of the seedling followed by that of the year: this year, beginning with 1-73, 1 have presently reached 133-73 in my count. This matter of record keeping should not be overlooked, for too many hybridizers in the past, of whom Mr. Dexter was perhaps an outstanding example, failed to do so, with the result that much of the value of their experience was lost where it could have been of benefit to others.
|
|
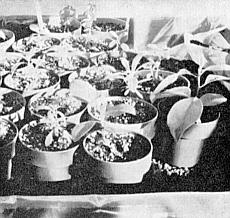
FIG. 48. After second transplanting,
seedlings are 10 inches under the fluorescent plant growth lamps in 3 and 3½" plastic pots. R. poukhanense , 8 months, center, and R. carolinianum album , 10 months, right. Photo by Peter G. Jordan |
I transplant the seedlings into 3 or 3½ inch pots when they are 1 to 1½ inches high. I value the advice given me by Mr. Jack Cowles, head gardener of the Hunnewell Estate in Wellesley, Massachusetts, to allow generous space for the roots of potted plants to develop by transplanting promptly, rather than delaying until they have become pot bound. My procedure in this second transplanting is the same as previously except that a higher percentage of fibrous matter can be used, for the larger pots are less apt to dry out than smaller ones.
You will find that transplanting the larger seedlings is not difficult. I have heard that the pots should be thoroughly watered before transplanting, but I have found moderation to be best. The media should not be either soaked or dried out, for in either case it will be very difficult to handle. My procedure is to fill the new pot 1/8 full of media, then invert the smaller pot in my hand with the foliage of the seedling between two of my fingers. Giving the bottom of the pot a sharp rap with my other hand to dislodge the soil, I slip off the old pot and set the plant on top of the media in the new one. This is best done in quick, smooth motions, for, if you delay, the root ball may begin to fall apart. This is not, however too serious. for I have had it split into several parts without apparent harm to the plant: I simply put it back together and fill in the new soil around it. After transplanting I water thoroughly and put the seedlings back under the lights, for there should be no transplanting shock.
During the summer when the temperatures in the plant solarium can easily approach 100°, the care of the rhododendron seedlings, which are said to grow only at cool temperatures, has presented something of a problem. One summer they were kept in the solarium with translucent white plastic over the windows (actually clean plastic garbage bags which I cut and taped to the glass). I turned off the plant growth lights to minimize the heat and stopped fertilizing. The plants remained healthy throughout the summer and grew normally once cool autumn weather returned. Last summer, however, I put most of the seedlings on a bench under a 4 mil. plastic sheet and removed them to an air-conditioned part of the Hospital. There. in a dark hallway, I burned the lights for 12 hours daily about 10" above the plants and watered once each week. A maximum-minimum thermometer under the plastic tent registered a range of 72° to 89° (the higher temperatures occurring on weekends when the air-conditioning was shut down). After about 10 weeks in this completely artificial environment, most of the seedlings had grown enough to require transplanting when they were returned to the plant solarium.
I have tried seed sowing in the fall with good results, although we experienced long periods of dark, cloudy weather in the months of November and December. Fluorescent plant growth lamps are a necessity for such fall seeding to offset the declining natural light. An interesting experiment showed that the rhododendrons have a phototropic reaction to the declining period of light. A number of the larger seedlings (3" to 5" high) were exposed only to natural light, beginning in late September. After 3 weeks the plants began to show reddish areas around the perimeter of the leaves that disappeared, at least on most of the foliage, after 2 weeks under the fluorescent plant growth lamps that extended the natural day to midnight. Among those seedlings left under the growth lamps throughout the period, the topmost leaves that were closest to the lights remained bright green. but the lower leaves showed a tendency to turn red and even to fall off on the deciduous varieties. I attribute all these changes to a phototropic reaction, for all other conditions remained constant, and all of the discoloration disappeared during the following spring.
|
|
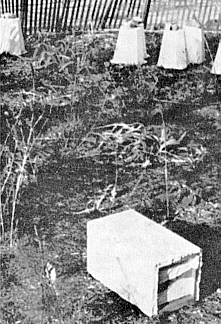
FIG. 49. Rose cones and orange crate are
used for winter protection of rhodo- dendron seedlings. Rocks atop the cones prevent their being blown over. Photo by Peter G. Jordan |
In setting the grown plants outside, a cold frame would be an ideal intermediary between the greenhouse and the growing beds. Here at the Hospital I have not attempted to build a frame because we have many neighborhood youngsters who would doubtless treat one adversely; but as a substitute I use orange crates, stapling plastic strips cut from shipping bags over the spaces between the wood slats. In the spring I planted two-year-old seedlings quite close together in groups of six, and then covered them with the crates in the fall. They survived the winter so well, that I decided to leave them uncovered this year. I have also used Styrofoam rose-cones for winter protection. They are moderately expensive, but also quite durable. For the past several winters I have kept a
Buxus sempervirens
beneath one of these with excellent results, though it is only marginally hardy for us here, and I expect to apply the same technique with the more tender rhododendrons shortly.
As I implied in my title, this is a modern method for raising rhododendrons from seed,
not the
modern method. I have very successfully used it, but whether it would yield the same results as efficiently for you, depends on a number of factors. As I noted earlier, the problems of seedling culture can all be resolved through creative ingenuity in adapting materials and techniques to our conditions. The goals of producing healthy seedlings and more beautiful flowers are clearly defined, but the best available means must be found to achieve those ends. New ideas and methods will appear that we can explore, for 'modern,' after all, is an extremely transient concept. Mr. Dexter and the other early propagators were not deceived: They observed their plants with the greatest care to discern which procedures were the most productive, and they always made the most of their opportunities. Those of us who were not yet born when they did their work, do their memory no dishonor now in seeking new techniques to advance the same goals.
Notes
- Clement Gray Bowers, Rhododendrons and Azaleas, MacMillan Co., 1939, 2nd ed. 1960, p. 401.
- ibid, p. 102-112.
- David G. Leach, Rhododendrons of the World, Charles Scribners, Sons, New York, 1961, p. 351 - 360.
- Frederick P. Lee, The Azalea Book, D. Von Nostrand Co., Princeton, N.J., 1965, p. 34 - 37.
- C. E. Lucas Phillips and Peter N. Barber, The Rothschild Rhododendrons, Dodd, Mead & Co., New York, 1967. p. 128 - 129.
- Roger G. Coggeshall, "The Propagation of Rhododendrons," Horticulture, XLVIII:5 (May 1970) p. 30 ff.
- Bowers, p. 103.
- ibid, p. 103 - 104.
- Hudson T. Hartmann and Dale E. Kester, Plant Propagation, Principles and Practices, Prentice Hall, Englewood Cliffs, N.J., 1959, 2nd ed. 1968, p. 30.
- Coggeshall, p. 31.
- Lucas Phillips, p. 128.
- Leach, p. 357.
- ibid.
- Bowers, p. 104; Coggeshall, p. 31.
- Lucas Phillips, p. 129.
- of the Carajon Chemical Co., Inc., Fremont, Michigan 49412.
- of the Bambe Co., North Stratford, New Hampshire 03590.
- Elda Haring, The Complete Book of Growing Plants from Seed, Hawthorn Books, N. Y., 1967.
- Bowers, p. 102 - 103.
- Lee, p. 34 - 35.
- Leach, p. 352.
- of 3656 Bridgeport Way, Tacoma, Washington 98466.
- of Sandwich, Massachusetts 02563.
- of London Road, Ipswich, 1 P2OBA, England.
- of P.O. Box 428, Geneva, Ohio 44041.
- available from the Professional Tape Co., Inc., 144 Tower Drive, Burr Ridge, Ill. 60521.
- Leach, p. 354.
- available from Stern's Nurseries, Inc., Geneva, N.Y. 14456.