An Amateur in Vitro: Tissue Culture at Home
Donald W. Paden
Urbana, IL
Rhododendron enthusiasts for many years have taken cuttings from plants, maintained their viability on a medium such as peat moss until a root system developed, and transferred the new plants to their gardens. The advantage of doing so, of course, is that plants propagated in this manner (rather than from seed) are clones with the same genetic make-up as the original. Micropropagation is an extension of this process with almost infinite possibilities for rapid multiplication - thousands of plants can be produced in a relatively short time. In some cases varieties difficult to propagate by other methods can be produced in quantity.
The term
in vitro
(in glass) implies that living plant tissue is being sustained or nurtured outside the life-supporting environment on which it is normally dependent for survival. Commercially, techniques have been developed which reduce the introduction of a new variety from roughly 10 years to 3 or less. On a much smaller scale, this option is also open to the amateur. A new hybrid can be gotten into the hands of one's friends in record time.
Possibly of greater significance in the long run, however, is the use of this and related techniques for research purposes. Thus, the test tube may be an effective tool in overcoming incompatibility between various species, for developing plants with resistance to disease, in testing the effectiveness of various chemicals, for developing varieties with tolerance to alkaline soils, and selecting particular plants with improved ability to withstand heat, cold or both. With persistence and imagination even the amateur can participate in some of these exciting
in vitro
adventures.
The present article is a brief description for the non-professional written by a non-professional about how to get started with tissue culture. The process is described in many places, although frequently in language difficult for the amateur to understand. What follows is an introduction only. Anyone seriously interested should consult the experts (e.g., 1, 2, 6, 8). One very helpful book, understandable to the non-scientist, is that by Kyte (4). A short article by Kyte and Briggs (5) is even less technical, although it may be difficult to find in most libraries. See McCulloch (7) for a general introduction.
Micropropagation is different from rooting cuttings where, with the expenditure of a few dollars and a little time, it is difficult to fail. Micropropagation involves the investment of at least several hundred dollars (or much more) and several hundred hours of somewhat tedious labor - and may end in failure. There is no single, well-marked road to success, even for the expert. What may work with one variety of rhododendron or azalea may not work with another.
Equipment and Material
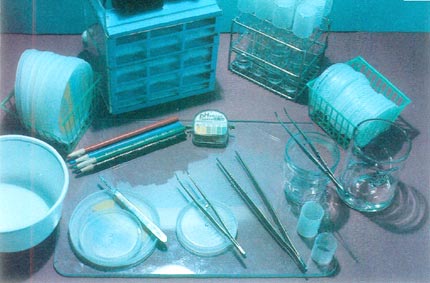
One of the really troublesome obstacles for the amateur in getting started is the matter of equipment. Table 1 is meant to help in this regard. Much of what one needs may be found around the home. In my own case, I amassed a somewhat ludicrous collection of World War II vintage items: a small pressure cooker, glass canning jars, a one-tube fluorescent desk lamp, a clip-on work light, a 12" x 20" foam ice chest (with the price still marked: $2.49), and a piece of plate glass with rounded corners (to serve as a work surface in the chest). A kitchen mixer, a measuring cup, a collection of translucent covers for tennis ball cans (a substitute for petri dishes), several plastic bowls and margarine tub tops supplement all this. For me the absence of a reasonably accurate scales mean dependence on a friend for occasional measurements. The local druggist or a high school science or chemistry teacher might have come to the rescue. The lack of a reasonably accurate pH meter also has proved a handicap, although pH indicator paper has served as a substitute. Since pH is so important, it may pay to invest in one of the several pH meters (available in the $100-$200 range). Avoid cheaper substitutes. A suggestion is made in an article by Stoltz(9) for building a relatively inexpensive pH meter, but the plans are not included.
| Table 1: Materials and Equipment Needed for Tissue Culture | ||
| Equipment | Amount | Source* |
| for Medium Preparation | ||
| Pressure cooker | 1 | HS |
| Test tubes (25 x 150 mm) | 144** | a |
| Translucent closures (25 mm) | 500** | a |
| Baby food jars, 4 or 7 oz | 50 | NP |
| Closures | 100 | b |
| Stainless steel rack for 12 test tubes | 1 | a |
| Syringes (3 ml) | 2 | MD |
| Grease pencil | 1 | BS |
| Lifters (for test tubes and for jars) | 2 | HS |
| Enamel sauce pan or tea pot (1 or 2 qt.) | 1 | HS |
| Measuring cup (250 ml) (graduated Pyrex) | 1 | HS |
| Pint canning jars | 3 | HS |
| pH indicator paper (or pH meter) | 1 | |
| for Disinfesting Buds | ||
| Kitchen food mixer (or stirrer) | 1 | HS |
| Plastic bowls | 2 | GS |
| Clean, discarded nylon hose | 1 | GF |
|
Household bleach
(5% sodium hypochlorite, e.g., Clorox) |
GS | |
| Transfer Chamber and Equipment | ||
| One-tube 12" fluorescent light fixture | 1 | ES |
| GE germicidal lamp for above Lamp (60 to 75 watt) | 1 | ES |
| Petri dishes (bottoms only) | 25 | a |
| Tweezers (6" and 8") | 2 | DS |
| Stainless steel handle for scalpels | 1 | DS |
| Disposable scalpels | 5 | DS |
| Distilled water (1 gal.) | 1 | GS |
| Air filter (e.g., 6x6 pleated Norelco 5000 or 9000) | 1 | HS |
| Semi-rigid transparent plastic | BS | |
| Growth Room | ||
| Shelf | 1 | |
| 4' fluorescent fixtures and bulbs | 2 | ES |
| Test tube racks or trays | 2 | a |
| Medium, etc. | ||
|
Anderson's Rhododendron Medium
(pre-mixed powder, 1 liter pkg.) |
50** | c |
| Agar (Phytager, Bactoagar...) | 100g** | f, c |
| Gelrite | 100g** | e |
| 2iP (cytokinin) | 500mg** | c |
| IAA (auxin) | 5g** | c |
| DMSO | 500mg | c, d |
| Potassium hydroxide | ** | c |
| Hydrochloric acid | ** | c |
|
* GS (Grocery Store); HS (Hardware Store); BS (Book Store); ES (Electrical Store or supplier); DS (Drug Store or supplier); MD (local medical doctor, farm supply store or dentist); NP (New Parents); GF (Girl Friend)
a, b, c, d, e, f - see Sources at the end of this article. ** May be minimum quantity. |
||
A word about a few of these items is in order. The number of test tubes at first seemed excessive but later proved useful. By using small baby food jars (4 or 7 oz.) instead of test tubes this rather expensive item might be avoided entirely if the jars could be obtained free from friends. Closures for the test tubes (Kim-Kaps or Ka-Puts) come in a variety of colors (i.e., to differentiate different medium concentrations) but tend to reduce light intensity and are expensive (given minimum quantities for each color). The six-inch tweezers conveniently has a curved tip and a catch for holding material. Tweezers should be stainless steel to avoid corrosion.
|
|
1. Home equipment for tissue culture
Photo by Donald W. Paden |
The Transfer Chamber
As insurance against contamination, a transfer chamber is probably a vital piece of equipment. A foam ice chest placed on its side on the kitchen table is for me a primitive substitute for a professional unit. After using this chest for some time (with minimal problems with contamination) I attempted to imitate the more sophisticated professional units. Several dozen small holes were bored in the back of the chest to allow a stream of filtered air to move into the back and out the front. Filtered air was provided by buying a replacement filter for a room-sized dust removal unit. This was jerry-rigged with an exhaust fan (cannibalized from an inoperative computer terminal) and reversed to provide a flow of filtered air into the holes in the back of the cooler. (The brand of room unit for which the replacement filter was designed was rated in a recent issue of
Consumer Reports
as marginally higher than a similar unit which used a "high efficiency particulate filter," the filter usually found in professional units). Whether all of this is much of an improvement over the "unimproved" chamber (or simply the kitchen table) is open to question. In my own case, the house itself may be relatively free of contamination because of a central electronic dust removal unit. A 9" x 12" plastic shield (see photograph of transfer chamber) which was rigged up in front of the chest to protect the explant material from being breathed upon provided extra insurance.
Immediately before use, the inside of the transfer chamber, the kitchen table, and the plate glass working surface are wiped with a 10 percent solution of household bleach (one part bleach and 10 parts water measured by measuring cup). At the same time two dozen clean plastic covers for tennis ball cans (i.e., "petri dishes") and a smaller number of margarine tub covers are dipped in the bleach solution and stacked in the back of the chamber in similarly treated plastic berry boxes. Two drinking glasses are also used in the chamber, one containing a 10 percent bleach solution and the other a 1 percent solution. (Following almost every pass at the plant material, tweezers and scalpel are dipped successively in the 10 and 1 percent solutions.) The chamber is further decontaminated by using a germicidal lamp for 20 minutes. The lamp is placed temporarily just in front of the chamber. As a protection from the danger to skin and eyes from exposure to the lamp, a black cloth is put over the chest and lamp, with the tools, etc. inside, during the time the lamp is on. The lamp should be turned on and off by a switch outside the covered unit.

|
|
2. Transfer chamber
Photo by Donald W. Paden |
Preparation of Medium
The simplest (and for me the only) way of preparing medium is to buy the essential ingredients pre-mixed (Table 1 and 3). These packets do not include the agar, auxins and cytokinins to be added later. These ingredients are purchased separately and are added to the basic medium in varying combinations. Agar is a derivative of seaweed and acts like gelatin. (The more agar used the firmer the mixture.) Unfortunately, agar may vary somewhat from one purchased batch to the next, so that some experimenting may be necessary to obtain the consistency desired. One laboratory reports better results using a combination of agar and Gelrite (a synthetic substitute for agar).
The auxin and cytokinin generally recommended for rhododendron are IAA (a hormone) and 2iP. (Other auxins sometimes used are NAA, IBA, and 2, 4-D. Other cytokinins are BA and kinetin.) One laboratory using Woody Plant Medium uses no auxin. Since it is easier to measure a milliliter than a milligram, these are generally made up in separate solutions to be dispensed as needed in various amounts with a syringe used for measurement. In my own case these are dissolved separately in 100 ml of DMSO so that 1 ml of each solution contains 1 mg of IAA or of 2iP. The two bottles are then labeled and stored in the refrigerator. These solutions must be warmed slightly to liquefy the DMSO before use.
In searching for a combination of hormones and growth stimulant that will work with a particular variety of rhododendron, a matrix of combinations is commonly recommended. This general notion is illustrated in Table 2. Letters are used to represent various combinations. For example, the letter z represents a solution in which there are 4 mg of IAA and 10 mg of 2iP. There is no magic in the amounts suggested in the table, although what is shown includes combinations frequently recommended for the initiation of growth of Rhododendron
in vitro
(See 4).
| Table 2: Matrix of Growth Regulators | |||||
| 2iP | IAA (mg/l) | ||||
| (mg/1) | 0 | 0.1 | 0.5 | 1 | 4 |
| 0 | b | c | d | e | f |
| 0.5 | g | h | i | j | k |
| 1.0 | i | m | n | o | p |
| 5.0 | q | r | s | t | u |
| 10.0 | v | w | x | y | z |
For practice the beginner might start with the four combinations shown in the lower right of Table 2. Four groups of 14 or 15 test tubes (or 7 or 8 baby food jars) should be labeled: t, u, y, and z. Label and date each test tube or baby food jar. A liter of distilled water (1,000 ml) is then put in a glass or porcelain pan together with a package of Anderson's Rhododendron Medium and 6 grams (roughly 2 teaspoons) of agar. The solution is then heated to dissolve the agar until clear. If a combination of agar and Gelrite is used, 3 grams (roughly 1 to 1 teaspoons) of agar are dissolved by heating in a half liter of distilled water. Separately, 1 gram (roughly teaspoon) of Gelrite is added to another half liter of distilled water and dissolved by autoclaving. The two half liters are now combined and the mixture is ready for the addition of the IAA and 2iP.
Two syringes (possibly without needles to avoid breaking the law) are helpful at this point, although both are not essential. Start by measuring 2.5 ml of IAA in one syringe and 7.5 ml of 2iP in the other. Since all four combinations are to contain at least 1.0 ml of IAA and 5 ml of 2iP, add these amounts to the liter of medium and stir. The liter of medium now contains the correct ingredients for combination t. Dispense a cup (250 ml) of the solution into the 15 test tubes marked t (15 ml per tube). The rack holding 12 tubes is convenient for both holding the test tubes and judging the amount to be put in each.
Equal amounts (1 cup) of the solution remaining in the pan should be put in the three pint canning jars and labeled u, y and z. The jars labeled y and z each need the addition of 1.25 ml of 2iP. The jars labeled u and z need an additional 0.75 ml of IAA. The three pint jars now have the correct combinations of 2iP and IAA shown for u, y and z and are ready to be dispensed appropriately to the three remaining sets of marked test tubes and capped. This accomplished, they should be autoclaved in the pressure cooker for 15 minutes at 15 pounds pressure and set in racks in a clean, dust-free place for cooling (slanted if desired). Since IAA will degrade in light and lose its effectiveness, the test tubes should be stored in the dark until needed, possibly several days later.
The reason for proceeding in the manner suggested above is that it is probably more accurate to start with the total amount of IAA and 2iP in the syringes rather than by measuring each of the amounts separately. The procedure becomes more complicated, of course, if 9 or more different combinations are used. Needless to say, the arithmetic must be worked out beforehand. If one becomes very serious about tissue culture, it is undoubtedly cheaper in the long run to invest in a suitable scales and the basic chemical ingredients than to buy medium pre-mixed.
Choice and Preparation Explants
In the literature on micropropagation a variety of plant parts have been used for so-called "explants" - roots, leaves, suckers, ovules, vegetative shoots, flower buds, and so on. The latter two have been used successfully with rhododendron.
Vegetative shoots are generally obtained from rhododendron grown (temporarily) in the greenhouse, in order to avoid outside contaminates. These cuttings from growing tips, roughly 1 inches long, are taken at about the same time as ordinary cuttings, scrubbed lightly in water to which a drop of detergent has been added and disinfested by stirring slowly for 20 or more minutes in a solution of household bleach (1 part bleach and 10 parts water) with a drop or two of liquid dishwashing detergent. A kitchen mixer using one beater enclosed in a plastic bag will do the trick. It has been suggested that vegetative shoots collected from
outdoors
might also be disinfested by stirring, as above, for up to 4 hours. The disinfested cuttings are then rinsed in sterile water (i.e., water that has been autoclaved in a pressure cooker) and moved to the transfer chamber where they are re-cut. Each test tube, of course, is recapped immediately upon the insertion of the explant.
|
|
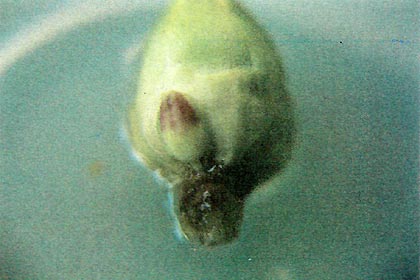
4. Flower bud with floret exposed
Photo by Donald W. Paden |
The use of flower buds as a substitute for vegetative buds is suggested, at least for the amateur without greenhouse facilities, since contamination is much less. The flower buds are brought in from outside from early autumn on, the outer bud scales are removed and the buds are disinfested by stirring as described above for 20 minutes. If buds of more than one variety are used at a time, each variety can be tied in a separate section of nylon stocking with a label enclosed, and put in the mixer. After 20 minutes the buds are rinsed in sterile water and moved to the transfer chamber. (They can be left in the nylon hose for several hours to keep them moist.)
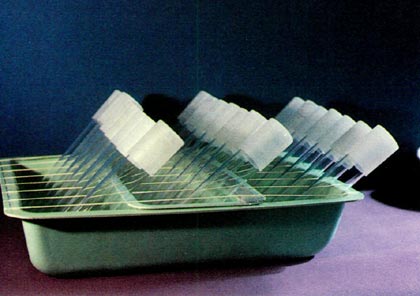
In the transfer chamber each individual floret is successively removed from the flower bud by peeling off the outer scales (without using rubber gloves, but with care not to touch the florets) until the individual floret is uncovered. Using a scalpel and/or tweezers, the floret is then dropped into a "petri dish" containing a small amount of sterilized distilled water. The florets in the petri dish are then picked up with tweezers and inserted in the test tubes. The labeled test tube is recapped immediately. Instead, the bud might be dropped directly into a baby food jar containing medium. If baby food jars are used, contamination can be reduced by swabbing the outside neck of the jar before capping with a 10 percent solution of household bleach. Test tubes can be kept (slanted) in homemade trays made of hardware cloth or in plastic trays. (See photograph.)
|
|
3. Test tube tray
Photo by Donald W. Paden |
Initiation of Growth (Stage I)
The test tubes or baby food jars, with explants, are then either moved directly under light, or possibly put in the dark for from 2 to 8 weeks. Although the dark treatment has not been all that effective for me, it is worth trying. Test tubes and jars should be examined every few days and those with explants which have turned brown or which are contaminated are removed. (Contaminated cultures should be removed from the culture room and routinely autoclaved before opening.) Initially, viable explants should be transferred every few weeks to new medium. The growth room obviously should be as free from dust and other possible contaminants as possible. (Gnats and even ants are able to invade test tubes or jars.) Trays of test tubes or jars are kept under fluorescent lights on a 16-hour day (10 to 12 inches from the lights) and at a temperature of from 70 to 80F. When green shoots or callus (a mass of green tissue) appear the explants are ready for Stage II.
|
|
|
|
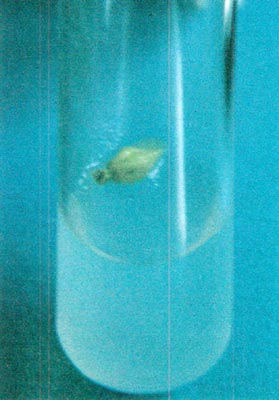
5. Initiation: explant in medium
Photo by Donald W. Paden |
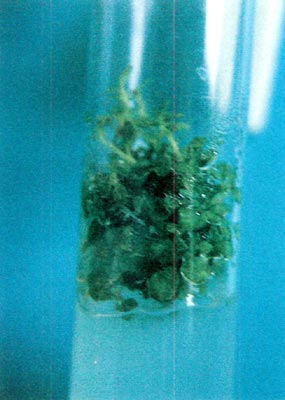
6. Multiplication: developing shoots
Photo by Donald W. Paden |
The Multiplication Stage (Stage II)
Once growth is apparent the shoots which develop from the ex-plant are ready to be transferred to a new medium, possibly using different combinations of IAA and 2iP. Experimentation is likely to be necessary for success, with the possibilities suggested in Tables 2 and 3. As new growth again develops, the shoots are removed from the test tube (working in the transfer chamber) and the individual shoots are laid on new medium. Proliferation may be encouraged by removing the growing tip of the shoots before placing on the medium. As new shoots or colonies of shoots develop, this procedure is repeated until the desired number is produced. Over-all cleanliness in preparing media, in maintaining the growth room and in working in the transfer chamber is essential.
The Rooting Stage
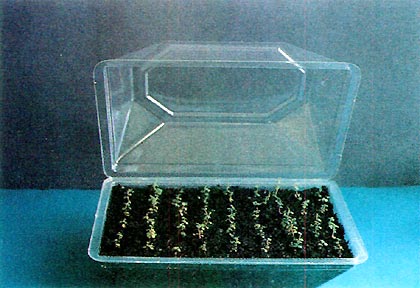
Whole plants may be produced either by rooting the shoots
in vitro
or by more conventional methods. It is generally easier to remove the shoots from the test tubes and root them in peat moss. Thirty or more shoots to inches long can be accommodated in a fairly small container (such as a covered clear plastic corsage box) and kept under lights. I mist mine several times a day until they are rooted, although this may not be necessary if the boxes are sealed. Once roots have developed, the plantlets are hardened off and put into larger flats for growing on under more normal conditions. Again, the serious grower needs to go to the literature (4) to gain a better understanding of the techniques and problems involved.
|
Table 3: Two Media for the Initiation and Multiplication of Rhododendron Shoots
(in milligrams per liter) |
|||
|
Anderson Rhododendron Medium
1
Stages I and II |
Woody Plant Medium
Stages I and II |
||
| NH 4 NO 3 | Ammonium nitrate | 400 | 400 |
| KNO 3 | Potassium nitrate | 480 | --- |
| Ca(NO 3 4 H 2 O) | Calcium nitrate | --- | 556 |
| K 2 SO 4 | Potassium sulfate | --- | 990 |
| MgSO 4 7 H 2 O | Magnesium sulfate | 370 | 370 |
| MnSO 4 H 2 O | Manganous sulfate | 16.9 | 22.3 2 |
| ZnSO 4 7 H 2 O | Zinc sulfate | 8.6 | 8.6 |
| CuSO 4 5 H 2 O | Copper sulfate | 0.025 | 0.025 3 |
| CaCI 2 2 H 2 O | Calcium chloride | 440 | 96 |
| Kl | Potassium iodide | 0.30 | --- |
| CoCI 2 6 H 2 O | Cobalt chloride | 0.025 | --- |
| KH 2 PO 4 | Potassium phosphate | --- | 170 |
| H 3 BO 3 | Boric acid | 6.2 | 6.2 |
| Na 2 MoO 4 2 H 2 O | Sodium molybdate | 0.25 | 0.25 4 |
| NaH 2 PO 4 H 2 O | Sodium phosphate | 340 | --- |
| FeSO 4 7 H 2 O | Ferrous sulphate | 55.7 | 27.8 |
| Na 2 EDTA |
Na
2
Ethylene diamine
tetra-acetic acid |
74.5 | 37.3 |
| Sucrose | Table sugar | 20,000 | 20,000 |
| Agar | Phytager, Bactoagar. . . | 6,000 | 6,000 5 |
| ThiaminHCI | Vitamin | 0.4 | 1.0 |
| Nicotinic acid | Vitamin | ... | 0.5 6 |
| PyridoxineHCl | Vitamin | ... | 0.5 |
| i-inositol | Vitamin | 100 | 100 |
| Glycine | --- | 2 | |
| IAA | Indoleaceticacid | 0 to 4 | 0 |
| 2iP | N 6 -isopentenyl-adenine | 0 to 15 | 1.624 |
| Adenine sulfate | 80 | --- | |
| Adjust pH 7 | Adjust pH 7 | ||
|
1
Revised for shoot multiplication.
2 Manganous acetate substituted. 3 Copper acetate substituted. 4 Ammonium molybdate substituted. 5 Roughly 2 to 3 teaspoons. See text for using Gelrite. 6 5.0 mg used instead. 7 Adjust pH to 4.5 using potassium hydroxide or hypochloric acid, as needed. |
|||
Medium
For both the general reader and the amateur the details of Table 3 may appear excessive. What the table shows, however, is of both practical and intellectual interest. The sheer number of ingredients in the medium illustrates dramatically the complexity of life and what is needed to sustain living tissue for extended periods of time (even in the dark). To some people this is as exciting as seeking rhododendron growing in the hinterland of China.
From a more practical point of view the lower part of Table 3 shows the amounts of 2iP and IAA commonly used in mixing media. It is worth noting that in the tissue culture laboratory of at least one nursery no auxin is included in their Woody Plant Medium. (See lower right section of Table 3). This vastly simplifies the problem of experimenting with different concentrations of cytokinin. The table also suggests, in a way which is otherwise difficult for the amateur to appreciate, that there is no one magic formula which insures success. The two different media shown, although having much in common, differ in important respects both in the actual ingredients and in the amounts of those they use in common.
As a further illustration, in the preparation of the stock solution for the Woody Plant Medium, three related ingredients were substituted for those shown in the table (see Table 3 footnote). Ten times the amount recommended of another ingredient was included (by mistake). Even so, 2 out of 4 varieties attempted were successful. Finally, Table 3 is important to the amateur because the original articles are unlikely to be available at the local public library. Without the information listed, the amateur is soon brought up short in trying new medium combinations. On occasion, such items as cocoanut milk, orange juice, malt, tomato juice and bananas have been used in medium with success, by various adventurous individuals although not specifically with rhododendron. Again recourse to the literature is essential. For example, two variants of the above procedure are described below. The numbers in parentheses indicate concentrations of 2iP and IAA (in mg) per liter of water.
Vegetative shoots
Explants are first placed in Anderson's medium (at one-fourth strength) with no agar and with growth regulators (2.0/0.5). Shoots which develop are transferred to regular medium (with agar) and with growth regulators (1.5/4.0). Subsequent transfers exploit a matrix of growth regulators (1 to 15/.5 to 4) to determine the optimum combinations of 2iP and IAA. See (3).
Flower buds
Explants are initially placed on Anderson's medium (with agar) using a matrix of growth regulators (1 to 15/ .25 to 4). Subsequent transfers are to Anderson's medium with agar and growth regulators (0.5/0.1). Or, one might experiment by starting out with liquid medium with the explants kept in the dark for a number of weeks. See (8).
|
|
7. Rooting
Photo by Donald W. Paden |
Conclusion
Success in tissue culture requires imagination, a certain amount of luck, a plentiful supply of buds, and a great deal of persistence and patience. Initially each of my experiments involved 50 or more test tubes with flower buds. Favorable outcome required anywhere from several to a dozen or more transfers. For example, one such procedure initiated in November involved transfers in March, June, July, August, November and January of the following year. The work was done on the kitchen table, with contamination less than 5 percent (perhaps too great to be tolerated commercially but not bad for the beginner). More disappointing, of course, than contaminated buds are those which simply turn brown and die. Attempts with a number of hybrids have been successful, including Wendy Lyn, Kenneth David Harris, Lodestar x
R. yakushimanum
, and (
R. carolinianum
x
R. dauricum
) x
R. dauricum
. Attempts with several species, including
R. yakushimanum
and
R. proteoides
, have been unsuccessful, although
R. catawbiense
presented no problems. Perhaps 1 out of 4 or 5 varieties attempted have resulted in plants.
The prospective tissue culturist needs to be aware of several things. Varieties that are difficult to root may also resist growing in vitro. This should not discourage attempts to try them, but one must be willing to face possible strike-outs. It takes only one test tube with shoots to herald a plethora of plantlets. The possibility of genetic variation in plants grown in vitro is something to be worried about, especially in commercial operations. For the amateur, however, this may be more of an interesting diversion than a prime concern. It is very important to devise and maintain a system of record keeping. With so many things going on it is easy to lose track of names, dates and media.
Finally, success in tissue culture may be almost as embarrassing as failure, since one must face what to do with 1,000 or more plant of one variety. With all considered, I doubt that the amateur is going to be much of a threat to commercial propagators. The laboratory has too many of the characteristics of a treadmill, requiring constant attention over a fairly long period of time. This article is not meant to discourage the intrepid amateur, however, but merely to allow him or her to enter into the fascinating hobby of tissue culture with the understanding that it requires considerable commitment.
References
1. Anderson, Wilbur C., 1975. Propagation of rhododendron by tissue culture.
Proceedings of the International Plant Propagation Society
, Part I, 25:129-135.
2. Anderson, Wilbur C., 1984. A revised tissue culture medium for shoot multiplication of rhododendron.
Journal of American Society for Horticultural Science
, 109 (3): 343-347.
3. Hartman, H.T., and D.E. Kester, 1983.
Plant Propagation: Principles and Practice
, Prentice-Hall, Englewood Cliffs, NJ, Chapters 16, 17.
4. Kyte, L., 1983.
Plants from Test Tubes: An Introduction to Micropropagation
, Timber Press, Portland, Oregon.
5. Kyte, L., and B. Briggs, 1979. A simplified entry into tissue culture production.
Proceedings of the International Plant Propagation Society
. 25: 90-95.
6. Lloyd G., and B. McCown, 1980. Commercially feasible micropropagation of mountain laurel,
Kalmia latifolia
, by use of shoot-tip culture.
Proceedings of the International Plant Propagation Society
, 30: 421-427
7. McCulloch, Steve, 1984.Micropropagation of rhododendrons.
Journal of the American Rhododendron Society
, 38: 72-73.
8. Meyer, Martin M., 1982.
In vitro
propagation of rhododendron catawbiense from flower buds.
HortScience
, 17: 891-892.
9. Stoltz, L.P., 1979. Getting started in tissue culture - equipment and cost. Kentucky Agricultural Experiment Station, 375-381.
Sources of Materials
a. Bellco Glass, Inc., 345 Edrudo Road, Vineland, NJ, 08360
b. Magenta Corporation, 3800 N. Milwaukee Ave., Chicago, IL, 60641
c. Gibco Laboratories, 3175 Staley Road, Grand Island, NY, 14072
d. Possibly local fitness centers or a local veterinarian.
e. Kelco, P.O. Box 23076, San Diego, CA, 92123-1718
f. Sigma Chemical Co., P.O. Box 14508, St. Louis, MO, 63178
g. Carolina Biological Supply Co., 2700 York Road, Burlington, NC, 27215 (Expensive).
Acknowledgement
The author is especially indebted to D.D. McCown, J.W. Gerdemann, M.M. Meyer, Holly Kerns, W.C. Anderson, and J.P. Tatum, who provided advice and assistance for my getting started in tissue culture. Several of these persons read the first draft of this manuscript and made helpful suggestions. Mistakes and omissions, however, are of my own doing.