Gibson's Plant 'em and Forget 'em Propagating Frame
Ken Gibson
Tofino, British Columbia, Canada
Construction of Propagating Box
The box can be of any size, but should be approximately 30 inches high, preferably made of plastic with white walls. Construct it of 3/4" plywood with the inside walls lined with 1" white Styrofoam (white for brightness and Styrofoam for insulation). As an easy alternative, a fish tote works well. Situate the box lengthwise, north and south, in an area of full southern exposure. If possible, locate it adjacent to white or aluminum walls for maximum light reflection.
|
|
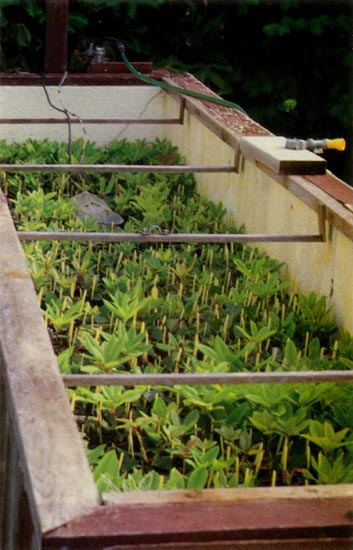
New cuttings in Everett Jefferson's
propagator. Photo by Ken Gibson |
The box should have an open bottom with 1/4" rabbit screen on 2" x 2" slats (treated wood or cedar to prevent rotting) set 16 inches apart to hold up the compost material and screen. Good drainage and aeration are important. Elevate your propagator 16 to 20 inches above the ground. Cement building blocks are ideal for this purpose.
Spread a 8 to 10 inch layer of coarse bark, sawdust or perlite on the rabbit screen. This layer (nicely leveled) retains day moisture to form a humidity bank as well as to insulate the heat zone. During periods of low humidity, cold, dry air enters from the bottom and becomes moist when drawn up from underneath.
Now put down a layer of plastic soffit screen and you are ready for your heating cable. Place the heating cable (preferably lead) carefully and evenly within a 1" to 2" layer of navy jack gravel (1/4" pebbles). The heating cable should be buried in the gravel about ⅓ the way from the bottom. It will warm the gravel to 70 degrees F. and disperse the heat evenly.
Next cover this heat zone with pulp-mill forming fabric or nylon growing screen. (Forming fabric is a waste product from pulp and paper mills and is sometimes available direct from the mill.) Soffit screen will work too, but, at times roots will grow through it and make it difficult to remove the cuttings. Now, spread approximately 1" to 1" layer of wet perlite over the fabric or screen. I use a board (about " x 1" x 18") and trowel the perlite on as a mason would trowel cement.
|
|
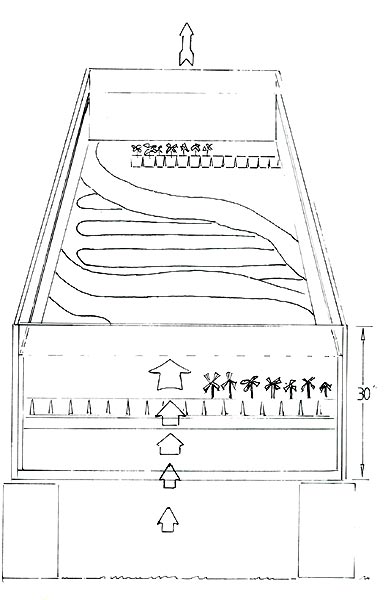
Gibson's Plant 'Em and Forget 'Em Open Case
Propagating Frame. The arrows show the movement of air through the frame, frame is set on cement blocks. Materials include clean white walls of " foam board, 2 x 2's hold up " rabbit screen with 8-10" layer of coarse sawdust (or perlite or bark) covered by soffit screen, heating cable lays in gravel covered by fine screen, 1" perlite and cuttings in bands on top. |
Preparing Propagator for Cuttings
It is now time to prepare your propagator for planting your cuttings. I have used 3" plastic pipe cut into 2" bands. Everett Jefferson at Qualicum has had good success using 2" square plastic pots with the bottoms removed; or, you might want to try square "net" or "web" pots. More depth may prove to be beneficial. This growing season, I have my cuttings in 3" x 3" x 4" square, bottomless pots, produced by Anderson Manufacturing of Portland. It is very important that oxygen is allowed to reach the roots and this may well be the reason this open case propagating method is so successful.
Place the pots/bands in rows and fill with a growing medium of your choice: for example, ⅓ peat and ⅔ perlite or peat, sand and perlite. I use a fine mulch from a lake beach - it consists of a conglomerate of pine needles, sawdust, ground leaves, and so on.
Now, test your cable to be sure it maintains a 70 degree temperature at the base of the cuttings. If using a soil thermometer, insert it in the growing medium until it touches the screen and pull it back approximately " for your temperature reading.
|
|
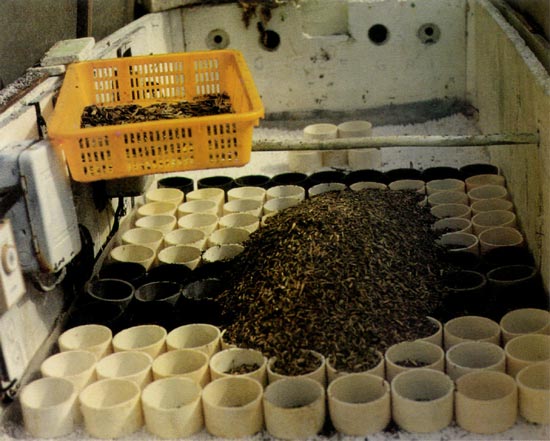
Propagator
Photo by Ken Gibson |
Prepare Your Cuttings
Insert your hormone treated cuttings into holes in the growing medium. Make impressions with a pencil or small stick. This is important so as not to remove the rooting compound while inserting the cuttings into the growing medium.
Propagator Lid/Cover
Make a snug fitting lid (or several lids, depending on the size of your propagator) of pulp-mill forming fabric or fine screen stapled to a 1" x 1" frame. The fine screen acts to mist the raindrops and provides adequate shade during sunny weather. It is not necessary to attach the lid to the box with hardware since the lid should be lifted for inspection and watering purposes. On warm misty days in winter, I prop the lid up about 10 inches on one side and place a plastic cover over it to ramp off our abundant rain. Remember to close the lid if frosty weather occurs as the space inside the box (the 12-14 inch space from the growing medium to the lid) retains the high humidity necessary on dry frosty days. Further experimenting, as to how much direct winter sun new cuttings can withstand, might well prove beneficial. It appears to me that as long as high humidity is retained, the late slanted rays of the sun will not be harmful.
Forget 'Em
Do not disturb your cuttings until spring. Then you can examine the degree of root growth and structure by lifting the band or pot. By April new leaf growth should be appearing.
Now start to decrease your soil temperature by about 5 degrees per week. In mid to late May, transfer the rooted cuttings to a cold frame, slip off the bands or pots from the well-rooted cuttings and plant the cuttings on a 6 x 6 inch grid spacing. Do not remove the bands or pots if the cuttings are poorly rooted as the shock may be too much for them.
Build up the sides of the small root balls with a mixture of peat, perlite and light soil. The cuttings should be in rows like hills of potatoes. I never plant rhododendrons, I place them.
This year, I plan to leave my cuttings in the larger pots all summer and transplant them in the fall, as there are quite a few casualties from transplanting.
|
|
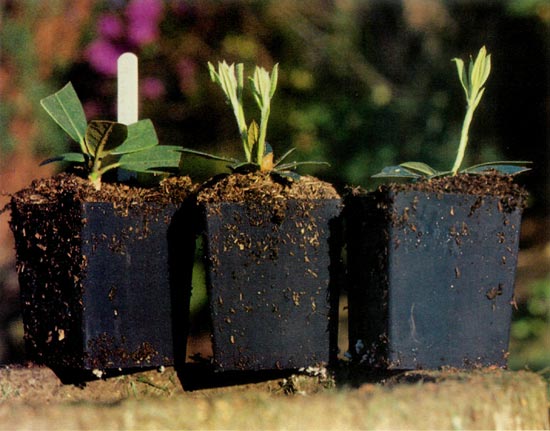
New cuttings in four-inch pots.
Photo by Ken Gibson |
Growing-on the Cuttings
A screen or lath that blocks out 40-50% of the sun can be placed at a 45 degree angle on the south side of the cold frame or try erecting a shade screen like a covered wagon top. Water your cuttings with a soluble fertilizer throughout the summer, liquid fish fertilizer or Hi-Sol (20-20-20) works very well.
During the following winter, I cover my one-year-old rooted cuttings with old glass shower doors placed at a 45 degree angle in order to cut down on the amount of weather directly affecting the plants.
Ken and Dot Gibson's home and garden are on a steep hillside overlooking the Pacific Ocean on Vancouver Island. He described the construction of the garden in "The Hill That Changed," ARS Journal, Vol.41:1 (Winter 1988).