Grafting: A Surgical Cure
Part II: How to Do It
Bob Bondira
Scotch Plains, New Jersey
Part I, Why To Reconsider Grafting, appeared in the spring 1994 issue of the Journal.
In Part I I explained why I think grafting should be reconsidered for some varieties of elepidote rhododendrons in some growing areas. I presented the idea that grafting can be viewed not merely as a method of propagation but as "organ transplant surgery." Many varieties that have weak, fussy, or disease susceptible roots can be more easily grown if given roots from a good strong organ donor via grafting. I also explained that past objections to undesirable side effects in grafted plants can be defeated. It is not difficult to make grafted plants that won't break and that will not send up growth of suckers from the understock, etc.
In this article, I will explain some of the methods that have been working best in my experiments. The emphasis is on how hobbyists can produce grafted plants in a home propagating setup under fluorescent lights.
Selection of Understocks (Rootstocks)
This can vary by soil type and climate, etc. Choose from among the toughest proven "good doer" varieties that have the strongest, most vigorous, easiest to please, and most disease resistant roots in your area. Also, refer to the "Compatibility" section in Part I. Having experimented with about a dozen varieties for my area, I currently favor 'Ponticum Roseum', 'Roseum Elegans', 'Cadis', and 'Caroline'
1
. However, these may not be the best varieties to use elsewhere. Please see the footnote at the end of Part I for my opinion on using 'Cunningham's White'.
Washing Cuttings
This applies to understock cuttings, top scion cuttings, and even cuttings for regular rooting. The first thing that I do with cuttings is write identification numbers on leaves with a laundry marking pen or some other type of indelible marking pen and record the names that go with the numbers on paper. Then I wash them. I do this before shortening the stems or removing or trimming any leaves or buds so that the only open wound during the washing is the cut end of the stems. I go to extremes to wash the cuttings well. First they are washed in a pan of clean water. Sometimes I even add a little dish washing detergent, and I don't hesitate to scrub !eaves and stems gently with a clean rag or even a soft bristled brush. With indumented types, I rub all indumentum off the stems and as much as I can get off the undersides of leaves without causing bruising injuries. Then I soak them for five minutes in a bucket containing a solution of one part liquid laundry bleach mixed with 10 parts of water. This is followed by a quick rinse in clean water, and then I am quick to cut off at least an inch off the bottom of the stem which may have taken in some detergent or laundry bleach. Then I do a more leisurely rinse in a new batch of clean water to make sure that all traces of detergent and bleach have been rinsed off. Then they go into clean plastic bags to keep them from drying out. I remove a few at a time as I proceed with the grafting, and the bagged cuttings can be put in the refrigerator overnight, or even for several days, if I don't have the time to use all of them in a grafting or sticking session following the washing. I would not recommend it as general practice, but I once succeeded in using cuttings that had been left in the refrigerator for three months after washing.
A Correction to Part I?
In Part I the term "leaf bract scar" was used in the section "Total Prevention of Suckering." A question has arisen as to whether these should be called "leaf bract scars" or simply "bract scars." Somewhere along the line I had learned to call them "leaf bract scars," but I can not seem to find any reference to what they should be called in the books that I searched recently when the question arose. In any event, they are the marks left on the stem by small, temporary, feather-like "bracts" that are on the stems when new growth is in progress. They are there as the stem lengthens, below the regular leaves, and generally fall off by the time the leaves have fully expanded. I thought they were called "leaf bracts." Now I am not sure if they should be called "leaf bracts," "stem bracts," "bracts," or whatever. Here in Part II am simply going to call the marks "bract scars." I would appreciate it if someone can document the proper term.
|
|
|
|
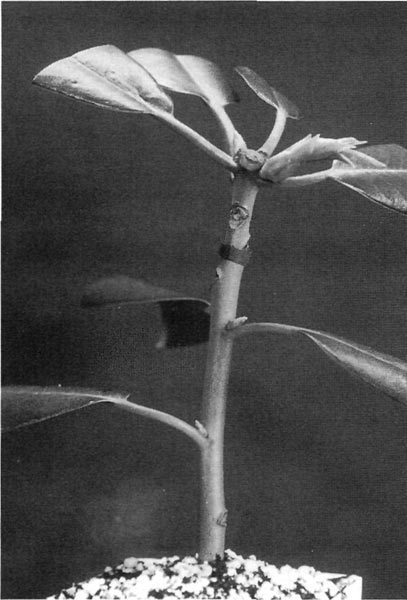
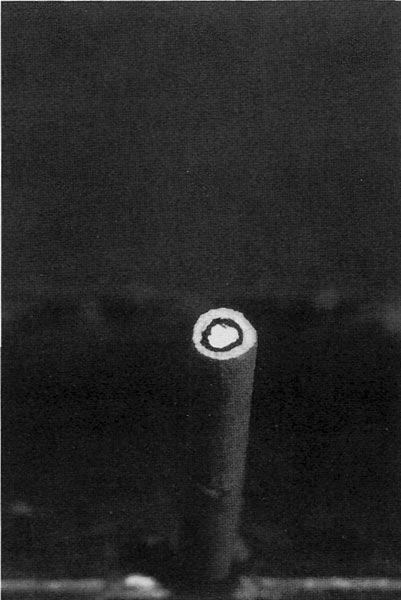
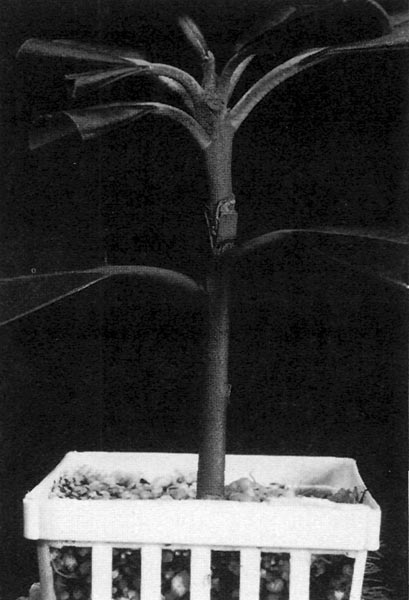
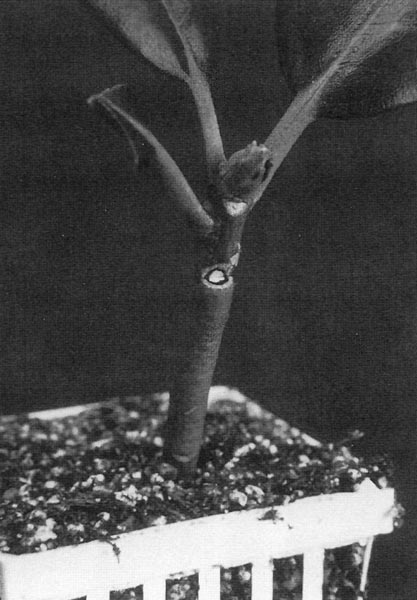
Figure 1. Preparing an understock.
Photo by Bob Bondira |
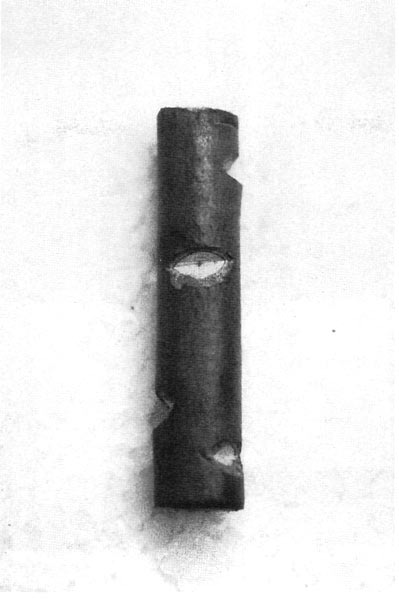
Figure 2. Notches.
Photo by Bob Bondira |
Preparing and "Sucker Proofing" the Understock Cuttings
Look at the photo labeled "Preparing an Understock" (Fig. 1). You will see that this cutting has been prepared differently from the way that cuttings are usually prepared for rooting. I initially keep one to three of the lower leaves on the stem and a few up in the top rosette area, and I keep a fairly long stem. The dormant buds associated with any leaves that have been pulled off get "notched out" and all bract scars on the stem get "notched out" as well. I also remove flower buds, as was the case in this photo. See the photo labeled "Notches" (Fig. 2 ) which attempts to give a good view of freshly cut notches on a sample stem section. The leaves that are retained are trimmed back as is done in standard preparations for rooting cuttings. Dormant buds associated with the "kept" leaves are left alone at this point, as it is harder to root these understocks if all of the dormant buds are removed before rooting. However, "sucker proofing" is not complete until all of the dormant buds, all of the bract scars, and the terminal rosette section on an under-stock's stem have been removed. I make a 1-inch side slice wound on each side of the stem and dip it in 1% IBA rooting hormone powder before sticking into the rooting medium of two parts coarse perlite to one part peat moss. I do not stick them in any deeper than 1 to 1 inch. The piece of tape around the stem in the photo "Preparing an Understock" (Fig. 1 ) is to show the point where I intend to do the graft on this one. I will cutoff the top at this point and wedge in a top graft just as soon as I know that this cutting has started to put out some roots. This could be any time from 4 to 12 weeks after sticking. Some varieties root faster than others. With some varieties of understocks, I have found that I can cut off the top and attach the graft to the un-rooted understock immediately at sticking time, then sticking it in to root with the top scion already attached. Some understocks are so easy to root that they will even root well with just one or two of their own leaves still attached. Other varieties resent losing the terminal rosette area before rooting and thus should be stuck to root first as shown in the photo. Also refer to the sections "Strong Graft Unions" and "Total Prevention of Suckering" in Part I. What does a bract scar look like? There is an example of an un-removed bract scar on the stem section in the photo "Highlighted Cambium Line on a Cross Cut" (Fig. 5 ). It's the little mark across the otherwise clear bark about two thirds of the way down from the top.
|
|
|
|
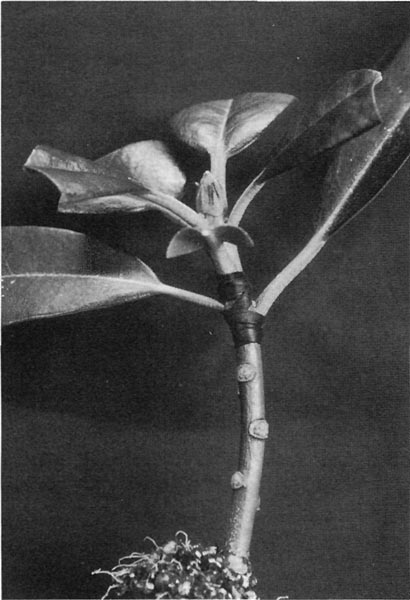
Figure 3. Inserting the scion.
Photo by Bob Bondira |
Figure 4. Wrapped graft.
Photo by Bob Bondira |
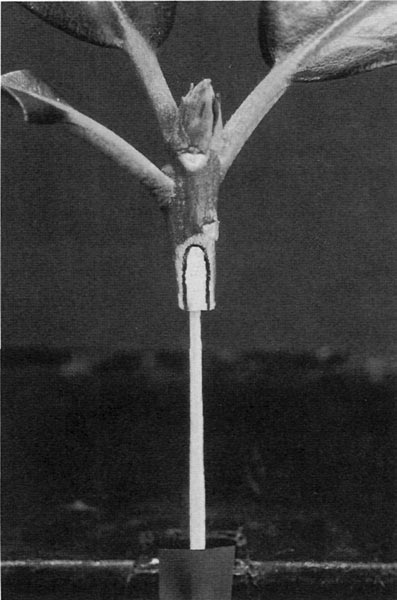
Attaching the Top Cuttings to the Understocks
See the photos labeled "Inserting the scion" (Fig. 3) and "Wrapped graft" (Fig. 4). Notice the healed notch wounds on the understock that had been stuck about six weeks earlier to start rooting. Now you simply cut the top off the understock and cut a split down the stem. Then carve out a wedge or tongue shape at the base of the top cutting and push it down into the split. The tricky part is achieving a good cambium match as discussed in the next section. Then you wrap the graft with an appropriate material. I have experimented with all sorts of things. The wrap in the photo was made by cutting a strip of rubber electrical tape and pulling hard enough to stretch it considerably as I made the wrap. This tape is fairly thick but thins out with stretching. It also stays stuck the best. It does not seem to have any glue on it, as it will not stick to your finger, but it sticks to itself very well, especially when stretched. If you can't find rubber electrical tape, the thinner grade of vinyl electrical tape will also work, but it isn't as stretchy and easy to work with as the rubber tape. Note that thicker "premium" vinyl electrical tape is less satisfactory than the thin. There are also some plastic "household use" tapes that work about the same as the thin vinyl electrical. You might have to try a few different brands or types, as the glue on some of them will not stay stuck for the required six to ten weeks in the propagating enclosure because of the high humidity and wettings. You can even wrap grafts with rubber bands, but then you have to mess with tying down or taping down the ends and the whole thing comes unwrapped if you lose your grip in the process. There are other difficulties with rubber bands. A stretched piece of tape does not try to pull itself all the way back to original size as a stretched rubber band does. This extra pull-back in rubber bands can result in injuries from them very gradually cutting into or collapsing the bark layer on your cuttings and hindering the progress of circulation from the understock to the top scion once they start healing together.
|
|
|
|
Figure 5. Highlighted cambium line on a cross cut.
Photo by Bob Bondira |
Figure 6. Highlighted cambium line
on a wedge cut. Photo by Bob Bondira |
The Cambium Match
Look at the photos labeled "Highlighted cambium line on a cross cut" (Fig. 5) and "Highlighted cambium line on a wedge cut" (Fig. 6). When you cut your understocks and scions, you will be able to see the faint cambium lines on them. I highlighted them for the photos with a black marker. You want to arrange matches of understock and scion sizes so that the cambium lines will be very close to the same width and line up together when you insert the scion wedge into the split in the crosscut understock. Having the top wedge lines a little bit wider than that in the bottom crosscut split also seems to work very well. Frequently things work out just by selecting stems of the same thickness. However, sometimes you will be pairing a thick barked top with a thin barked bottom or visa versa. It does not matter if the stems do not match up in thickness around the outside; it is the close alignment of these inside cambium lines that is important. Some pairings may look like serious mismatches in stem thickness, but they work out fine if the cambium lines are closely matched.
|
|
|
|
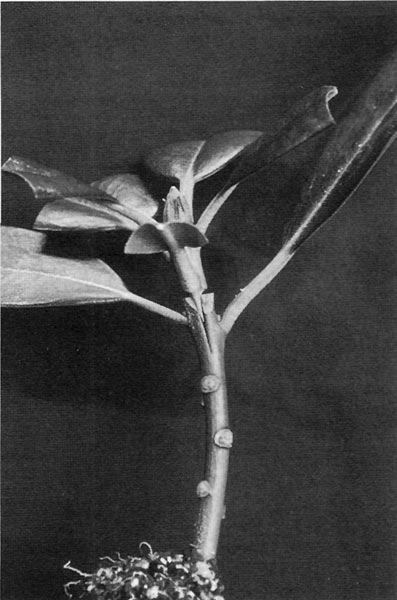
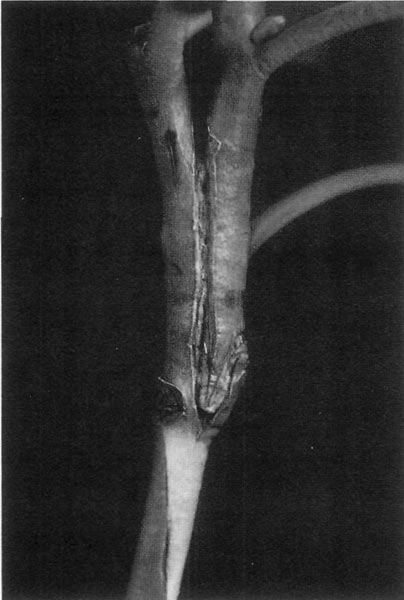
Figure 7. Unwrapped side graft.
Photo by Bob Bondira |
Figure 8. Unwrapped top graft.
Photo by Bob Bondira |
When the Wrapping Comes Off
After six to ten weeks in the propagating enclosure the wrappings on the graft unions can be removed. There are photos (Fig. 7 & 8) showing an unwrapped top graft and an unwrapped side graft that are off to a good start and ready to grow on. If the rootball is already as big as your fist, you can now notch out the remaining dormant buds on the understock portion of top grafts to complete "sucker proofing." If the rootball is still small, wait until it gets larger or until some new growth starts. It does not matter if new growth starts first on the understock or top scion. If growth starts first on the understock, you notch it out along with any remaining dormant buds on the understock and thereafter only the top scion will have the ability to grow. In any event, don't forget to complete "sucker proofing" all grafted plants before moving them outdoors. With the side grafts, you prune off the top part of the understock just above where the two sides healed together. Up to this point I have been explaining the details of how to do the top graft. I am not going to say as much about the side graft because I think you can figure out the differences from the photo (Fig. 7). The side graft is trickier to cut and match. It also takes more practice to get good at it, but there are some advantages in increased flexibility. Side grafts can be made on understock cuttings that are not equipped with leaves lower down on the stem and just have leaves around the top in the terminal rosette. You also get some flexibility in arranging the side to side cambium matches in that you can control the width between the cambium lines to an extent by starting with thin side shavings and continuing with additional thin side shavings until you reach a depth that has the cambium lines at the desired width.
Home Propagating Enclosure
Concepts
There are all sort of sweat box, humidity tent, and other propagating enclosure methods being used successfully by hobbyists to root cuttings under fluorescent lights in the home. Many of the concepts also apply to a propagating enclosure for grafting. You don't need a greenhouse and you should not even consider bottom heat if you can set up in an area where the temperature rarely goes below 60°F, and this is not hard to arrange in most homes. Basements can be an ideal place for this. However, while a decent percentage of cuttings can be rooted by relying solely on the concept of the high humidity enclosure, it is not good enough for high success grafting. Wounded cuttings are stuck in a moist rooting medium from which they can absorb some moisture. But in the grafting methods that work best for me, the top scions are stuck high up on the understocks. They are not going to be able to absorb any appreciable amount of moisture from the understock during the first three weeks, not until the top scion and the understock start growing callous tissue that is forced to fuse together by being bound within the confines of the wrapping. However, this process can not take place if the top scion can not be kept plump and full of moisture. A dry top scion can not grow callous tissue very well, even if it is not dry enough to look wilted. High humidity alone is not good enough to keep the top scions plump enough for good callous formation during this period. The best things that you can do to get through this initial period are: (1) Figure out some way to wet the leaves of the top scions every two to three hours while the lights are on and about every four to five hours when the lights are off. (2) Only keep the lights on for a short time each day during the first three weeks; you can go as short as eight hours of light per day and get them off to a better start than you could with more light that causes more drying. You can increase the light period later on for growing on. (3) Keep them cool. I will say more about temperatures later on in this article. Incidentally, this advice can also improve your success in rooting regular cuttings.
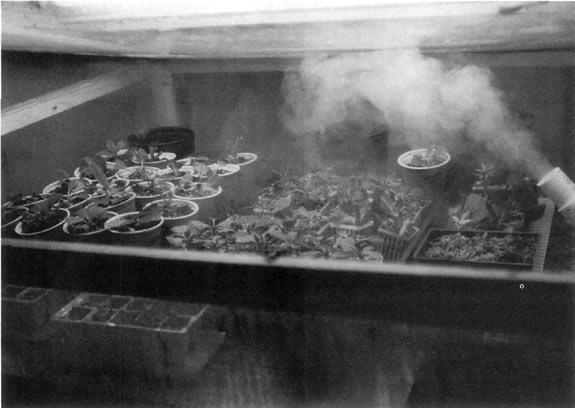
I have my setup in the basement of my home and I initially considered tapping a garden hose into the washing machine water faucet via one of the "Y" junction connectors that are available for splitting a hose line. I already had a programmable garden faucet timer that could be set to turn the water on and off up to eight times per day for as little as a minute each time. I had seen special "fog it" garden hose nozzles at my local garden center that put out a wide pattern of an extremely gentle fine spray at the rate of one-half gallon per minute. So, I knew I could set up a spray schedule that would not spit out more drain water than could be handled by a washtub or something set under a propagating enclosure. But then I learned that a fellow Princeton Chapter member, Dick Gustafson, had dreamed up an ingenious way to use a Cool Mist Ultrasonic Room Humidifier. He had found that piping the foggy output from this type of humidifier into a propagating enclosure several times a day by using an electrical timer had increased his success rate in rooting cuttings. I realized that this application would be great for grafting.
|
|
Figure 9. Piping in the fog.
Photo by Dr. Edward A. Jasinowski |
|
|
|
|
Figure 10. When the fog is off.
Photo by Bob Bondira |
Figure 11. When the fog is on.
Photo by Bob Bondira |
Advantages of the Cool Mist Humidifier
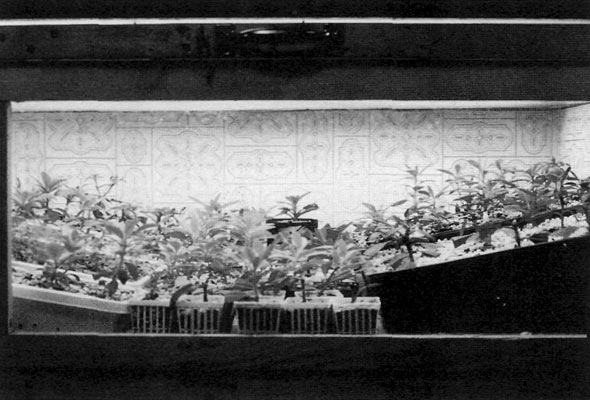
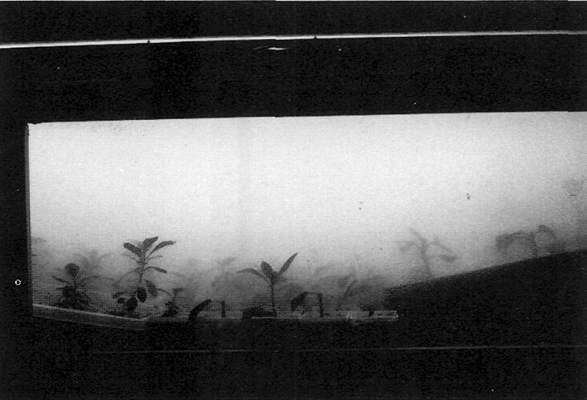
The photo labeled "Piping in the fog" (Fig. 9) was taken by Ed Jasinowski of the Princeton Chapter. It shows the foggy output made by his humidifier entering his Plexiglas propagating enclosure, although the lid is up for the purpose of taking the picture. The photo labeled "When the Fog is off" (Fig. 10 ) shows a Plexiglas window on the front of my basement unit. It is usually coated with water droplets, but I wiped it off for the purpose of taking the picture. The other walls and the bottom were made from a $14 sheet of plastic laminated shower stall paneling supported by a frame made of 1" x 2" lumber. I only used Plexiglas for the top and the front window. The photo labeled "When the Fog is on" (Fig. 11) shows the same window on my enclosure, five minutes after turning on the humidifier. Electrical timers with 48 setting pins are available at most hardware centers for about $10. They will run the humidifier for a half hour for each pin that you set. Set eight pins scattered around the clock and your grafts get eight fog baths per day that last for a half hour each time. These swirling fog baths do deposit moisture on the leaves and they will remain wet for an hour or two after the fog stops. A typical $50 Cool Mist Ultrasonic Room Humidifier will hold two gallons of water. I have to refill mine after three days when running eight fog baths per day. After all of the grafts have had at least four weeks of this, I gradually start cutting back on the number of fog baths per day by turning one off each week or so. Once I get down to one per day, I leave it that way until about two weeks before it will be time to move things outdoors. At that time I harden off the plants by stopping the baths and gradually propping open the lid a little higher every few days with small blocks of wood. This will get the plants weaned off the constant high humidity atmosphere and start introducing them to the real world. There are several advantages to using this kind of humidifier: (1) You can automate wetting the foliage without installing any plumbing. (2) It does not use lots of water, so your potting mix is not kept too soggy, yet you won't have to do much watering of the plants. Not much water drains out of the propagating enclosure. A bucket under a very small drain hole would suffice to catch the drippings. (3) The humidifier unit is located outside the propagating enclosure. It takes in fresh outside air in the process of making the fog that is blown into the propagating enclosure. The air in the propagating enclosure does not get stagnant because you get a change of air with each fog bath. (4) It also cools down the temperature in the enclosure with each change of air. When the lights are turned on, they start to raise the temperature inside the enclosure. Each fog bath will bring the temperature inside back down to the temperature outside the enclosure for a while. This is a significant benefit. The plants are much happier at 65°F to 70°F than they are at 75°F to 80F or higher.
These benefits are derived specifically from the use of a Cool Mist Ultrasonic Room Humidifier that uses an ultrasonic nebulizer to make very visible thick white fog and not from the several other kinds of room humidifiers that are made. You don't want warm mist and you don't want an evaporative type that only puts out humidity without making the thick fog.
|
|
Propagating box.
Photo by Bob Bondira |
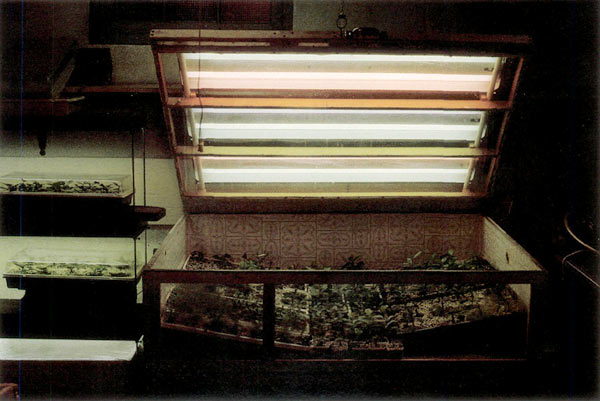
More On Enclosures
See the photo labeled "Propagating box". This is my unit. You don't have to make one just like this. A unit sized to fit under one light fixture might be enough for many hobbyists. I would just like to point out a few things: (1) The lights are outside on top of the clear Plexiglas lid. Don't put the light fixtures on the inside; they would make it get too hot in there, and it is not a good idea to get light fixtures wet. (2) The wood framing is on the outside. Only plastic surfaces are inside. (3) The hole in the right side is where the fog comes in.(4) The unit is not level. It is set up with a slight tilt so that water runs to a small drain hole in one corner. At first I let this drain into a bucket. Later on, I set up a piece of garden hose that runs from the drain hole to the sump pump hole in the basement floor. (5) The unit closes up fairly tight to retain humidity. I actually had it too well sealed, as the lid rests on rubber weather stripping when closed and the humidifier could not blow in the fog because air could not escape until I drilled a few small vent holes in the lid at the corners on the left side. (6) A hinged lid is a great convenience with a unit this size, especially if you can hang a chain or something from the ceiling to hold it open. Units that are not so deep from front to back could be made to open from the front. I should also warn that some petite ladies, and possibly senior citizens, might not be able to lift a lid with three light fixtures on it. My wife can't open my unit. If you want a large unit but can't lift the weight, you can rig counter balance weights attached to thin ropes run through pulleys attached at the ceiling and on down to the front corners of the lid. Enclosures could also be made from all sorts of other materials. Stretching clear plastic on a frame made of 1-inch plastic pipe would be one example of an alternative construction method.
|
|
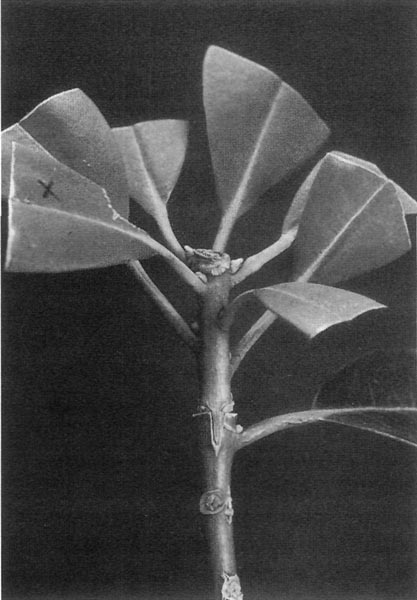
Figure 12. Ready to grow on.
Photo by Bob Bondira |
Home Propagating Tips
The following apply indoors, under the lights, to cuttings, seedlings and grafts:
(1) Temperatures. My experiments with bottom heat in a home basement environment where the temperature is usually between 65°F and 75°F indicated that bottom heat was worthless under such conditions. I have had to figure ways to cool down, not add heat. Get a thermometer and take temperature readings inside your enclosure near the end of the light period when the lights have been on for the longest. It may be a lot hotter inside there than you think because of heat building up from being close under the lights. Fluorescent light tubes don't get as hot as light bulbs, but they are still up around 100°F and other parts of the fluorescent light fixture get even hotter than that. I found that I had to raise the light fixtures a couple inches higher than I would prefer in order to cut down the warming effect in the propagating enclosure below. The plants do best at 65°F to 70°F and a lot of time above 75°F is not good.
|
|
|
|
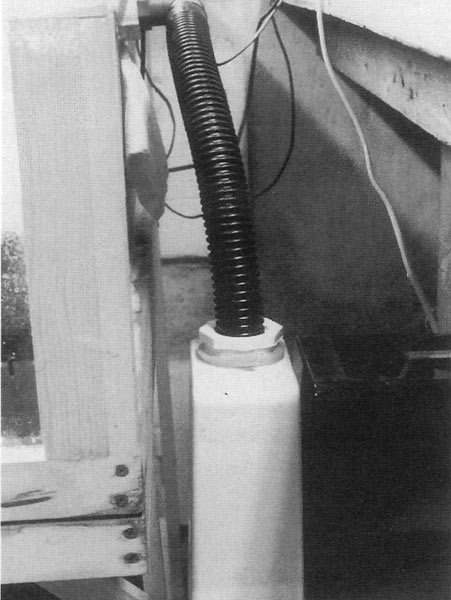
Figure 13. The humidifier. The original white
discharge nozzle shown atop the dark water container has been replaced by the black hose. Photo by Bob Bondira |
Figure 14. The humidifier hooked up to side of
propagating enclosure. Photo by Bob Bondira |
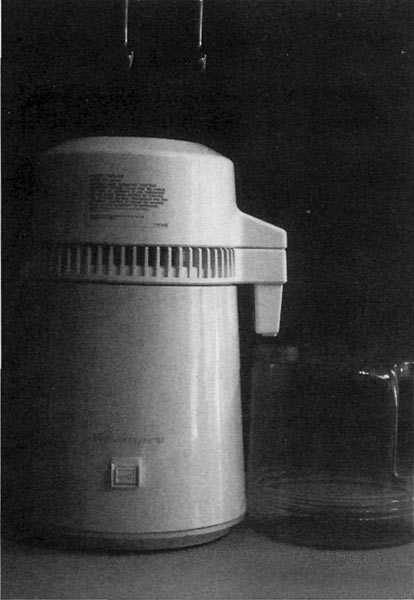
(2) Water. While you can be successful at home propagating while using regular tap water, it is easy to run into problems. Stunted seedlings, burning of leaf edges, and other less than optimal results can be caused by mineral salts buildup. When using tap water indoors, it usually pays to "flush" the pots by pouring through a lot of water to wash away some of the mineral salts left behind by prior waterings. This means applying enough water to have a lot of water come out of the drain holes of the containers. It will also pay to repot into fresh mix periodically when you have been watering indoors with tap water. You can achieve better results with fewer problems by using distilled water. I now use distilled water exclusively for both watering and for filling the humidifier. Also, your humidifier will last longer if you use distilled water. Minerals in tap water will shorten the life expectancy of the ultrasonic nebulizer in the humidifier. I highly recommend the use of distilled water. Sears stores sell a small home water distiller for about $120. It says "Kenmore Countertop Water Purifier" on the box, but it's a distiller, not a filter, although they keep it in the section with the water filtration appliances.

|
|
|
|
Figure 15. This understock is ready to use.
Roots are visible at the sides of the rooting pot, although there is no harm in waiting a few more days or weeks. Photo by Bob Bondira |
Figure 16. The water distiller.
Photo by Bob Bondira |
(3) Light. I have experimented extensively with light period, including 18 hours a day and 24 hours a day. In my opinion, you should not exceed 14 hours per day for cuttings and grafts and 16 hours for seedlings. They perform better for me with a nightly rest and cool down period. And as I said earlier, you can get cuttings and grafts off to a better start by using a short 8- to 10-hour day during the first three weeks and then gradually increasing it later. I use one expensive Gro-Light tube and one cheap cool white tube in each light fixture, but I'm not sure the Gro-Lights are necessary as a lot of other home propagators say that they do fine without them.
(4) Fertilizer. For cuttings and grafts, I have come to the point where I do little or no fertilizing while indoors. I just want to grow big rootballs indoors. Pushing top growth can come later, outdoors, and it will be easier to do so if the plants have bigger, unburned, unstunted root systems. Whenever I fool with much feeding indoors, it seems that the increased top growth that I get comes at the expense of slowing further growth of the root system for a while. Newly rooted cuttings and understocks do not initially have normal roots with normal root bark on them. They have brittle white "starter roots" coming out of callous tissue on a wounded stem. Until all this has had some time to age and start turning into normal roots and forming some root bark, this stuff seems to be much more likely to be stunted or burned by fertilizer or mineral salts. Feeding of seedlings is beyond the scope of this article and would take a while to explain.
(5) Potting Mixes. For rooting cuttings and understocks I suggest sticking in a mix of 2 parts coarse perlite to 1 part peat moss. Once rooted, the transplanting and growing on mix is 1 to 1 of the same materials. For sowing seed and transplanting very tiny seedlings, I initially substitute very fine perlite for the coarse. I have tried a lot of other things, but I always wind up coming back to peat and perlite for indoor use. Also, I think it is worth a little extra trouble or expense to obtain a good grade of peat moss for use indoors. Try to get something that is better than the dust, sticks, and other debris that is commonly found in a bale of peat moss. One garden supply center in this area sells what they call a "propagator's and grower's grade," although it says "horticultural grade" on the bag. It is a lot better than the typical. It is more uniform and fibrous, much less dusty, and contains hardly any twigs or other debris. It is also a different color, not as dark as the regular. It is rare for a cutting to rot when using this stuff.
(6) Sanitation. See "Washing Cuttings" earlier in this article. I will also wash the inside of my enclosure and all of my pots and flats, etc., at the beginning of each propagating season, making the bleach solution twice as strong. With good sanitation and the good grade of peat moss, I have no need for fungicides.
|
|
Figure 17. Cambium matchup.
Photo by Bob Bondira |
Grafting Season
I start sticking understocks for rooting and putting grafts on un-rooted understocks as early as August 1. Easy to root understocks can be stuck as late as Dec. 15. Grafting onto understocks that already have some roots forming can be done as late as Feb. 15 and still be ready to move outdoors on schedule. May 1 is what I consider to be the date after which there is no more danger of overnight frost in this area. So, May 1 is my target for moving things outdoors. You can vary some of the above dates if you want things ready to go outdoors at earlier or later dates than May 1.
There is another consideration, temperatures again. Is the place where your unit is set up cool enough in August and early September? If not, wait for cooler temperatures. My basement is cool enough in August, as the central air conditioning compressor is down there on top of the furnace. My wife suffers from airborne pollen allergies at that time of year so the air conditioner is run extensively instead of opening windows.
They Graft Roses
I am an elepidote rhodoholic with little knowledge of other plants, but I am under the impression that grafting is much more common and accepted in rose cultivation. Many rose hybrids sold at the garden centers around here are grafted plants. Why? Do rose growers know something that we don't?
Bob Bondira, a member of the Princeton Chapter, has been growing rhododendrons since 1975. He says he started out to do some home landscaping with rhododendrons but went astray somewhere along the line and ended up "operating an amateur research and development station instead."
Editor's Note: 1 'Caroline' Gable hybrid