Propagation: A Different Approach
John Hammond
Prestwich, Manchester England
Are Direct Light Techniques a Viable Option?
Notes of an Ongoing Experiment.
Background
Some 20 years of experimentation at the green-fingered amateur level, initially with azaleas and latterly with rhododendrons, has convinced me that there are few absolute "rights and wrongs" to be observed in the propagation field. It is perhaps more a case of replicating a set of "ideals." One can find many recommended "best practices" prescribed in the literature that should lead to the raising of viable plants from both seeds and cuttings, but to my mind there are two distinctly different interpretations of the term viability: the first is raising cuttings or seedlings at a plus 90 percent success rate; the second is minimizing the financial cost of achieving a consistently high success rate. This latter item is rarely discussed in respect of those non-professionals such as myself, and one is left with the inference that we either make do with a small plastic propagator or more up-market to the sophisticated world of expensive commercial products and all that entails. I believe that many members feel they do not have the ability to grapple with such equipment, which appears to be costly to install and complicated to operate, so they lose heart at the time when they have just got interested in propagation. Yes, you guessed right - this article is going to be controversial!
In reality many "best practices" in a commercial nursery do not appear to translate easily to the backyard garden where the green-fingered enthusiast is usually looking for a significantly lower output across the board. So the economies of scale, an important factor in the nursery trade, are lost before the amateur even starts. Other disadvantages are high one-off costs for fancy equipment to control watering and soil heating, to say nothing of the running costs for these utility services. All this pre-supposes that one has a greenhouse available in the first place.
Having visited many gardens in the U.K. and in the Pacific Northwest, and having seen a good many propagation setups in either glasshouses or poly-tunnels with heavy shading achieved by either fitted blinds or by positioning in a sheltered location, I decided that it was time to look for a more basic and less complicated approach. I have never had a problem with making decisions, but it was a different matter on this occasion when it came to putting the theory into practice!
I became an "armchair enthusiast" during the darker nights one fall whilst trying to sort out a logical approach to utilise a couple of hunches that I had developed over the years. The first of these notions was that it should be possible to propagate in both indirect and direct sunlight conditions if the leaf temperature could be controlled. High levels of light intensity usually result in high foliage temperatures, and one would expect a much higher water loss from the leaves as the light intensity increased. The second notion was that if the foliage was already wet then the water on the leaf surface evaporated, the temperature would fall, the humidity would increase and the leaf would tend not to become damaged by excessive transpiration. If the foliage could be kept consistently damp in all conditions of high light intensity, without completely saturating both the foliage and the growing medium, then there was an outside chance that the theory might work. Inevitably, there was a risk that I might lose the whole of a year's propagation work which would have been a total disaster! Having come to terms with this, I then got back to the things that really matter. So the planned capacity for the project was set at 500 cuttings and 15 large seed lots which was significantly higher than my own needs at the time but allowed some room for expansion. This worked out to a full 10-foot run down one side of the greenhouse so I needed to find a source of large plastic seed trays at an advantageous cost. And without realising it at the time the putting into practice phase had got off the ground.
|
|
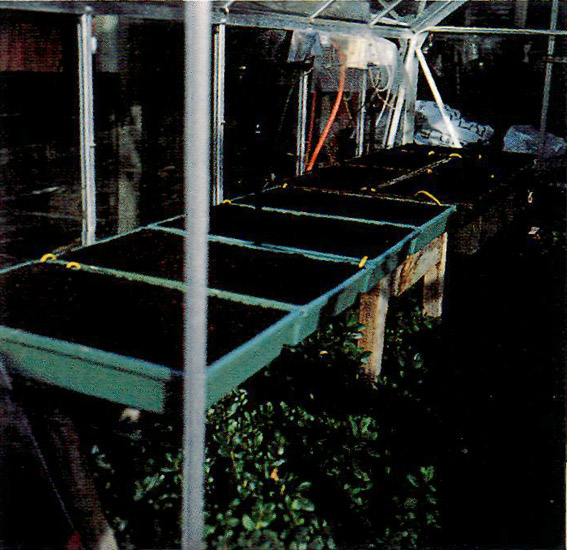
A general view of the soil heating and tray layout looking down the
greenhouse at the beginning of the second season when the sharp sand had been replaced with 100 percent fine chopped bark. When the temperature was monitored over a period the results suggested that the heating was more stable and even with bark as a medium. Photo by John Hammond |
Installation
On return from the 1993 ARS Convention in Tacoma I was all fired up and ready to roll. Once I'd completely demolished my existing Heath-Robinson propagation setup, which had functioned well except with some harder to root azaleas, there was no turning back. Out of the box where it had lain for the last two years came some cheap secondhand micro-spraying equipment, and this was connected up to a temporary length of hose pipe. This rig got secured down to a rudimentary bench that was fashioned out of a couple of old wooden tables and secondhand spars of timber which together formed a solid base for the 10-foot run of seed trays. A trip to the local garden centre resulted in the acquisition of an 80-foot length of soil heating cable and a thermostat, then down to the local builders merchant for a few bags of sharp sand.
Whilst at the garden centre I picked up a batch of 14 x 22-inch plastic seed trays, 3 inches deep, and these were put in position side by side after drilling a few additional holes in the base of them to ensure that adequate drainage was available. Next came the task of filling them with sand whilst installing the soil heater cabling in accordance with the manufacturer's instructions. This process, whilst time consuming, was easy apart from the fact that I could have used another pair of hands. A minor complication at this stage was the drilling of a couple of holes in one end of one of the trays in order to secure the thermostat in position. A couple more power sockets needed adding to, to feeder cable that was installed to supply a wall-mounted fan heater a year or so ago. Some care was required to ensure the earthing arrangements were adequate for the new setup. So, after a busy weekend's D.I.Y. session the work was complete and all that was required was some more seed trays, a supply of prepared growing medium and a selection of plant material to be "stuck." I used a 50:50 mix of high quality peat (Humax) and fine chopped bark (Cambark) with a frugal scattering of fertiliser (Osmocote) 1 inch from the base of the 3-inch deep trays. I decided to use the "magic-leaf" option rather than the automatic timer or "wet webbing" types of control to trigger the micro-spraying equipment. This choice seemed an obvious one at the time, but it was to cause some concern once the project got under way.
The First Season
Batches of evergreen azalea cuttings from 20 different named hybrids were "stuck" in rows in the large seed trays whilst a further selection of four or five cuttings were taken from around 40 similar plants and sown in 6cm plastic pots. At the outset the mico-spraying was brought into use and the soil heating thermostat was set at 68°F (20°C) by monitoring the temperature of the growing medium using cheap clinical thermometers in three of the seed trays. To my amazement no wilting occurred of any of the cuttings immediately after planting, even though on some days the cuttings were sown in bright sunny conditions; previously I had often had a few cuttings wilt despite careful handling in damp conditions. In keeping with my previous practice I wounded the cuttings either by a slight paring to expose the cambium layer or by a vertical cut with a sharp craft knife down the full length on each side of the cutting, together with a light application of hormone rooting powder. The same methodology was used for a few dwarf rhododendrons that I have had difficulty getting roots on in the past.
Earlier the same year I received 16 packets of ARS Seed Exchange seed from Linda Wylie so I used another three large seed trays to germinate 12 of these lots. To make life easy I utilised the same 50:50 mix and fertiliser arrangement in the trays with a thin layer of sphagnum moss scattered over the top of each tray. Margeret's food processor's liquidiser attachment worked wonders when she was out at work one Saturday morning! Each seed lot was carefully scattered within a sectioned-off area of a tray and then placed in direct light on top of the soil heating setup. The only concession to being positioned in full sunlight was that one layer of white plastic film fashioned out of cut-up Safeway shopping sacks was used to cover each tray as a means of preventing the sphagnum moss fully drying out. As a control measure I used the same methodology to germinate eight seed lots of deciduous azaleas taken from my own plants towards the end of the previous winter.
Some six months into the project the results were remarkably good with a plus 95 percent success rate for rooting the evergreen azaleas; this figure included all the varieties I had not been particularly successful with previously. Despite my concerns that the leaves would turn yellow, crinkle and some go brown with exposure to full sunlight throughout the summer, this did not occur and the plants remained green and healthy throughout. Some of the rhododendrons took longer to root, but these too had a success rate of plus 90 percent. And what of the seed lots? Most of the lots germinated in 14 to 21 days; the others were more sporadic but they all came through although just a few seedlings resulted from a couple of the ARS seed lots. I later decided that this was a problem with handling the seed rather than the methodology used to germinate the same. I will return to this subject a little later. My own seed lots germinated at around 100 percent success rate which was considerably better than I had anticipated, so the control batches confirmed the overall methodology was satisfactory.
|
|
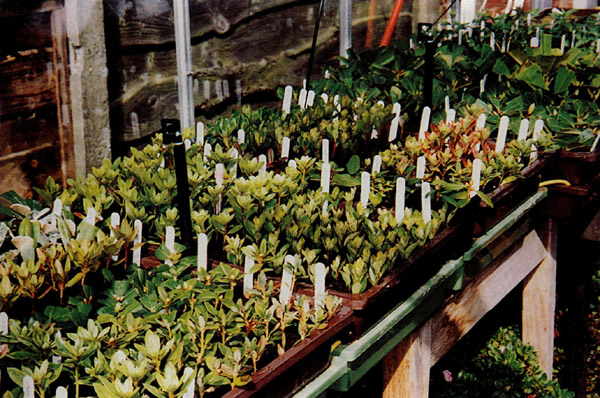
Taken in late summer, this view demonstrates that no measures have been
taken to protect the cuttings and seedlings from direct sunlight and that the plant foliage experiences a wide temperature cycle over a 24-hour period. Located on an east-west axis, the greenhouse is open to full sun from 9:30 a.m. to sunset. Photo by John Hammond |
What were the advantages and disadvantages? There was little doubt that the success rate spoke for itself. Only time would tell if the results were due to some freak conditions. Then there were other gains that were less obvious at first sight. Firstly, running the setup in full sunlight considerably reduced the main power needed to run the soil heating installation; its temperature was gradually lowered in early October and switched off before the colder fall evenings arrived. On bright sunny days the "magic-leaf" dried out rapidly, and the intervals between spraying in the heat fell to around a couple of minutes. This caused some initial concerns in terms of probably saturation of the growing medium and the increased risk of disease and pests. When I monitored the situation more closely I realised that the spray was only activated for less than a couple of seconds at a time and that the growing medium did not become saturated by such short bursts of mist spray. It was only necessary to water the seed trays once every four or five days to ensure that the sand in the soil heating trays remained damp. Weak fertiliser (Sequestrene and Miracid) was added every 21 days.
Parallel to turning off the soil heating, the mist spray was also disconnected and the system was drained before the onset of winter. This avoided the possibility of problems arising from the trays being near saturation during the colder period of the fall. Throughout the colder months the greenhouse was kept at 35°F (2°C) minimum by the fan heater switching in to keep the air moving and providing a minor level of background warmth. This technique worked well and mirrored the smudge pots and windmill methodology I noted in the vineyards of the Pacific Northwest and California. As a compromise a hand held spray was used in an evening after the odd warm sunny day in the fall. No noticeable yellowing of plant tissue resulted from this approach, and with the arrival of spring both the cuttings and the seedlings were showing signs of new growth and were as green and healthy as they had been at the start of the fall when I stopped transplanting work.
A major advantage, in my view, was the ability to germinate large seed lots without making any special arrangements except for checking that the sphagnum moss stayed damp. In practice the moss only began to dry out significantly on the hottest of days, and a light spraying in the evening was sufficient to control the conditions beneath the plastic film. This was a relatively short-term hassle, as the plastic film was removed after six weeks once the seedlings had begun to grow leaves and they were left to endure full sunlight which they did with no apparent adverse effects under the mist spray.
Yes, there were some negative aspects to be considered. At the outset I had no illusions as to the need for cleanliness and good housekeeping. To be one step ahead of any problems I sprayed all the cuttings and seeds with a fungicide (Benlate) and initiated a 14-day spraying programme against pests and diseases. I failed to keep up with this because of commitments at work that meant I was away from home at times, but this caused no problems so the cycle became a 21-day routine by default. Dead leaves needed to be removed promptly as did any signs of botrytis; this also applied to other plant material in the greenhouse to avoid transfer of disease. Some leaching of sand occurred if the soil heating trays got particularly wet, and whilst this was a minor hassle it did not help in keeping the greenhouse clean.
Of far more importance was the 40 percent losses with three varieties of azalea cuttings when they were transferred into another greenhouse a few days after transplanting into individual 6 cm plastic pots. More work was needed to begin to understand the reasons for these losses and to deal with the cause. Finally, whilst not exactly a disadvantage, the rooted cutting output exceeded all expectations which meant a high commitment in transplanting and potting on later in the year. Where was I going to find a home for all these plants I had raised?
The Second Season
In preparation for the arrival of spring 1994 I removed the lower set of trays containing the soil heating cable and replaced the sharp sand with 100 percent fine chopped bark (Cambark) to eradicate the leaching problem. I also envisaged that the bark would be considerably lighter in weight when wet and would thus take less power to maintain at a constant temperature which I reset at 70°F (21 °C) with a view to achieving a quicker rooting cycle with the rhododendron cuttings. From the previous year's experience with the dwarf rhododendrons I decided to change the growing medium to a 66:33 mix of fine chopped bark and peat, respectively, which was aimed at reducing the water retention in the large seed trays. This would also give improved aeration and hopefully provide better rooting conditions. A similar mix was used for seeds.
That season I was much more adventurous with my choice of plant material for cuttings. Several dwarf species, dwarf hybrid and medium hybrid rhododendrons were used for cuttings, the latter including some Pacific Northwest varieties which had proved difficult to put roots on previously. In addition I included four varieties of evergreen azaleas used for forcing as indoor plants together with a few other named evergreens that didn't hang around long when friends came looking for plants.
I have a notion that in order to achieve a consistently high level of germination with rhododendron seeds they require a period of winterisation that is equivalent in severity to their normal habitat. This has to some extent been borne out by seed capsules collected after the worst of the winter has passed; without exception they have germinated well in the spring. Similarly, in my experience, crosses of the better Pacific Northwest hybrids germinated well in the spring. Similarly, in my experience, crosses of the better Pacific Northwest hybrids germinate better here in the U.K. after three weeks in the freezer at 10°F to 15°F (-12°C to -9°C) as do any
Rhododendron yakushimanum
seeds or crosses of this species. More work is needed in this area, and I digress only to pick up an earlier point relating to the methodology of handling seed prior to attempting germination.
A change in approach with a view to improving the handling of seedlings was to revert back to my earlier method of using 2-litre plastic pots to germinate seed lots individually. Whilst less efficient in space utilisation it reduced the handling of large trays and avoided disturbing one seed lot when transplanting another.
|
|
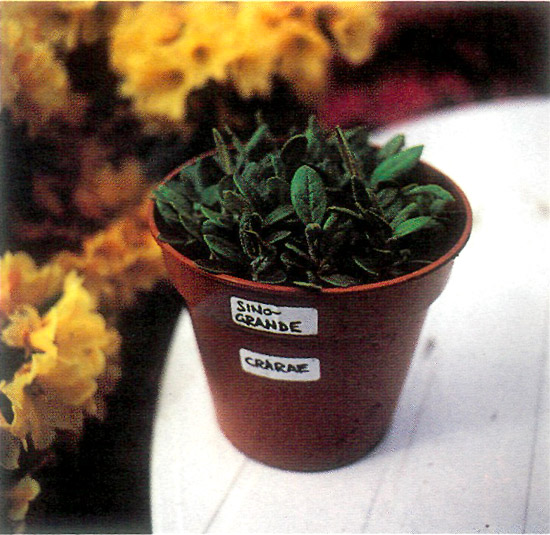
Seeds are germinated and raised on the far end of the bench, as this
area tends to receive less mist from the spray system. Here is a second season batch of R. sinogrande seedlings prior to being planted in early spring 1995. They have grown a little larger than I would have wished, but I prefer to leave transplanting until the warmer days, as they appear to suffer less retardation with this approach. Photo by John Hammond |
Our departure from the U.K. on vacation is certain to initiate a change in the weather, and 1994 was no exception with hot sunny days for almost three weeks. I had left the setup running 24 hours a day, as normal, and on our return the only problem was an outbreak of whitefly which was quickly controlled. Overall, the weather that season was pretty much the same as the previous year, and the results with both cuttings and seedlings equaled the previous year's figures. No adverse effects were noted from running the soil heating cable in 100 percent bark, and my electricity bill suggested that there had been savings in this area. On removing he trays to begin transplanting, I found that some of the more vigorous cuttings had put roots down into the soil heating trays and the root systems overall were better than the previous year; this seemed to suggest that operating at 70°F (21°C) was beneficial. Another good year with no discernible damage to the plant material.
|
|
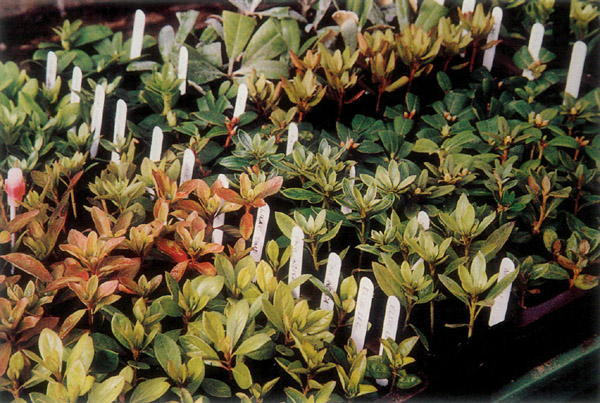
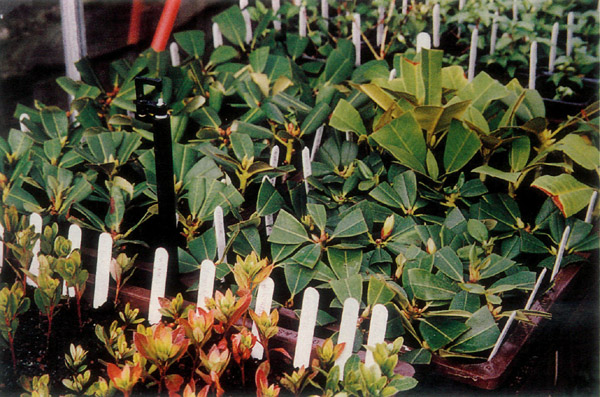
A mix of evergreen azaleas and rhododendrons propagate well together.
Each tray holds around 100 azaleas or 70 medium sized rhododendrons. Photo by John Hammond |
The Third Season
I saw no reason to make any changes to the setup the next season (1995), and the only out-of-course preparation was to replace the top half inch of fine chopped bark in the soil heating trays as a precaution against disease. A different range of both cuttings and seedlings were propagated, but the former was not entirely by choice. Shortly after we had departed to attend the ARS Convention in Portland there was a severe late spring frost which decimated the early growth caused by a mild March and April. Yes, the hot weather then arrived as usual whilst we were in the Pacific Northwest, but this time it forgot to stop before our return; indeed it lasted all summer and into the fall. A combination of severe frost and draught is less than helpful in encouraging plants to provide growth to use for cuttings, but I obtained sufficient material to run the set up with a reasonable variety of cuttings.
Despite the long sunny days, warm nights, and a greenhouse temperature that registered +100°F (+38°C) on many occasions, there was no significant damage to the plant material. Some minor yellowing of leaves occurred - leaves which were due to be cast off went brown much faster - but the cuttings rooted well, and when the cooler weather came in the fall they looked as green and healthy as the two previous seasons.
|
|
A range of hybrid rhododendron cuttings include 'Ring of Fire',
'Nancy Evans', 'Unique', 'Britannia' and 'Percy Wiseman'. Generally these appear to require up to twice the time to root as azaleas. Photo by John Hammond |
Commentary
It seems to me that plant tissue becomes stressed and changes colour towards yellow as a product of both light and heat. Damage, usually only cosmetic, appears to commence at about 90°F to 95°F (32°C to 35°C) in the greenhouse if no preventative action is taken. Sunburn, resulting in permanent damage that is apparent as leaf deformation and browning at the edges, commences at around 100°F (38°C). Shading is the main recommended method used to control the light intensity, but this can also effect shoot growth with the possibility that some plant tissue does not reach maturity before the fall frosts occur. Cooling is the other method of control, usually by ventilation, but is also achievable through use of mist spraying techniques; the latter technique is the basis of this project. Lateral shoots usually grow shorter and firmer under full sunlight conditions, but that has not been the case with this project, and I have a notion that the answer can be found with a third key factor, humidity. I know little about the effects of relative humidity and not a lot is written about it in the literature so far as rhododendron propagation is concerned. As spraying the foliage with water is known to raise the humidity for a short period, then it follows that frequent short duration applications via a mist spray cycle is likely to increase humidity significantly during periods of high light levels when the heat vapourises the fine droplets quite quickly.
High relative humidity is one factor that is thought likely to lead to vigorous growth; it may also be the reason why cuttings tend not to fade when "stuck" on bright sunny days. High relative humidity can be a factor in providing suitable conditions for the spread of plant diseases in a nursery. My experience to date suggests that this is not a major concern with a relatively small propagation unit if the usual good housekeeping and preventative spraying programmes are employed.
Whilst this three-year project has no relevance in terms of drawing any definite conclusions, such investigative work needs to be left to others more adequately equipped than myself. The results indicate there is still much to be learnt in the field of propagation and that there are other ways of approach which would enable the enthusiastic green-fingered amateurs amongst us to improve our techniques, knowledge and ability to maintain a wider interest in the genus
Rhododendron
in a cost-effective way. At the outset I suggested that some aspects of this article may be controversial; indeed the approach I have used could be seen as contrary to that recommended in many a book by authors I have a high regard for. There will no doubt be a lively discussion with two I can think of right away! However, this exchange of views is a means by which we all benefit and projects of this nature need to be viewed in a positive light.
The conclusion belongs to Gordon K. Wylie, an ARS Past President and a respected friend, who rather succinctly summed the whole matter up in a letter I received from him which I quote: "Anyhow, this all supports one of my favorite themes that one often learns the most from trying things that are sometimes criticized in the literature."
Well put, Gordon. I know you won't mind sharing this wise counsel with the many others of our membership who have the foresight to keep an open mind in the search to improve knowledge and techniques.
John Hammond was the manager and secretary of the ARS Annual Convention in Scotland in 1996 and is currently the Alternate Director of ARS District 13.