 Staff
Handbook: Tools :
WS FTP
Staff
Handbook: Tools :
WS FTP
WS FTP
WS FTP is one of the most widely used FTP clients for the Windows platform. Use WS FTP to connect to an FTP server and transfer files to and from a remote site.
Connecting to a Server (Remote Site)
When you first open WS FTP, you will see a dialog box like the following:
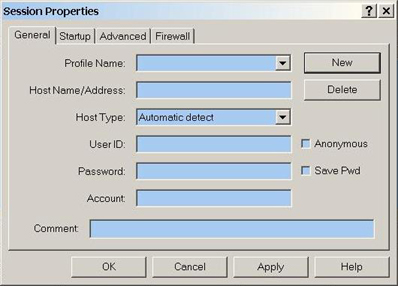
You'll need to fill out a few of the fields in the previous dialog. The table below describes what each field is used for (fields highlighted in red are required).
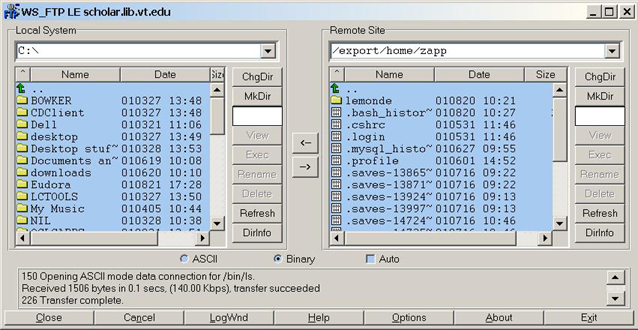
Field Name Description Example Profile Name Your Name for this connection SPEC Host Name/Address The hostname of the server you'd like to connect to. For example, if you're updating the page http://scholar.lib.vt.edu/index.html, you want to connect to the server scholar.lib.vt.edu. spec.lib.vt.edu Host Type leave this set to the default Automatic Detect User ID Your username on the host in question. For the servers scholar.lib.vt.edu and spec.lib.vt.edu, this is usually the same as your VT PID. jbob Password Your Password jbob's password Account leave this blank Comment You could make a note here if you were creating a profile based on the current settings. If you're not creating a profile, it's just silly (but harmless) to fill this out. After the required fields are filled out, click the 'OK' button to connect to the server. Your main windows in WS_FTP should now look something like the following:
Navigating the Directory Tree
Once you've connected to a remote machine, you can use WSFTP to transfer files between your machine and the server. WSFTP displays the contents of the current directory on your machine on the left side of the screen. The contents of the current directory on the server are displayed on the right side of the screeen.
To ascend to the parent of the current working directory, double click the up arrow
. To descend into a subdirectory under the current directory, double click the name of the subdirectory or the folder icon next to it
.
If you need help with the concept of the directory tree, parent directories or subdirectories, take a look at the section of the handbook on file and directory management.
Transferring Files and Directories
To transfer a file from the current directory on your local machine to the current directory on the server:
- highlight the file on your local machine by left-clicking once on its name (which should be listed on the left side of the screen)
- left click the right arrow icon
to transfer the file to the server.
To transfer a file from the current directory on the server to the current directory on your local machine:
- highlight the file on the server by left-clicking once on its name (which should be listed on the right side of the screen)
- left click the left arrow icon
, when you click this button the file will be loaded onto your computer in the directory specified in the left window. This comes in handy when you need to get a file from a URL or when you know exactly where the file is located on the computer.
Creating and managing directories
To create a new directory on either your local machine or the server, click the mkdir button
next to the listing of the directory contents. You will be prompted for a name to give the directory; the directory will be a sub-directory of the current one.
Deleting files and directories (use with care)
To delete a file or directory on either your local machine or the server:
- Highlight the file or directory you intend to delete.
- Click the 'Delete' button next to the listing of the directory contents
If you select a directory and choose this command, WSFTP will delete the directory's contents before deleting the directory itself. Once again, the 'Delete' button on the right removes files and folders off of the remote computer and the 'Delete' button on the left removes hightlighted files and folders off of your computer.
