Growing Rhododendron Seedlings in the Home
by Robert Stuart, Littleton Common, Mass.
Lack of a greenhouse need not keep anyone from growing rhododendron seedlings. Although a greenhouse will provide more ideal conditions, I have had excellent results for a number of years in my home.
In some ways the house furnishes much better conditions for rhododendrons than for many other seedlings commonly grown there. Tomatoes and zinnias tend to become leggy and spindly due to lack of light and high temperature whereas rhododendrons do not require or like too much sunlight and seem to thrive on rather high temperatures. I have had just as good or better growth in an east window getting the morning sun till about 10 A.M. as I have had in a south window getting sun most of the day.
The seed pods should be left on the plants until fully ripe but must be watched closely and gathered before they pop open and the seed is lost. In this climate and with most plants this occurs about the time of the first real frost about October 1. The pods are stored in envelopes and kept on a shelf in a storage room for a month or so when they will have opened and the seed can be easily shaken on to a large paper and poured back into the envelopes for storage until planting time. Pods or seed must not be stored in plastic bags or tightly covered containers as mold will develop and seed will be ruined.
I do not like to plant the seed earlier than Christmas time as the seedlings become too large and crowded before I can transplant them, also I do not have window space enough to handle them in the house after transplanting. On the other hand, for some reason hard to explain they do not do nearly as well if planted even a month later. After germination and the first seed leaves appear they seem to stand still for a month or six weeks and if planted the first of January they go through this period and are ready for real growth as the days start to lengthen rapidly in late February or early March. At any rate if planting is delayed even as little as February they wind up the first season's growth about half the size of those planted January 1.
I plant all my seed in tin cans the size of Campbell's soup cans. They are large enough to give 10 to 25 seedlings and fit together closely on window sills or shelves. Plastic pots should do as well. Clay pots, although ideal for a greenhouse are not adapted to the dry atmosphere of the average house. The porosity of clay pots caused extremely fast drying out and would require constant watering. The rapid evaporation also causes a cooling of the pot which would retard growth.
The cans are thoroughly washed so as to leave no traces of food on the sides to cause molds to get started. After punching several good sized holes in the bottom with a large nail I put several small stones or gravel in, then fill about ½ full of coarse sand.
Then the can is filled with a soil mixture which I make up in the fall consisting of 1 part leaf mold from either oak or white pine or a mixture of the two, 1 part good garden loam, 1 part coarse sand and 1 part peat moss. Everything is then worked through a piece of ¼" hardware cloth. After filling with this mixture the soil is firmed down lightly so there is a space of about ½" above it in the can. Next about ¼" of the milled sphagnum moss available at most garden supply stores is placed on top of the leveled off soil. This comes very dry and I have found it advisable to place in a plastic bag for a few days after sprinkling with a little water. If used dry it is very hard to dampen. Even better than this is the sphagnum moss which I gather fresh from a swamp and grind in a meat grinder using a coarse blade on the chopper.
|
|
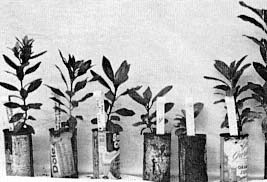
Fig. 19. Rhododendron seedlings in late
October 1959. Planted January 1. in orange juice cans. Left to right: carolinianum x chryseum , micranthum x 'Snow Lady', minus x Cornell Pink, catawbiense x ('Pilgrim' x yakushimanum ) Exbury seedling, 'Narcissiflorum' x calendulaceum var. coceum . Stuart photo |
After a thorough watering the prepared cans are set aside for a day or longer till the moss becomes firm and settled. Next a tiny bit of Arasan is placed in the seed envelope and shaken well. This lessens damping off trouble. I have not found pieces of seed pod or chaff at all harmful if mixed with the seed. A small pinch of seed is then carefully sprinkled on top of the moss and pressed lightly into it with the finger. If several lots are being planted care must be taken that no seed adheres to the finger to get planted in the next can. After pressing, the can is carefully watered, labeled and set in the window for 24 hours to permit slight drying. After this a plastic bag is placed over the can and tucked underneath it. Usually no farther attention is needed until germination. I use second hand bags such as bread or other foods come in turning them inside out so that no particles of food that might cling to it are inside. The cans should be inspected occasionally for drying out. Sometimes a whitish mold develops but does not seem to do any harm. Germination of some species starts in about 2 weeks, for others a month or longer. The humid conditions inside the plastic bag permits the seed lying on top of the moist moss to germinate and the developing roots to penetrate into it.
After the little plants are started the plastic bag should be just set loosely over the can and shortly removed entirely. If left on too long the humid conditions create soft growth subject to damping off. Gradually a green moss may develop around the seedlings but does no harm. When the seedlings are small watering must be done very carefully. After the initial watering at planting time I do all watering from below by setting the cans in a large plastic flat and filling with water around the cans. I let them soak about 5 minutes. After removal of the plastic bags watering is necessary every other day in this fashion. In damp cloudy weather watering is less frequent and should be avoided if possible. As the plants get larger with deeper roots the moss should be allowed to become rather dry between watering but not to the point where the plants wilt. If damping off does get started I find a light dusting of Arasan on plants and moss checks it. Some pour a weak vinegar solution on all plants occasionally or a teaspoon of ammonium sulfate dissolved in a gallon of water.
By May the azaleas are ½" to ¾" tall and the rhododendrons have made proportionate growth and are ready for transplanting. I save the frozen orange juice cans, prepare in the same way as the original soup cans except no moss is placed on top of the soil mixture. These cans are fitted into market vegetable boxes each one holding 64 cans for easy moving, etc.
The transplanting operation has to be done with care. I tip the can of seedlings upside down and give a rather sharp rap on the edge of the table holding the other hand under it to catch the soil ball which by this time is well filled with roots. This is carefully broken apart so as to do as little root damage as possible and a good strong seedling set in each of the small cans. A hole is made in the soil with a pencil or plant label and the soil carefully firmed around the seedling setting at the same level as the seedling grew before. Then the soil is settled by carefully pouring water around it. When all 64 plants are set the box is left in the shade for a few days. If there are seedlings left over the remainder of the soil ball can be replaced in the can, a little soil mixture or sand filled in around it, watered and left for replants or given to friends.
The plants are grown on a back porch during the summer sheltered from strong winds but get sun till 10 or 10:30 each morning. Watering is done with a small pitcher or house plant watering can when the soil gets dry on top which in gunny weather is about every other day. As the seedlings get an inch or so tall watering is done with a fine mist from the hose. Occasionally they are watered at this stage with a very dilute mixture of soluble fertilizer, iron chelates or a teaspoon of urea in a gallon of water.
The plants grow quite rapidly in the warm humid weather of mid summer. In early September or late August the sun is no longer so strong and the boxes are moved off the porch into the yard where they get full sun. They are left there until sometime in October, covering them over or bringing them inside if frost threatens. When a real cold spell threatens the boxes are placed in the windows of an unheated room where the winter temperature is low but seldom gets down to freezing. In the early spring before new growth starts the plants are set in a frame which has a little peat or leaf mold worked into the soil, setting about 6" apart each way. If new growth does occur before setting out great care must be observed to cover well if frost threatens as the new growth is of course very tender. The plants are mulched in the frame with pine needles or oak leaves and have a snow fence over them for semi shade which is removed in August when the sun becomes weaker. The frame is protected in winter with sash and burlap on top of the glass to keep out the sun and raised in warm spells to prevent too early growth. The sash is again removed in early spring before growth starts. After two years in the frame the plants are well started and are set out doors and many kinds will have blossom buds. All transplanting is clone by setting the root ball the same depth it was before transplanting. I believe more rhododendrons are killed by too deep planting than about anything else.
Seedlings grown from natural species should be just as good as the parent plant and resemble it if no other rhododendrons are in bloom at the same time in the near vicinity to hybridize with it. Hybrids and named varieties will not be the same and in most cases will be inferior to the parent but there is always a slight possibility of getting a superior plant in the next generation and if so it should be examined by an expert to determine if it is superior to present varieties and worth further propagation by cuttings.
At any rate if a fairly extensive planting is planned and funds are rather limited to purchase named varieties the seedlings will make good background material for choice varieties.