Propagation of Rhododendrons
Ernest V. Allen, Eugene, Oregon
Editors Note: The Society neither endorses or recommends any method of propagation as being superior because such a work is presented in its publications. Rather the presentation should be accepted as a successful method employed by the writer that has been adapted to his own particular conditions.
There are six methods of propagating rhododendrons: 1. Cuttings, 2. Grafting, 3. Budding, 4. Air Wrapping, 5. Layering, and 6. Seeds. Which of these methods to use depends upon the facilities the propagator has at hand and the result he wishes to achieve.
CUTTINGS
Cuttings offer the best method for most shrubs. There is virtually no closed season for taking cuttings, but the best time is from June through September.
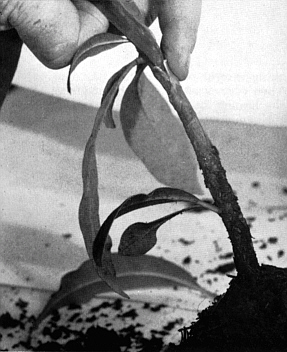
The important factor for success in using cuttings is the proper choice of cutting wood. Choose normal growth wood, rejecting weak thin shoots and abnormally thick heavy ones. Where the plant is in part shade and part sun, the cutting should be taken from the sunny side. Downward pointing tips with arching or drooping branches often root readily. Half ripe wood is the best. Too soft wood will quickly rot, while too hard wood will take too long to root or it may not root at all. In order to select half ripe wood, flex a twig between the fingers, putting pressure on the thumb in the center of the cutting. If the twig bends almost double before it breaks, the wood is ideal for cutting.
Length of the cutting is determined by the type of rhododendron. Small leaf varieties are from 1 to 1½ inches long, while large leaf are from 3 to 4 inches long.
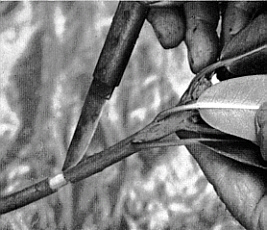
The bottom of the cutting should be cut square across with a sharp knife. Care must be taken to keep fresh cuttings from becoming too dry, so a pail of water to submerge them in is very helpful.
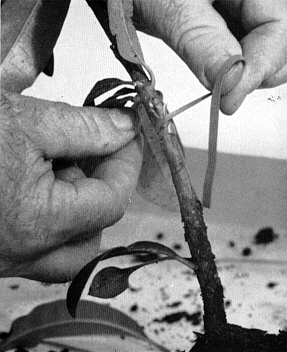
Before planting, excess leaves should be removed with a sharp knife. This balances the cutting and makes a better looking plant. Two to four leaves should be left on. When this is done remove a thin layer from one side of the stem a half inch long and deep enough to expose the cambium tissue. Dip the cutting into hormone powder and shake off excess. This keeps the cambium tissue from bleeding and helps stimulate plant until roots are formed. A good hormone to use is Hormodin Number Three.
A good rooting medium is composed of ⅓ sand and ⅔ sphagnum peat moss. The sand should be a good sharp type such as plain mason sand. Pure peat moss or plain sand can be used, but a mixture holds moisture and allows roots to grow freely. The principle value of peat moss is in controlling moisture. The medium should be six inches deep in the propagating beds.
Care should be taken in inserting the cuttings into the medium because sharp sand will cut a ragged edge in the cambium tissue if the cutting is forced through it. A hole ¾ to 1½ inches deep should be made with an instrument approximately three times the diameter of the stem. Place the cutting firmly against the bottom of the hole exercising care not to push it any deeper and press medium firmly around the cutting without bruising the tender stem. The cutting should be watered immediately after being placed in the propagating bed.
In order for roots to develop properly a bottom heat of at least 72° is necessary. A thermostatically controlled electric lead cable is ideal for this purpose. Since heat stimulates plant growth it is necessary for the propagation beds to be warmer than the air in order for roots to develop properly. If the air temperature is higher the cutting will divert its energy toward producing leaves with few or no roots being developed. A small glass house is very desirable as a moist humid air is easily maintained. The air temperature around the beds should be maintained at between 45° and 54°.
It takes from 6 weeks to 6 months for a rhododendron cutting to root. The small leaf varieties usually root in 6 to 10 weeks, while some of the larger leafed ones take as much as 6 months. Roots generally appear during the winter months from October on. During this time the temperature should remain constant and the beds must be kept moist. It is a good idea to water them daily.
At the end of the first 6 weeks, the cuttings should be checked for roots. This can be done by gently applying pressure to them. If they are firmly in place roots generally have formed. When ready to pot the cutting has formed a 3 inch ball of fine fibrous roots.
When roots are established the cuttings should be removed from the bed; and placed in pots. This can be done by gently lifting the cutting out of the bed with a small gardener's dibble. taking care not to damage the new little roots. A four inch pot containing a mixture of well rotted fir needles or oak leaves finely pulverized, coarse sand, peat moss, and a good woodland loam is best for transplanting. The cutting should not be planted too deeply in the pot.
At this time the plant should be given its first feeding of cotton seed meal or Nitrogen fertilizer and sulphur sparingly in water. Nine parts nitrogen to one part rock sulphur is an excellent combination, because it produces the necessary acid soil.
Due to the shock of being transplanted the plant should remain inside the glass house for a week. At this time the roots no longer need be heated.
For the first year the plant needs to be protected and should be kept in a lath house. In the second spring it can be un-potted and set out.
From the time it is placed in a pot the Rhododendron needs to be fed twice a year, with one of the suggested fertilizers. March and August are the best months to fertilize. It is especially important to feed the new plant not later than August as it will put out new growth which will be hardy enough to stand the winter. Fertilizing later than August causes late growth which is apt to be killed by frost.
GRAFTING
As a general rule the difficulty of rooting cuttings increases with foliage size. Therefore, those plants of the large leaf variety have been considered almost impossible to propagate by this means. In order to overcome this difficulty the propagator uses grafting to reproduce plants of the large leaf variety.
In order to graft an easily grown hardy root stock is required. Favorite under stocks are the rhododendrons:
R. ponticum
for grafting,
R. fortunei
for budding,
R. discolor
or
R. decorum
.
R. ponticum
is easily grown from seed and will take either large or small leafed grafts.
R. discolor
and
R. decorum
are also widely used but they prefer grafts of the large leaf variety. The disadvantage of
R. ponticum
is that it will force suckers and these have to be carefully pruned while
discolor
and
decorum
do not.
The best time to graft is during February and March, just after the March fertilizing.
The root stock should be about a half inch in diameter or about the size of a lead pencil. It should be cut off with a sharp instrument two to four inches from ground level and a ¾ inch split made down the center of the stump. Leaves just below the split should be left on to stimulate the flow of sap to the graft.
The scion, the plant to be grafted into the root stock, is selected the same as a cutting as described in the previous section. It is of half ripe wood and the same bending test is to be applied. Excess leaves should be removed in the same manner. The diameter of the scion should be the same as that of the root stock so that the two will form a perfect union with cambium tissues together.
The stem of the scion should be cut into the shape of a wedge and the cut should be three quarters of an inch long to correspond with the split in the root stock. Viewing the scion from the bottom, the wedge shape should form a triangle. Pry open the stump of the root stock and very carefully insert the scion so that the cambium tissue on the root stock and scion touch on both sides. By carefully removing the grafting tool, the stump will firmly hold the scion.
Using a ¼ by 2 or 3 inch rubber band wrap the root stock so that the graft is securely held in place. If the plant is large and growing in the garden, use a good tree seal or grafting wax to prevent air from drying the scion until it starts to grow. Where possible it is best to place grafted plant in a glass house where a moist humid air helps to keep the graft moist until the union is made.
BUDDING
June and July are the best months for successful budding. In budding as in grafting, a root stock is used, and the rhododendron
fortunei
is a favorite.
Where the bud is to be placed on the root stock make a "T" cut in one side of the branch about a half inch in length and through the cambium tissue. Peel back the sides of the cut. (FIG. 50).
|
|
|
Fig. 50. Making the T cut in budding
rhododendrons. |
Fig. 51. The newly placed bud being tied
into place. |
Select a bud from the half ripened wood of the rhododendron to be reproduced, and gently remove the leaf being careful not to disturb the bud. Then very carefully slice the bud from the branch, being sure to go through the cambium tissue and remove some of the under wood along with it. Insert the bud into the "T" cut on the root stock and cautiously wrap a rubber band above and below the bud so as to secure it firmly in place. (FIG. 51).
When the bud begins to grow cut off the root stock about a half inch above it. This cut should be made at a 45° angle so that water will run off and not cause the root stock to rot the new plant. After the old stock is removed the plant should be fertilized in the same manner as other Rhododendrons.
AIR WRAP
An air wrap is applied directly to a rhododendron the garden and needs no special hot house care. It is particularly advantageous because a larger plant can be acquired.
In choosing a branch to air wrap, one of half-ripe wood about 7/16 of an inch in diameter should be selected. The best time is when the wood is half ripe, but wood on the hard side can also be used.
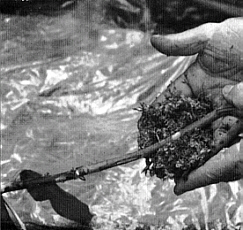
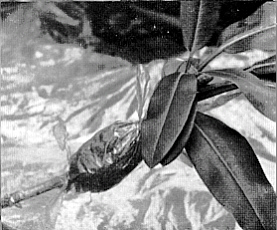
About 8 to 10 inches from the end of the branch cut a complete circle through the cambium tissue and a half inch from it cut another circle. Remove the bark between the two cuts and brush the peeled place with hormones. Then wet sphagnum peat moss and make a ball about two inches in diameter around the peeled area. With an 8 inch square of polyethylene wrap the peat moss and tie both ends so that the wrap is air tight.
In six to ten weeks roots will form and can be seen through the polyethylene. Cut the branch off the mother plant below the air wrap, unwrap, and carefully pot in the same way as described for other young plants.
|
|
| Fig. 52. Preparatory cut in air layering. |
Fig. 53. Appling Sphagnum before
wrapping. |
|
| Fig. 54. Wrapping completed. |
LAYERING
As in air wrapping, the layering method of propagation needs no special hot house care.
To layer, a branch is selected and bent down to the ground. On one side. where the branch is about as thick as a lead pencil, a small cut is made and bark peeled away to expose the cambium tissue. Then the branch is weighted down securely and covered with plain soil.
In approximately a year roots will form. At this time the new plant is cut away from the branch at the roots and potted. It should receive the same care as other young plants as previously described.
SEEDS
Seed Propagation is not used commercially because seed seldom produces an exact replica of the mother plant. This is usually due to natural cross-pollenization. Instead, seed is used to develop new varieties as in hybridization.
Seeds are taken from the pods in October or November. There are hundreds of seeds in each pod. They are then stored in a dry place. Although December through February is the planting season, February 10 is considered the best day to plant.
To plant; the seeds are sprinkled on the top of beds of wet sphagnum peat moss. Beds are then covered with glass or wrapped in polyethylene and not disturbed until the seeds come up in 6 to 8 weeks.
After the seeds are up they are exposed to the air a little each day until they are able to stand being uncovered.
When the first two leaves appear, the seedlings are planted in beds containing a mixture of ⅓ sphagnum peat moss, ⅓ oak leaf mold, and ⅓ good top soil. There they are left until spring and then potted until large enough to set out. The potting medium is the same mixture as used in the propagating beds.
The potted rhododendrons are fed with the Nitrogen-sulphur fertilizer in the same manner as other rhododendrons.
These new rhododendrons should bloom in three years.
CONCLUSION
In selecting which of the six methods to be used in propagating rhododendrons the advantages and disadvantages of each method should be considered. An advantage of cutting, grafting, budding, air wrapping and layering, is that they will reproduce an exact replica of the mother plant. Seed is good because it offers new plants, but will seldom produce a replica of the mother plant.
Cuttings offer quick rooting but difficulty increases with the foliage size and some of the large leaf varieties have been considered almost impossible to propagate by this method. A hot house and heated beds are required for this method. However, numerous cuttings can be made from the same plant.
Some of the large leafed varieties which can not be reproduced by the cutting method are propagated by the grafting and budding method. But wherever possible, use one of the other methods as the plants do better on their own roots.
The advantages of air wrapping are that a larger new plant can be produced and no special hot house or propagation beds are needed.
For the layering method no special equipment of any kind is needed. It takes one year to root a layer and only one plant may be produced from a limb.
As seeds rarely result in a reproduction of the mother plant, many new varieties are produced, some desirable, some undesirable. Seed is easy to grow and care for.