Amateur Rhododendron Propagation Techniques
Part 3
John G. Lofthouse, Vancouver, B.C.
In parts 1 and 2 of this series, propagation of rhododendrons from seed, cuttings, and grafting was discussed. The methods and techniques described were adapted for growing under fluorescent lights. Some modification of culture might be necessary (especially in the initial stages) if grown under greenhouse or outside conditions. For the third and last article in this series, I would begin by describing 3 methods of striking those "hard to root" rhododendrons. These methods are somewhat more elaborate than those described previously, and should be used only for rhododendrons (wanted on their own roots) that have failed to strike when taken as cuttings.
Layering
Layering has been used for many years for striking the more difficult rhododendron. This consists essentially of covering an actively growing branch (after wounding) with soil, peat or a light compost. While roots are forming, the actual "cutting" is still attached to the mother plant. Nourishment is available until a good root ball has formed. Only then is the new plant severed from the parent. "Almost ideal rooting conditions," you might say, and it is. Use it if the variety to be propagated is on your own property or near at hand. But if you only have a scion, let's see how we can use this method under fluorescent lights.
The scion is cleft grafted to under stock as described in part 2 of this article. The only modification is that the scion should be left as long as possible and not cut to the 2½" to 3" previously mentioned. After the graft has united, and the top dormant terminal bud expanded into rapidly growing leaves, the process known as "air layering" is undertaken. Air layering is similar in results to the techniques described in the preceding paragraph, but performed on the elongated scion above the graft.
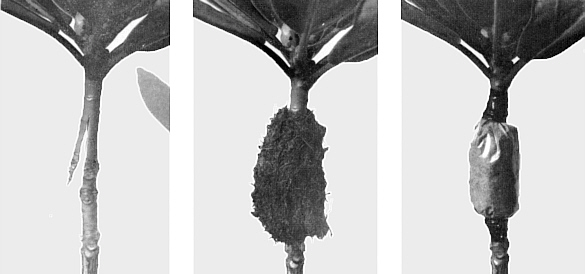
A little lower than halfway between the healed graft and the lowest set of leaves, using a sharp razor blade, make a diagonal cut upwards for 1½" to about the center of the stem. Being careful not to break, bend the stem to open this cut about ¼". Apply Rootone 10, Seradix B3 or a similar strong rooting hormone powder to this wounded area. With the stem still flexed to keep the cut open, lightly fill with pre-dampened peat moss. When the stem is straightened the peat will be gently compressed. Apply a small handful of wet peat moss over this cut area. Compress the peat well while applying, to wring out all excess moisture. The peat should cover about 3" to 4" of stem to about 1" in diameter. It must not touch the healed grafted area. Try to give at least 1" clearance at this point.
Cut a piece of thin polyethylene approximately 5" x 7" and cover the layered area snugly. Tie the polyethylene at top and bottom with thin cord against the stem, being careful not to draw too tightly as this might impede stem circulation. Trim off excess polyethylene ⅛" above and below ties, then cover stem and ties with black electrical plastic tape to seal ends (see photos). If properly applied, polyethylene will keep peat moist until roots have formed, yet will not impede the transfer of air necessary for proper root formation. Do not remove plastic until roots fill layered area, then cut off carefully below roots. Plant in a soil mixture similar to that outlined in part 1 of this series. Air layering can be used outside at most times of the year to propagate rhododendrons and many hard to root plants. It is a wise precaution to shade air layers from the hot sun.
|
|
Fig. 13. Left. Upward cut is made half way between graft and lower leaves. Scion
is 'Faggeter's Favorite'; understock is R. macrophyllum. Center. After wounded area is treated with hormone damp sphagnum peat is applied. Right. Completed air layer. Photos by author |
|
|
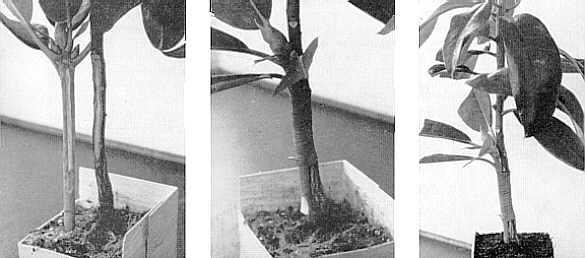
Fig. 14. Left. Scion on left, stock on right showing cut areas. One inch of soil has been
removed from stock plant to provide room for rooting compost. Cut areas will be turned face to face and aligned before binding. Center. Scion has now been bound in place against stock. Lower end of scion has been wounded and treated with strong rooting hormone. Rooting will take place in this area. Right. Completed graft before enclosing with polyethylene. Compost has been filled to top. Stock will be removed after graft has healed. Photos by author |
|
|
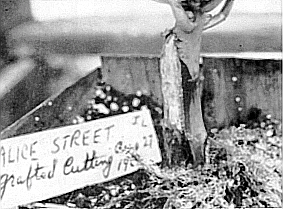
Fig. 15. Picture taken March 1964 of graft
previous August. Stub on stock on left, rooted grafted cutting on right. Note heavy root growth from scion on right. At this time stock had not been detached and was acting as a vigorous second root system. Soil washed away to expose roots. Photo by author |
Grafted Cuttings
This propagation method has one thing in common with layering described above. The scion receives nourishment from a stock plant in the interval before producing its own roots. I devised this technique several years ago. It has worked successfully on a number of hard to root rhododendrons. I have not read or heard of its use, but possibly it may have been used before.
The plant material is selected as described for "propagation from cutting" part 2 of this series. Cuttings should be left as long as possible when taken. Any excess can be removed later if necessary. The outline of this procedure is as follows (more details will follow later) : The side of the scion is grafted to the side of the stock plant. The bottom of the scion, below the grafted area, extends down into a peat compost, just as a normal cutting does. It is also wounded and treated with a strong rooting hormone. The stock plant soon starts to give nourishment through the grafted area to the scion or cutting, while rooting takes place later.
Refer to the photos. This will make the procedure much easier to follow. Both stock and scion should be approximately the same diameter, close to ¼ of an inch. If any variation exists, the stock should be the larger. Preparation of stock is as follows: First remove soil from top of pot or plant band for a depth of 1". If root growth is heavy in this area, wash away excess soil with hose. This soil will later be replaced with peat. Remove lower leaves, flush to stem, with a sharp razor blade for a distance of approximately 5". But, be sure adequate leaves are left on top or plant may die. Starting 1" above the original soil level, and continuing straight upwards for an additional 3", remove a uniform strip of bark. Expose no more than
3
/16" of an inch of wood, and cut no deeper than one quarter of the way into the stock.
The same length and width of bark must be then removed from the scion. Before proceeding however, position scion against the stock to be sure (after cut is made) bottom of cutting will extend into the peat to be added later. This is where the rooting eventually takes place. After removing bark from scion, wound at bottom for ½" on opposite side. Apply strong rooting hormone to this area only. Position scion against stock, aligning cambium layers for maximum contact, and bind together with a long rubber grafting band. Now refill pot or plant band with pre-dampened peat, and water. Cover completely with polyethylene and put under lights.
When union of graft is complete, and new top growth is evident on scion, top of stock can be removed. This is best done progressively in stages over several weeks. Rooting of scion takes considerably longer and varies with variety. Washing away soil at bottom of scion, after good top growth has occurred, will show progress of rooting. When rooting is well underway, plant should be repotted. When a good root ball has formed on scion, stock plant can be severed with sharp pruning knife or hack-saw blade.
Pre-grafted Cuttings
This is an unusual propagation method, yet it seems to work quite well in rooting certain varieties at most any time of the year. Quite recently, I discovered its value by accident. A grafted plant was broken below the graft. I then separated the scion from the stock by breaking it through the partly healed graft. It was then propagated as a cutting in the usual manner. I have tried only a limited number of these cuttings. Most seem to root quite readily. It is presented here, more as a matter of interest for the serious hobbyist to try if he so desires.
A number of the hard to root types, when taken as cuttings, never seem to callous properly. Leaves appear to yellow and fall off before moisture can be supplied from the lower stem. In these pre-grafted cuttings, this does not seem to occur. Possibly because the callous is well under way, and cell activity is quite active in the area where rooting will later take place. May I suggest to anyone attempting to try this method, use the "veneer graft" for the first step of the operation. It produces a cutting with a properly cut stem section. This graft is described in any good book on propagation principles and practices.
Hybridizing
To finally conclude this series, I would like to comment briefly on breeding and hybridizing. Due to the wide scope of this subject, the mechanics of crossing will not be discussed. This has been done before in this, and many other publications.
When looking for flower color, plant habit, or any one of many plant characteristics you might wish to improve, the following ideas are worth consideration.
Get to know the species as well as possible. Study their floral and plant characteristics. It is this knowledge that will enable you to form a goal for your hybridizing program. If two species have the plant features you would like to combine, stop before you proceed and check to see if this cross has been made before. The Royal Horticultural Society of Great Britain, publishers of the Rhododendron Handbook (part 2) lists hundreds of species crosses and their hybrid (group) names. David Leach's "Rhododendrons of the World" has also an excellent list.
If your intended crosses have been made before, obtain one of the hybrids if possible, and start from there. Try self pollinating! Many of the best results come from F2 or second generation crosses. Also try back crossing this hybrid with one of the species. Often from these seedlings will come the plant characteristics you have in mind.
Do not make too many crosses at one time. This will result in thousands of seeds. Only a small fraction could be brought to maturity. One of the foremost rhododendron breeders in the Pacific Northwest, and one who has a number of preliminary awards to his credit, told me he makes only a few selected crosses each year, but grows several hundred of each to maturity.
Good luck!