Leaf Bud Grafting
John G. Lofthouse, Vancouver, B.C.
If Tough To Root, or You Want Them Fast
Try this method
After many years of developing new rhododendron varieties, the following method has been very helpful in speeding these new hybrids to friends and the public.
Until the development of micro propagation on a larger scale, during the last decade, propagation by grafting, budding, layering and cuttings, have been the usual methods. Most propagators are familiar with rooting by cuttings. Fewer are familiar with the other techniques. Each method has certain advantages.
Combined Techniques.
The method described, is a combination of grafting and budding, and offers many advantages in propagation of "hard to root" varieties. It can also produce up to five or six times more than the cutting propagation method with the same quantities of available material. Of course, micro propagation, (meristem) will produce much more. But this method generally requires facilities not available or required by the average hobbyist.
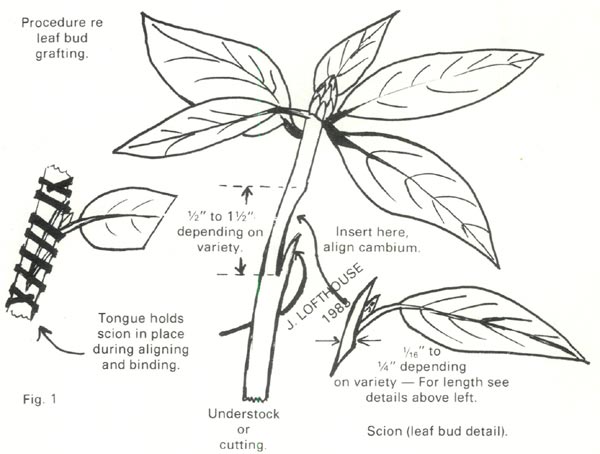
Procedure.
In the method described, a small piece of the stem, and attached leaf and bud, are inserted into the stem of the understock, or into the center portion of an easy to root cutting. The method should become quite clear if you refer to Figure 1. Chip, bud and leaf are cut from the desired variety and inserted in a rooted (generally vigorous) stock plant. Stock should be green and not too hard. " to ⅜" in diameter. Sap should be moving, such as late spring and early summer. Bud should be developing, possibly the size of a match head, and taken from a branch about " to " from the terminal rosette of leaves. When removing the chip, make the lower cut first. Cut down about ⅜" and ⅓ of the way in. Then take out the chip with a cut from above the bud and down to meet the lower incision made before. Use a very sharp blade and keep fingers and hand away from sharp edge. This method is usually much safer than ordinary grafting. The wood is soft and heavy cutting pressure is not required.
|
|
Note 1. If grafting on rooted understock similar to diagram above, remove terminal
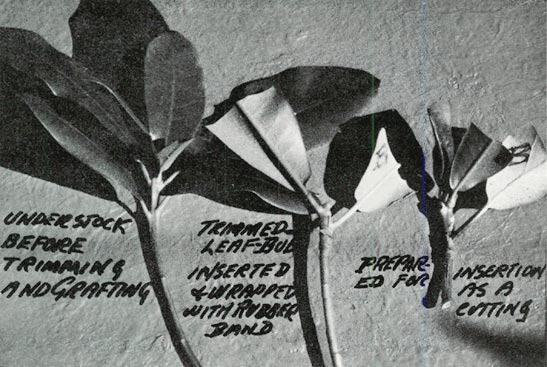
bud and the two leaves to the right. Shorten remaining leaves 50%, also leaf on bud graft. Note 2. If stock is to be rooted as a cutting, leave terminal bud on. Wound below wrapped graft. Apply rooting hormone and prepare in your usual way. Examinez photographs for details, see figures 2 and 3. |
Insert bud and align cambium. If cambiums cannot be aligned on both sides, be sure to align on one. As there is also cambium contact on the lower outside of leaf-bud scion. My failures have been very few. Use ⅛" wide, flexible rubber band, starting at the bottom and working upwards. See insert on wrapping in Fig. 1.
If done on rooted understock, place poly bag over top and leaf-bud graft. Close bag and tie to stem below the r ubber band. If understock is growing in container, don't bring bag down over the container. This high humidity area sometimes encourages main stem fungus damage at ground level. So leave compost in pot uncovered. Keep plant out of sun, but give plenty of light.
If inserting scion of leaf bud in a cutting to be placed in propagating bench, no poly covering is necessary. Wound and treat with rooting hormone as usual. Do not remove terminal buds of leaf bud grafted cuttings.
|
| Fig. 2 |
After Care.
This method encourages very fast cambium union. After three weeks, remove dormant or small growing buds in axis of leaves that were left at top. This encourages scion bud growth. It is not necessary to remove leaves. They will eventually drop off, but add to the plant's vigor at this stage. Any other buds should be removed after scion bud starts growing.
Comparison With Shield T. Budding
These methods require a T made into the stem, and the bark, rolled back so the bud can be inserted. This is quite hard to do with the average rhododendron. The bark does not peel easily, is time consuming and failure prone. Regular grafting, if done correctly (see articles by author re propagation in back issues and also tape slide presentation) can be quite satisfactory, but takes much more time. If care is not taken, finger and hand cuts can be inflicted.
Uses.
This is a simple method almost anyone can do quite easily. I guarantee you will find it most useful. Material collected in the spring can be propagated when other techniques usually fail. Big leaf and hard to root material can also be propagated this way.
If you develop a new hybrid, much more propagating material can be obtained at the start than when propagating by cuttings. This method, used to its best advantage, requires plenty of understock. I grow cuttings and seedlings of Calstocker and
R. calophytum
, etc. for understock. Try to use materials that do not sucker. These are grown from seed to ideal size for grafting in about 18 months. If you have no suitable understock, nurseries often have ideal sizes of Anna Rose Whitney or other plants recommended for your area. Sometimes these can be purchased quite reasonably. Possibly members of your chapter could supply you. Ask!
|
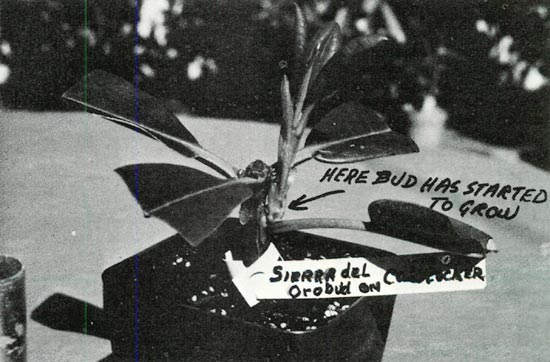
| Fig. 3 |
Summary.
The complete leaf-bud graft can be done in a very short time. Graft union, after consolidation, is very strong. Branches develop very fast, and first flowers usually appear in about two years. When used as a grafted cutting, roots often form at union, giving a dual root system.
By using this method, 1000 Butterflies was released to the public about three years from its introduction at the Vancouver A.R.S. Convention in 1979. We realize, micro propagation would be faster, but producing too many of a new variety is not always desirable. Also, it often involves losing control of your creations.