Rooting Stem Cuttings of Some Eastern Native Rhododendrons
Richard E. Bir
North Carolina State University
Fletcher, North Carolina
Introduction
Following my lecture at the May 1994 ARS Annual Convention in Asheville, the journal editor asked me to write an article on rooting native rhododendron cuttings. I was flattered. However, she had waited patiently during the question and answer session after my lecture so she must have known that folks in the audience obviously knew more than I.
Your first question in reading may be: Why Dick Bir? quickly followed by: Why natives? Perhaps the editor chose me because of where I live - in the Blue Ridge Mountains of North Carolina - and what I do - an Extension Nursery Crops Specialist with North Carolina University. That means we are often involved with developmental research in conjunction with nurserymen and basic researchers, bridging the gap between the lab and reality. Our work might be referred to as developing appropriate technology or practical answers.
Living in the southern Blue Ridge and working in the North Carolina Piedmont as well, I am privileged to travel in one of the most floristically diverse areas in the temperate world. Many of our local native plants may have commercial landscape potential, but practical ways to produce them for the landscape trade are just as important as trials to evaluate these plants. For nearly 16 years since coming to North Carolina from Extension work in Florida, I have had the privilege of working with some of the finest university researchers, nursery growers and knowledgeable plant enthusiasts anywhere trying to unlock some of these secrets. Honestly, we have just scratched the surface and haven't done anything remarkable, but I'm happy to share a little of what we have learned with fellow members of the American Rhododendron Society. It's basic stuff anyone could have done!
Rooting Cuttings
In my lectures, I emphasize that anytime we attempt to root stem cuttings we are trying to keep a plant part alive long enough for it to recover. To do this we alter certain environmental factors.
MOISTURE: When you sever a piece of stem from a bush or tree, you are removing that plant part from its most basic life support system. The process is similar to pruning. In most climates prunings die within a couple of days because they can no longer get what they need to survive. The reason they look wilted or dried up is that they are! Therefore, the first thing I suggest when taking cuttings of almost any plant is to take them early in the morning - when the leaves and stems are full of water and humidity is high. If the parent plant was wilted the day before, water it and then wait a day or two before taking cuttings.
|
|
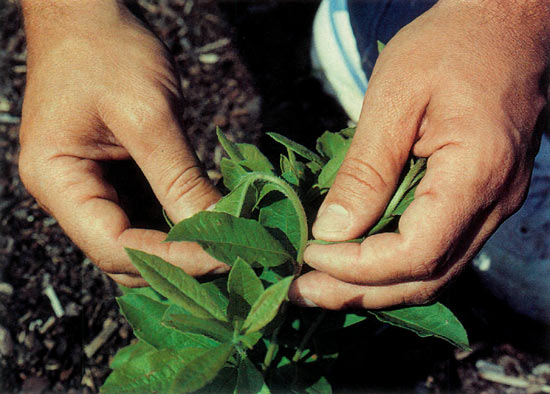
R. calendulaceum
, flame azalea, demonstrating the flexibility of
stem tissue when it is at the proper stage for softwood cuttings. Photo courtesy of Richard E. Bir |
If at all possible, take cuttings from healthy vigorous growth. Avoid weak stems as well as diseased and insect infested plant parts. For the native azaleas we've tried, softwood cuttings usually work best (see photo above). Little success exists for us with evergreen
Rhododendron catawbiense
or
R. maximum
, as my multiple failures from wild finds of white and blush pink flowering
R. catawbiense
will attest. For
R. minus
var.
minus
Carolinianum Group (formerly known as
R. carolinianum
), we've found that taking semi-hardwood cuttings of this lepidote in late summer or early fall yields the greatest success (see photo below).
Timing of cuttings as well as parent plant care before taking the cuttings is of utmost importance. Timing refers to the stage of growth and the condition of the tissue when you take cuttings, e.g., softwood, semi-hardwood or hardwood, but it also refers to the age of the plant and the time of day when you take cuttings. It is easier to root cuttings from young (juvenile) plants than from old ones and from young tissue such as root sprouts than from old woody branches.
Again, take cuttings in the morning while the dew is still on the foliage. Next, move your cuttings out of the sun and to somewhere both cool and humid. We put our cuttings in plastic bags and put them in a cooler with a little ice if the weather calls for it. If we're in the woods and cooler-less, wrapping cuttings in clean, moist fabric, paper or moss and placing the cuttings in a plastic bag in the backpack and out of the sun has worked. On a larger scale, i.e., when we must have enough cuttings for experiments with the many treatments, replicates, etc., needed to conduct statistical analysis of research on plants as genetically diverse as some of our native species (working with clones is often much easier), in order to keep them from drying out, we've thrown cuttings into dark colored trash bags with a few moist paper towels and kept the bags out of the sun until we got back to the research station. These efforts to preserve turgidity are often the difference between success and failure with native plants. The effort is worth it!
After cuttings are stuck, propagators usually go to elaborate means to provide high humidity such as plastic tents, intermittent mist with various controllers or fog. All of this is important; if you moisture stress native azalea cuttings the odds are against your successfully rooting them.
TEMPERATURE AND LIGHT: The rhododendrons we've investigated are not heat lovers during propagation. Fortunately, I live in a place where the temperature rarely rises above 85°F so intermittent mist or a plastic tent to maintain high humidity around cuttings is generally all we require as long as we keep the cuttings out of direct sunlight. Shading of 50-70% is effective at keeping heat from building too high if cuttings must be in the sun while rooting. This is plenty of light. Under plastic tents, place a thermometer inside the tent. If the temperature rises to near 100°F, vent to replace hot air with cooler air, mist leaves to cool them as well as increase humidity and close the plastic tent again. Proper placement of your propagation unit - which can be as simple as a pot with a plastic bag over it - removes the need for venting and rewetting to control heat.
Propagation literature refers to the benefits of bottom heat, i.e., keeping the propagation medium around 75°F during rooting. We've found that bottom heat is not needed under our conditions. Media temperatures are close to 75°F much of the time after we take softwood cuttings on native azaleas and in late summer when we take cuttings from our native lepidotes. Why go to a lot of trouble to add something you already have?
I mentioned earlier that 30-50% natural light (70-50% shade) is plenty. That figure refers to quantity of light. Duration, i.e., how long the days are or how short the nights are, is another factor we've played with but on which we have not conducted replicated research. Basically, we have two scenarios for native azaleas: 1) Take softwood cuttings when days are getting longer, i.e., late May or early June, and place them under artificially extended days (lights) while they are rooting. We're lucky in that we have built-in lights where I work. However, I've seen folks using 60-watt bulbs a foot above cuttings on a time clock set so that lights come on from 10 p.m. to 2 a.m. as well as folks who stick cuttings under 24-hour illumination with warm white or grow-light fluorescent bulbs. Both have been successful. The idea is to light the cuttings with short nights/long days until they have made enough food to force a new flush of growth and then harden them off for winter. 2) Root softwood cuttings but don't light them and don't disturb them by pulling them up to see if they are rooted or to repot them. Once cuttings are rooted, they are moved to a shaded area - lath shade for us - and allowed to go dormant normally that fall, then protected from winter cold either in an unheated, white plastic covered greenhouse or under mulch. Rooted cuttings are only repotted after they start to grow again the following spring.
NOTE: None of this manipulation applies to our native lepidotes. We stick the cuttings in late summer and pot them up the next spring, or whenever we have the time in the winter.
FERTILIZER: Parent plants from which cuttings are taken should receive balanced fertilization. I have not personally investigated the effects of high levels of fertilization on native azaleas and the resulting implications for greater or poorer rooting of cuttings. In general, I don't recommend high levels of fertilization on most natives, but some - not rhododendrons - respond in a remarkable fashion. We have observed that cuttings from stock beds or nursery grown plants, i.e., plants that have been receiving balanced nutrition and are less stressed by pests and drought, root a much higher percentages than cuttings collected from the wild. Does this surprise anyone?
Once cuttings are rooted, I generally don't fertilize them until after they have been repotted. With native azaleas grown under lights, a little nitrate fertilizer after they begin their new flush of growth is plenty. I avoid ammonia fertilizer in the fall on young, recently rooted plants. However, none of this is based on our research. It is based upon what others have found working on non-rhododendrons. So far, it works.
PREPARING CUTTINGS: Once we get them back to the research station, we prefer to prepare cuttings 4 to 6 inches long from terminal growth - no secondary cuttings from further down stems of vigorous growing shoots. On wild plants, cutting wood is often much shorter so we work with what we have but still make a fresh cut on the base of each stem. Out experience with native rhododendrons is that it doesn't seem to matter whether the cut is straight across or slanted or whether stems are wounded.
Rooting hormones like IBA, NAA and PITB have been reported to increase percentage rooting and the number of roots on cuttings of certain species. Our limited research has shown no benefit to treating native rhododendrons with anything besides IBA. Our basic rule of thumb is to use the lowest concentration of hormone that will achieve the greatest percentage rooting and number of roots statistically.
Rooting hormones will not overcome poor handling of cuttings. You must pay attention to timing, moisture and temperature, light, fertilizer and pests. If you pay attention to these, properly using hormones on freshly cut stems may increase your success. Our research has shown that 0.8% IBA (Hormodin No. 3) gave us the best results on flame azalea,
R. calendulaceum
, softwood cuttings and punctatum,
R. minus
var.
minus
Carolinianum Group, semi-hardwood cuttings. Since some of the IBA in talc formulations of hormones are becoming more and more difficult to find, you may wish to experiment with liquid formulations such as Dip and Grow, Wood's or C-mone. On other natives such as Carolina silverbell we've found that we get statistically the same results from 0.8% IBA talc as we do from 0.25% (2500 ppm) IBA liquid (C-mone diluted 1 part C-mone to 3 parts water or isopropyl alcohol) applied as a one-second quick dip. One-half to 1 inch of the base of the cutting should be treated. With cuttings taken from firmer wood a bit later in the season, we have had good response to increasing the IBA concentration to 5000 ppm with the liquid formulations but no benefit from higher concentrations. You may want to experiment with concentrations. Every situation is different. I'm just sharing what worked for us.
MEDIA: Cuttings should be stuck at least an inch deep if they are 4 to 6 inches long. Depth of sticking depends on the size of the cutting - shallower for shorter cuttings - and how open or well-drained the rooting medium is. Stick deeper in open, porous media and shallower in tighter more poorly drained media.
We prefer to use a well drained rooting medium with a significant organic component. In research, we have used perlite thoroughly mixed with an equal volume of Canadian sphagnum peat most often. However, screened (get out the big chunks) pine bark alone, mixed with sand or a combination of peat, pine bark and sand have all worked well for us at various times. Finally, we prefer to stick cuttings in flats or pots that contain at least 3 inches of rooting medium and prefer a depth of 4 inches. We do not stick the base of the cutting within 1 inch of the bottom of the rooting container since the propagation medium at the bottom of a container is frequently wetter than we like.
GENETIC DIVERSITY: Every seedling rhododendron is at least slightly different from every other seedling rhododendron. Differences can not always be easily seen, as they go beyond flower color or fragrance and leaf color or shape. One difference is how easily these cuttings may be rooted. For some, exactly the same treatments or minor variation in the conditions that were successful for us may be the key to success for you. Other plants simply may not root. Often it has been the most desirable plant that has proven the biggest challenge.
However, if you can successfully root and grow one cutting, percentages are in your favor if you take future cuttings from the plant that resulted from your single success. Why? Your new plant has been selected for its ability to root and is probably being grown under much better cultural conditions that the parent. Differences are particularly dramatic if you are able to root cuttings from mature old plants in the wild.
Summary
Southeastern U.S. native azaleas: Softwood cuttings rooted best when treated with 0.8% IBA in talc. Once rooted, these cuttings should not be disturbed until they have put on another flush of growth (under lights) or if unlit they should be allowed to go through normal winter dormancy, unfertilized but protected from winter cold, and transplanted only after they resume growth in spring. These techniques have worked well for flame, pinkshell and smooth azaleas,
R. calendulaceum
,
R. vaseyi
and
R. arborescens
. Stage of growth is not as critical with naturally suckering species such as dwarf and swamp azalea,
R. atlanticum
and
R. viscosum
, respectively.
|
|
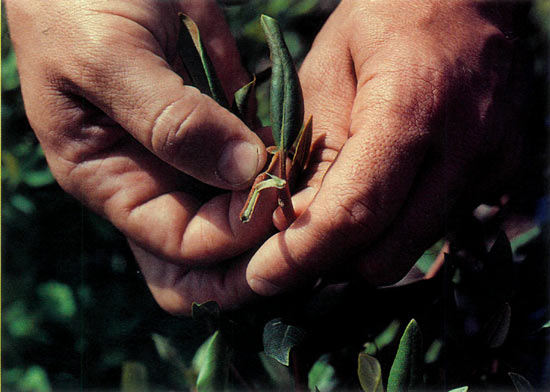
R. minus
var.
minus
Carolinianum Group, demonstrating the
proper stage of growth for a semi-hardwood cutting, i.e., when bent the stem snaps but a piece of bark remains attached. Photo courtesy of Richard E. Bir |
Evergreen Southeastern U.S. native rhododendrons: We have had too little success rooting
R. catawbiense
and
R. maximum
to suggest specific procedures. For the lepidotes,
R. minus
var.
minus
and
R. minus
var.
minus
Carolinianum Group, late summer semi-hardwood cuttings, i.e., those that snap but a little tissue adheres (see photo above), treated with 0.8% IBA talc or a one-second quick dip in 2500 ppm (0.25%) IBA in alcohol produced the best results.
Greatest success occurred rooting terminal cuttings from current season's growth. Lastly, proper handling of cuttings to reduce stress is of utmost importance.
Literature Cited
Bir, R.E. Identifying native azaleas. Carolina Gardener. 5(6): 18-21, 1993.
Bir, R.E. Growing and propagating showy native woody plants. University of North Carolina Press, Chapel Hill, N.C., 1992.
Bir, R.E. Native azaleas for wet places. Horticulture. LXX(5): 52-55,1992.
Bir, R.E. A practical approach to native plant production systems. Amer. Nurs. 166(11): 46-53, 1987.
Bir, R.E. Native plant production using a multidisciplinary approach. Amer. Nurs. 166(12) 74-83, 1987.
Shelton, J.E. and R.E Bir. Propagation of flame azalea from softwood cuttings. Proc. SNA Res. Conf.25:220-221,1980.
Richard E. Bir is an Extension Horticulture Specialist for Nursery Crops at the North Carolina Cooperative Extension Service, North Carolina State University.