Building Rhododendron Furniture
John Anderson
Enumclaw, Washington
The unique flowers and leaves of rhododendrons delight serious collectors and casual gardeners alike. But another intriguing feature of the genus is the branch structure. For forty years, the main set of gravel paths in The Anderson Garden has led visitors past blooms and foliage. Three years ago I created a network of interior trails under the large rhododendrons to highlight the trunks and branches. This year my fascination with these intricate plant frameworks took the form of building rhododendron furniture.
For a year I collected large prunings until I had what looked like a pile of antlers. I saved the most interesting contortions, leaving many of the forks uncut. Some pieces with heavy ends were obvious candidates for legs, while others had the smooth curves of arms. In the end, I used about one-fourth of the pieces in the first bench.
When the time came to begin construction, I built a template of scrap wood. Benches are like clothes - everybody needs a particular size for a comfortable fit. To achieve this, a few dimensions and angles are critical:
- Depth of seat from front to back
- Front and rear height of seat from ground
- Height of arms above seat
- Angle of seat to back
Less critical are the back height and seat width. Height of the back is primarily based on aesthetics once a basic minimum is reached. Bench width is based on how large and how many the people are who will sit in it. However, benches for more than two people are rather impersonal, since everyone is facing in a line staring ahead, as if waiting for a bus.
I built only a seat and back for the template. The seat had a frame of 2 x 4s at each side, with two in the middle separated by space of 1½ inches (3.75cm). A few pieces of fence board, running perpendicular to the 2 x 4s, held them together and formed the seating surface. I constructed the back similarly, except with 2 x 2s under the ends of the fence boards, with one in the middle. The middle 2 x 2 was about 4 inches (10cm) longer than the end pieces so it could fit between the middle 2 x 4s of the seat frame. One large screw through each set of 2 x 4s and 2 x 2 provided a hinged joint for trying various seat/back angles. Temporary braces on the sides held the seat and back rigid for sitting at the different angles. (You can also experiment with various curves on the seat and back for an even better fit.)
To try different bench heights and angles between the seat and ground, I set the unit on various blocks until it felt right and then measured the distance to the ground for the front and back legs. For my wife and me, the best dimensions for the seat were 17 inches (42.5cm) from front to back, with the front of the seat 14 inches (35cm) off the ground and the back of the seat 12 inches (30cm). Once you have a custom-fit template, build a copy out of the wood you would like for your bench. I chose 5/4 cedar decking, with a 2 x 4 and 2 x 2 cedar frame.
The real fun now begins with the placing of branches. You could build a seat/back out or rhododendron wood too, but I like the way smooth cedar sets off the curves of the other pieces. It is impossible to draw a plan for a rhododendron bench of this type. You create as you go. When my father designed The Anderson Garden, he drew detailed plans before planting the first rhododendron, but when he began an oil painting, he played with various colors and shapes until something began to emerge. When I fashioned the crooked branches of rhododendrons into furniture, I tried the numerous pieces in various positions until I saw something I liked and the piece grow.
There are three types of pieces you will need to attach to the seat/back: legs, arms, and braces. You might also want to add an aesthetic appendage. Keep in mind the triangle rule of strength for any irregular shape - that it should be attached in three (or more) places. The further from a straight line these points, the stronger the connection.
Begin with the legs. Choose branches that will be heavy enough to support the required weight and that will look proportional with arms and braces. The strongest bench has front legs that attach at the front of the seat and the top of the back. Curves show the lines of a rhododendron and add strength. Forks can be used as legs and braces simultaneously. Back legs can go right up the seat back. To fasten the rhododendron pieces to the frame and to each other, I drill pilot holes and countersink #10 deck screws of varying lengths.
Leave extra length on the branches until after attaching. The top can be trimmed later. Getting the bottoms of all the legs cut on the same plane to give the seat the right angle can be a little tricky. I took the template seat height measurements and marked them on the legs and then attached four temporary braces to mark what would become the plane of the ground. This enables me to mark two sides of each leg, establishing the correct cutting angle.
Once the leg bottoms are cut, you can fine-tune them by placing the bench on four blocks. Level the bench from side to side by removing one of the blocks. If it still doesn't level, remove the block from its diagonal. Measure the excess of these one or two legs and trim it off. This fine-tuning might not be necessary if your bench is placed on the ground, since it can be leveled with dirt or gravel. (We use cedar blocks under the legs to extend the life of the bench.)
Next come the braces. They can go anywhere for strength and appearance. They are strongest when they are not parallel or perpendicular to what they are bracing. At a minimum, the front, back, and legs should be braced. Braces of unusual shapes are strong and capture the lines of rhododendron structure. After the braces are installed, the bench is strong enough to sit in. It is time to fit the arms. Again, unique shapes are appropriate. You can test the height for comfort. Since the arms will need to support some weight, be sure to anchor them in three places. Forks work well for arms.
|
|
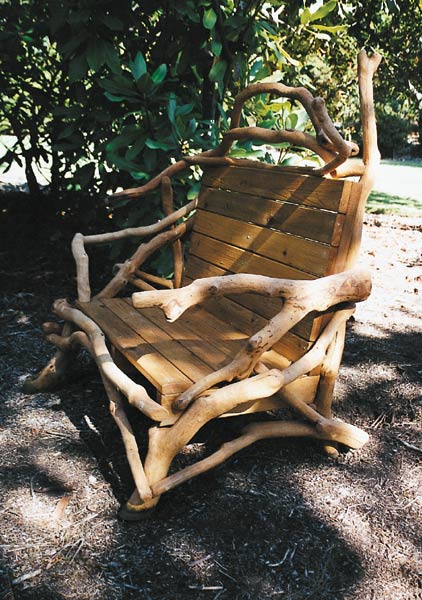
Rhododendron bench in the Anderson Garden,
Enumclaw, Washington. Photo by John Anderson |
Once the bench is assembled, it can be used as is or finished. I prefer a UV protective stain so that all this work doesn't deteriorate in a few years. For finishing, the bark should be removed. There are several ways to do this. I disassembled the bench and used a wood rasp and sandpaper. On others I have used a pressure washer, which is much faster but leaves the inner bark, which adheres quite well and can be stained. You can also use a sandblaster. Before staining, fill the countersunk screw holes and sand them smooth. We have twenty-three benches and chairs around the garden, but our custom-fit rhododendron bench and chair are by far the most comfortable of all.
The Anderson Garden was on tour during the 1993 and 1999 ARS Annual Convention.