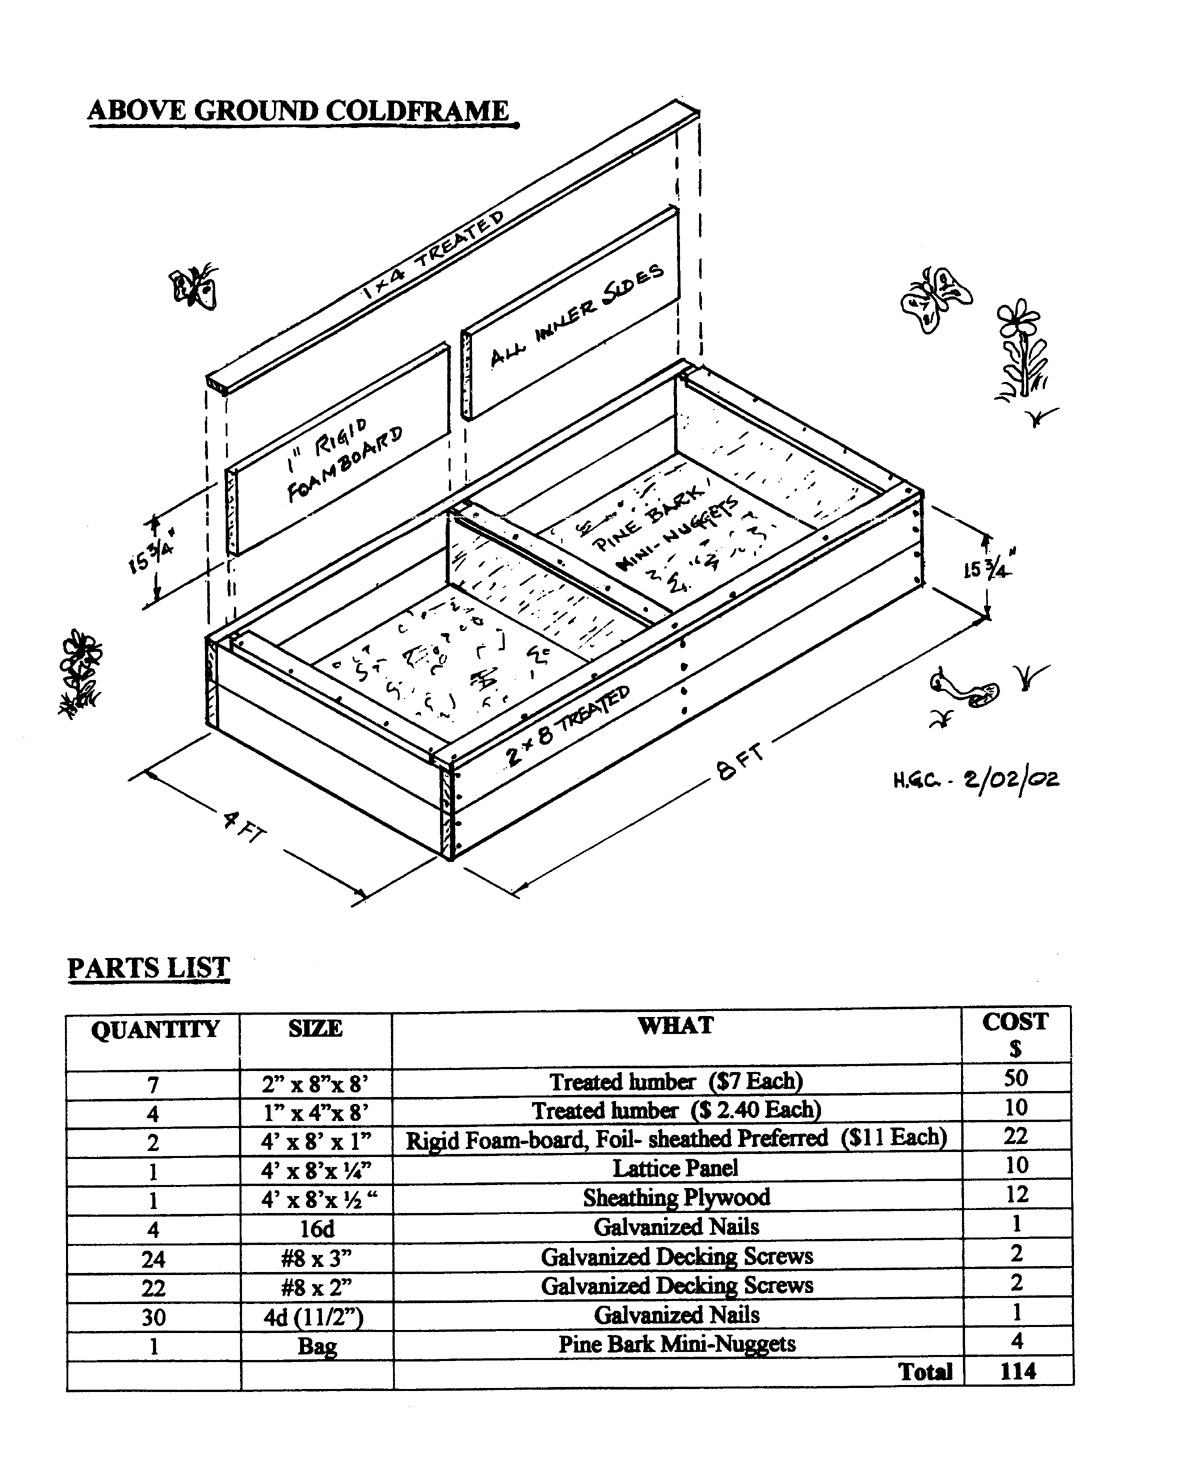
Gray's Way: Above-ground Cutting Frame
Gray Carter
Easton, Maryland
Reprinted from the Mason Dixon Chapter newsletter, Spring 2006
Have a need for a cutting frame but don't want to go out and dig that big hole in the ground? Here's a plan for an above-ground cold frame that is low-cost, easy to build, and can easily be moved to another location without hauling dirt to fill in.
My estimate is that once you have all the parts on hand, it will take you about a "good long afternoon" to put it together. I have assembled two without help, but it would be nice to have someone around when you are handling those long boards, or if you want to move the whole box over a bit. All the parts can be gotten at any good building supply house like Lowes or Home Depot, or that one a couple of miles down the road where that guy next door got all his house stuff. Get treated lumber and look for boards as aged and as straight as possible. This is not easy since everyone else there is trying to do the same thing; before aging, treated lumber is very heavy and subject to warping as it dries.
The foam-board should be rigid and, if possible, coated with foil on both faces. If you can't get this, take what you can get as long as it is rigid. Even if you don't have a truck, you can get all of the 8-foot boards in a small car if you make several trips and are careful with loading. To transport the sheets of foam-board, take a ruler, a felt tip pen, a 4-foot long piece straight board or a straight edge, and a sharp utility knife with you when you go to get it. On a flat surface on the store apron or in the parking lot, lay down the foam panel, mark it into 15 inch sections across the narrow width and cut them apart; you will need six sections from the first panel and two more from the second. If you are pressed for cash, you can probably get by with just the six sections from one panel by not putting the foam-board on the interior center walls; the ones I have built have foam-board on all sidewalls.
To set up, find a reasonably level place with some residual shade; mine are under a gigantic tulip poplar. If you have a choice, locate so it gets the minimum sun with maximum exposure to the north. Level off a place about 5 by 9 feet with a shovel and rake. If you have significant ground water runoff, let it slope an inch or two downhill. Give the spot a good spray of Round-up to kill the weeds and grass.
Cut three of the long boards in half (into two 4-foot pieces); be as accurate as possible to be sure all six pieces are the same length.
Attach one 4-footer to one 8-footer (look at sketch). It is helpful to have someone hold up the other end resting on a 4-foot piece; in any event you will have to support the other end. With a ⅛ inch drill bit, drill two holes in the end and attach with two of the 3-inch screws. Repeat this with other boards until you have a 4 x 8-foot frame. Find the center of the long side and install the 4-foot divider. Make two of these frames and stack them onto the prepared level spot, and then join them together using 16-penny galvanized nails driven in at an angle.
Next put on the 8-foot 1 x 4s across the top front and back, using 2-inch galvanized screws. Measure the length for the three short pieces of 1 x 4s, front to back, and screw on.
Next install the foam-board on the inside of the short sides and on the center board if you choose to use it there. If you are careful, you can probably fit these pieces tight enough so they stay in by themselves. If not, use a few #4 galvanized nails to secure them. Now cut the foam-board for the front and back to length and install them.
|
The cold frame is now ready for use. I would put about a 2-inch layer of mini pine bark nuggets on the bottom to raise the plants up a bit and to keep the inside a little cleaner. In the summer time, cover it with a sheet of lattice panel to reduce the sun exposure and to keep the little animals out. In the cold months (starting around Christmas until around April Fools Day) cover with something to keep the cold out; also it's not a bad idea to put in some mouse poison since to them it seems nice and cozy with plenty of good food. For several years I have used a sheet of inch sheathing plywood as a cover and this has worked out pretty well; the plants don't seem to mind the absence of light for these months. This winter I found a couple of 8-foot glass doors and I've used them to cover one of the cold frames; I won't know for a while if this is better. However, some people say that the glass should be coated with white paint and still have the lattice panel in place to reduce the sun in the cold months. I'm not sure I see a significant difference between a glass panel coated with white paint plus a lattice panel on top or a solid cover.
Gray Carter is a member of the Ben Morrison Chapter of the Azalea Society of America, a member of the ARS Potomac Valley Chapter, and an associate member of the ARS Mason Dixon Chapter ARS.