QBARS - v24n2 Fluorescent Light Bench for Growing Seedlings
A Fluorescent Light Bench for Growing Seedlings
Edwin C. Brockenbrough, M.D., Bellevue, Washington
Fluorescent lighting for plant growth has opened new opportunities for the home gardener interested in growing rhododendrons from seed. Many rhododendron enthusiasts are discouraged from this fascinating aspect of rhododendron culture because of the relatively long time it takes seedlings to bloom under natural conditions or because they lack facilities for growing and protecting the young plants. With the use of a simple fluorescent light bench these problems can be largely overcome. Three years growth can be telescoped into one and seedlings can be grown in one season to a point where they may be wintered outside with little or no protection. Moreover, plants can be grown in the corner of a basement or heated garage during the winter, taking up little space until they are ready to go outdoors in the late spring. Because the average home is dry and inhospitable to moisture-loving plants in the wintertime, provision must be made for maintaining a relatively humid atmosphere around the seedlings but still permitting some air circulation.

|

|
|---|
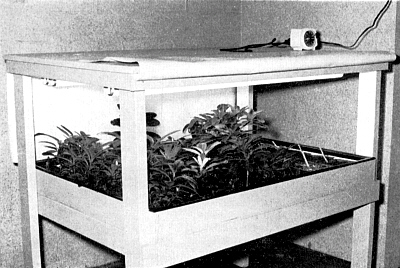
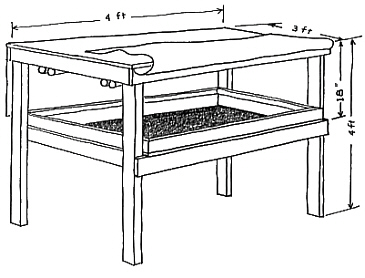
The plant bench illustrated here has been used successfully under home conditions, yet is easy to construct and relatively inexpensive. The lumber consists of one-half inch plywood (4' x 8' sheet), 2 x 4's, 1 x 4's, and several strips of molding. A pair of four-foot double fluorescent fixtures are mounted 18 inches above a 3 x 4 foot plant tray. The tray is lined with polyethylene (4 mils or thicker) which is secured by strips of molding fastened along the sides with brass screws. About one-half inch of pea gravel is placed on the bottom to provide both a water reservoir and large surface area for evaporation. Water should not cover the top of the gravel. The addition of white vinyl side curtains (the kind used for upholstery) helps maintain the humidity and also reflects light back on the plants. I leave the ends open for air circulation but in a very dry situation these might be covered as well. The inner surfaces of the frame are painted a flat white. A time clock is used to turn the lights on for about 18 hours out of the day.
I like to sow the seeds in October or November to get in as much growing time as possible before spring. Five inch plastic bedding trays are partially filled with milled sphagnum moss and thoroughly scalded with hot water to prevent the growth of algae on the surface. The seeds are then scattered over the moss and the tray is covered with thin polyethylene, tented over a plant label, and secured with a rubber band. After 4-6 weeks the covers are removed and the young seedlings hardened off for several more weeks. I use a hand sprayer several times a day during this period to keep them moist. At 8-10 weeks they are transplanted into additional plastic trays, 25 seedlings in each, filled with a commercially available peat vermiculite mixture. Watering is carried out with a rubber syringe spray as often as necessary to keep the surface of the planting mixture damp. This is daily at first but becomes less frequent as the plants grow and shade the surface. I use half-strength fish fertilizer in light applications every two or three weeks, beginning about two weeks after the first transplanting. Growth now begins to accelerate rapidly and the seedlings must be transplanted once or twice more before they go outdoors in the spring.
In June, when the normal daylight hours approximate the indoor lighting period, the plants are moved outside to a shady location. After a period of adjustment to the new conditions they are transplanted into flats. By September most of the seedlings will approximate the size of one year old cutting-grown plants and can be wintered outdoors without special protection.
Using this system I have quite a few plants which set flower buds during the second year. I expect that the majority will bloom at three and four years, however, or much the same as cutting-grown plants.

