QBARS - v30n1 Build Your Own Mist Control
Build Your Own Mist Control
Warren Berg, Kent, Washington
Instructions for building this balance screen mist control were presented to the
Breeders Roundtable at the 1975 Annual Meeting.

|

|
| List of Materials | Detail # | Quant |
| Housing Support Structure 3/16 x 6 x 14 | ||
| Plexiglas - Heat Formed or Glued with | 1 | 1 |
| Acrylic Adhesive (Cadillac Plastics SC-94) | ||
| Support Block 3/16 x 3/8 x 1¼ | ||
| Plexiglas - Glued with Acrylic Adhesive | 2 | 2 |
| Switch Assembly | ||
| Support Beam Plexiglas 3/16 x 1/2 x 3 ¾ | 3 | 1 |
| Solder-less Spring Terminal | 4 | 1 |
| Radio Shack # 270-1547 | 5 | 2 |
| Magnetic Reed Switch (1 INCH) | ||
| One Amp Radio Shack # 275-026 | 6 | 1 |
| Balance Bar Assembly | ||
| Balance Bar Plexiglas 3/16 x 5/8 x 10 | 7 | 1 |
| Stainless Steel Screen 3 5/8 x 5 3/4 | 8 | 1 |
| 24 or 32 Mesh | 9 | 1 |
| Fulcrum Cross Bar 3/16 x 5/8 x 3 5/8 | ||
| Plexiglas Glued with Acrylic Adhesive | 10 | 1 |
| Cross Bar Stiffener 3/16 x 1//2 x 1/2 | ||
| Plexiglas Glued with Acrylic Adhesive | 11 | 2 |
| Rectangular Ceramic Magnet 1/8 x ¾ x 1 | ||
| Radio Shack # 64-1875 | 12 | 2 |
| Nut and Bolt 4-40 x 3 /4 Stove Bolt | ||
| ¾ Hex Nut | 13 | 1 |
| Washer 3/8 Diameter | ||
| Balance Bar Stop 3/1 x ½ x 3¾ | 14 | 2 |
| Plexiglas Glued with Acrylic Adhesive | 15 | 1 |
| Balance Beam Plexiglas 3/16 x 1¼ x 3¾ | 16 | 1 |
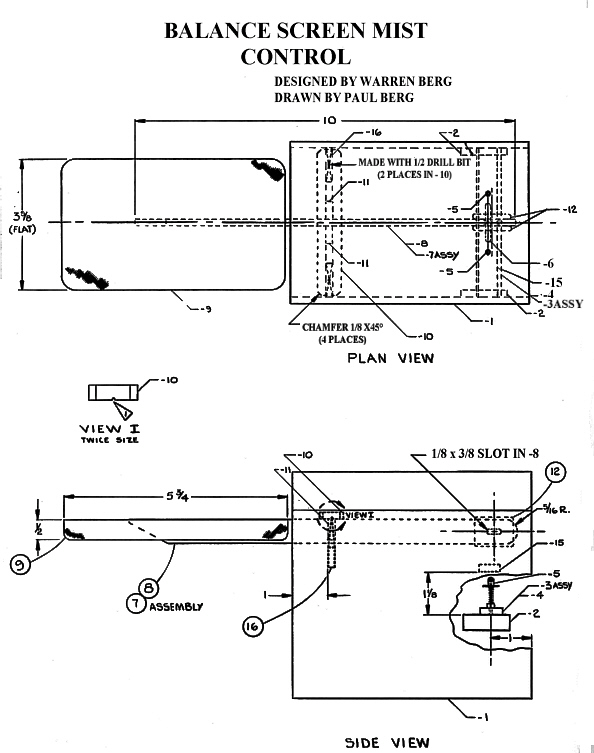
Because of the many requests for information on building a dependable control for mist propagation, I would like to pass on the plans, with a few pointers on its construction and use. The balance screen controls the mist according to the rate of evaporation, automatically adjusting for day, night, direct sun or clouds. It requires no maintenance and is fairly simple and inexpensive to build.
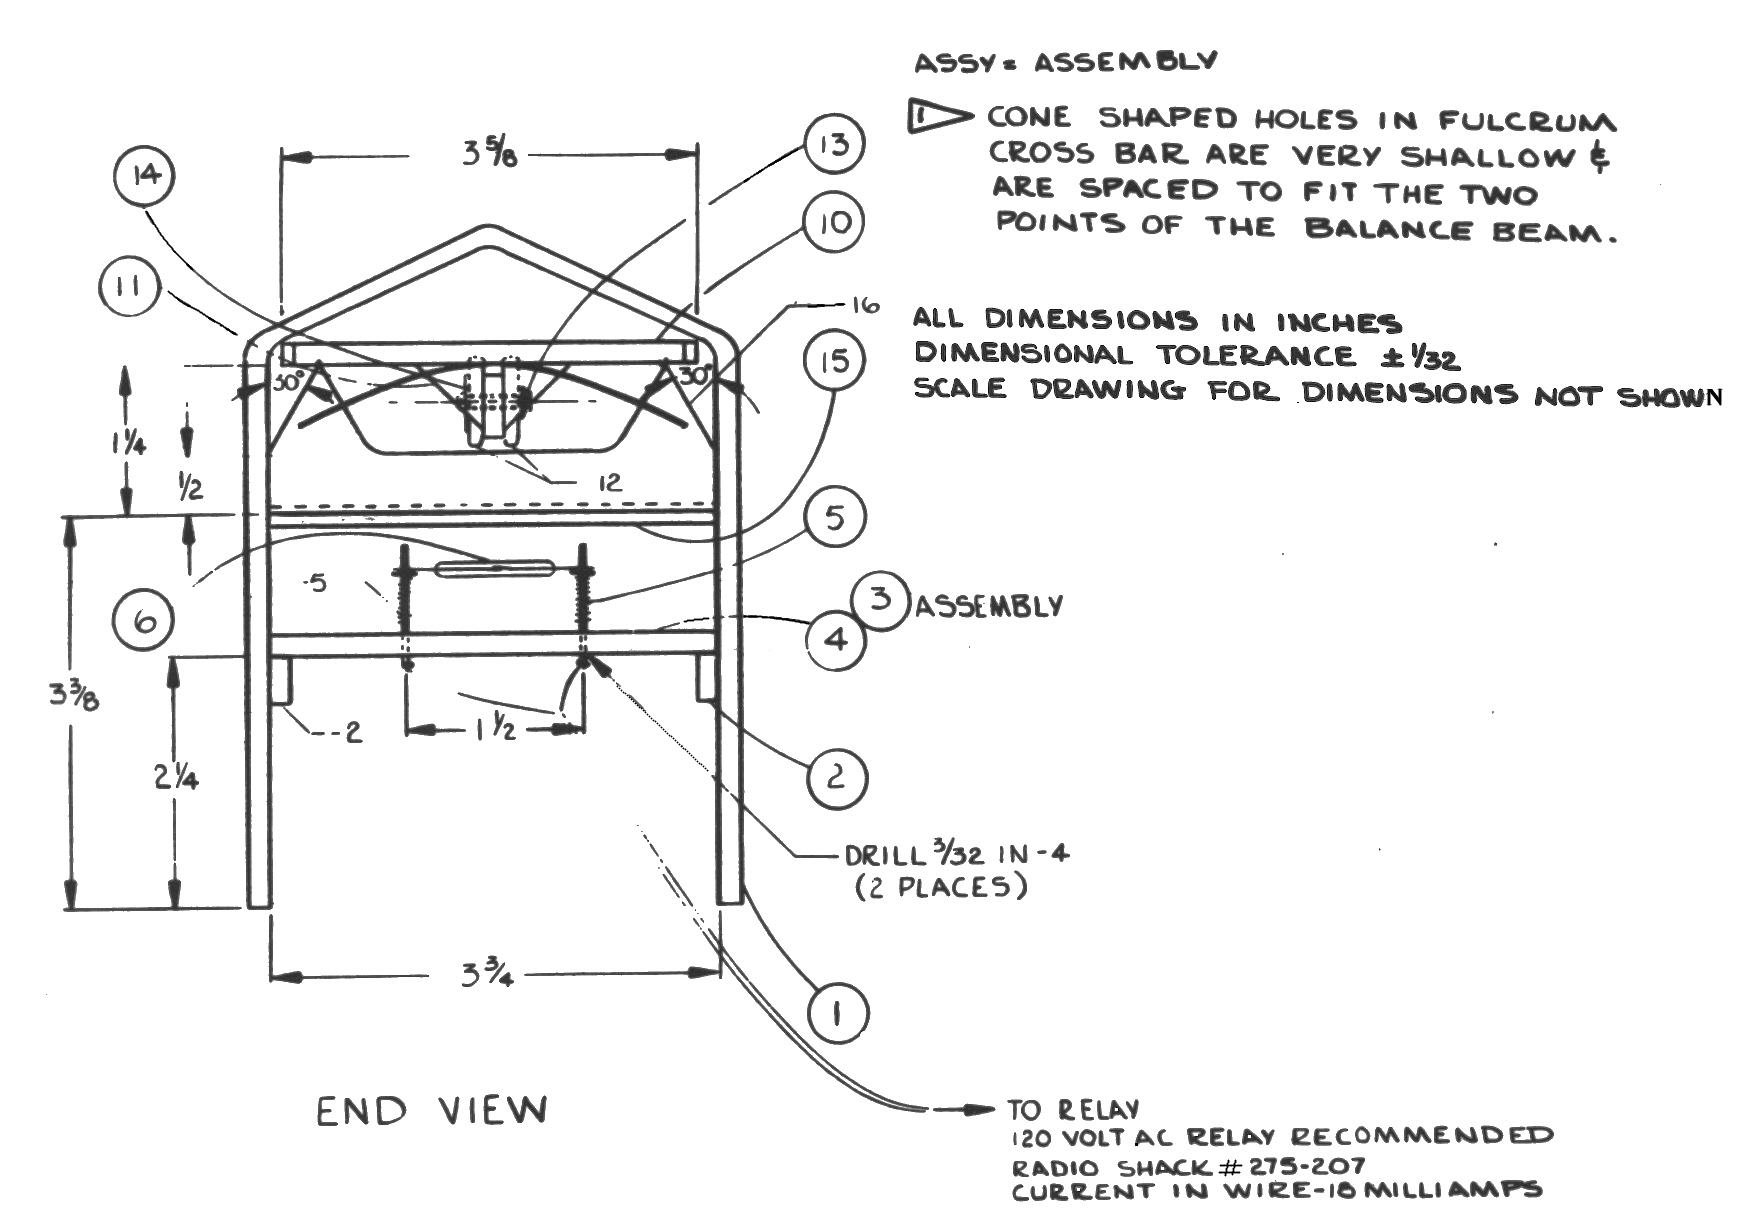
Start with a flat piece of 3/16th inch Plexiglas cut 6 x 14 inches. Mark three lines (2 inches each side of center) where it is to be bent. Heat the Plexiglas at these three points with a heat tape or any heat source no more than ½ inch wide. It will bend easily when it is the right temperature. Use 24 or 32 mesh stainless steel screen. Position the screen on balance bar (part #8) so that it is slightly higher than the magnetic end when dry. Epoxy cement may be used to fasten screen in place.
After installation of assembled balance bar, place the switch assembly directly below the ceramic magnets so that the balance screen moves approximately the same distance above the horizontal, as below, in order to open and close the switch. Listen carefully for the click of the switch, or use an ohm-voltmeter.
IMPORTANT Do not cement switch support beam (part #4) in place. It should fit snugly to slide in and out on support blocks (parts #2). The 1½ inch separation between the solder-less spring terminals may be changed, depending on the wire to relay fastens on the bottom of the terminals as shown. Install part #15 last, just above the switch. If necessary, cement a small plastic block under the inside peak of housing, to keep the balance screen from going any lower than is necessary to close the switch. In other words, the up and down movement of the balance bar should be only enough to open and close the switch.
It is undoubtedly safer if you run low voltage through the control switch. For this purpose a used furnace transformer relay may be obtained at very little cost. Also a old washing machine solenoid valve works well to control the water supply.
Adjust the mist cycle by moving magnets either fore or aft. Moving aft, shortens cycle. Position of unit in the bench will also affect the cycle.
Stainless screen may be attained from B. Swenson, 2450 24th Ave. West Seattle, Wash. 98199. They are $1.50 each. Heat tape is available from any Cadillac plastic dealer.
