JARS v39n1 - Are You Interested In Growing Rhododendrons And Azaleas From Seed?
Are You Interested In Growing Rhododendrons And Azaleas From Seed?
The following eight articles describe many different methods. Some of these are for large scale efforts, and some are for kitchen table hobbyists. Some presentations address only germinating the seed, while others also detail the after care. Anyone interested in growing rhododendrons and azaleas from seed should be able to find a method and / or technique among the following ideas to fit his or her individual needs.
Rhododendrons From Seed
George W. Clarke, Portland, OR
The fine indoor sport of germinating rhododendron seed and sending them on their way to mature plants can be both rewarding and aggravating, complex and simple. Though the methods used here on the West Coast may differ somewhat from those used in other parts of the country, cleanliness and simple attention to details are still the basic watchword. Much has been written on this subject during the past few years, but for the benefit of the newcomers or those wishing to try their hand for the first time, a brief resume may be in order.
The seed boxes most often used here are the simple refrigerator food containers; square opaque, with a tightly fitting lid. A container 4" x 4" x 2½ seems to hold all of the seed of one variety that most of us care to raise. The most trouble free germinating medium consists of milled sphagnum moss. This material is already quite clean so it is only necessary then to see that the containers are sterile. If they have been used before, soap and water followed by a dip in a strong solution of chlorine bleach is usually all that is needed.
The milled sphagnum moss from the sack is quite dry so that it is well to prepare a suitable amount by soaking for an hour or so in a bucket of lukewarm water. After wringing out the excess water, the moss is placed in the container and gently firmed so that it leaves about ½" space at the top.
Sowing the seed is simply a matter of dropping the seed evenly on the surface of the damp moss. Do not attempt to cover the seed. Nature doesn't, neither should we. Put on the container lid, making certain that it fits tightly, and the job is done. During the period of germination, usually 3 to 6 weeks, and with the lid tightly in place, there will be no need for supplemental watering.
As the seedlings develop, the lid must be opened a bit and air allowed inside so that the young plants may gradually become accustomed to their eventual environment. Usually by the sixth week the lid can be removed completely. Watering, of course, will now be needed as the drying effect of the air begins. Do not water from above. The water droplets or spray will beat the little seedlings down, and this will end them. A sharp ice pick can be used to put holes in the corners of the plastic containers, one near the bottom and another an inch or so higher. Then, setting the seed containers in a couple of inches of water will allow the water to rise slowly inside and irrigate the little fellows without harm. Excess water should be drained off.
From the time of sowing to their eventual transplanting out of doors, artificial lighting can be beneficial in stimulating their growth. Wide spectrum, fluorescent tubes seem to be the least troublesome. Before germination occurs, the containers can be kept some 24 inches from the light source. After germination and removal of the lids, they can slowly be moved closer. Twelve inches seems about right.
After the seedlings have gained their second set of leaves and some degree of hardiness (usually in two months or so) they should be pricked out and transplanted into a larger container filled with a peat moss mixture of a moderate grind. After another couple of months, a third transplanting is usually in order and preparations can then be made for the move outside. This should first be to a very protected and very shady spot. Later, the young plants can be moved gradually to a place with greater light intensity. This, then is the end of the beginning.
A brief word about problems. Benlate, Captan, and Dexon, when used as directed on their containers seem to offer protection against early mortality. After removal of the lid and exposure to the air, it's a good idea, if possible, to keep the air moving. A low-speed air flow is desirable.
Good luck!
From Seed to Seedlings to Who Knows What
Ed Brown, Lakeville, Massachusetts
Reprinted from Massachusetts Newsletter "The Rosebay"
Raising rhododendrons from seed can be an interesting and rewarding adventure. To begin, in the spring you can hybridize your own favorite plants, or let Mother Nature take her own way.
After the first frost in the fall, you should harvest your seed capsules. Put each capsule, or all the capsules from each cross, in an envelope, marking clearly either the cross you made or the plant from which you have taken the open-pollinated capsules. Store these envelopes in some convenient place in the house to dry for approximately a month. By this time, the capsules probably will have started to split, releasing some of the seeds into the envelope. Complete this process now, by breaking open the capsules with a small pair of tweezers or pliers, shaking the capsule to release all the seeds.
Now we must think about providing an environment in which these seeds will germinate. The medium on which I sow my seeds consists of three ingredients. These are: a good grade of peat moss, perlite, and milled sphagnum moss. Mix equal parts of these ingredients together. Then fill trays, flower pots or (as I use) tomato boxes, to a minimum depth of 2½ inches of this material. Set the containers in a tray and water them in from the bottom; this might take a 24-hour period, for all of the medium to become moist, but not soaking wet. Finally sprinkle about ⅛ inch of milled sphagnum moss on top of each container, and water it in from above. Now you are ready to sow your seeds. Sprinkle the seed of each variety over an individual container; make sure to write out a label giving the name of the parent or the cross, and place it in the pot.
You are now ready to place the containers in an environment which will hold the humidity while the seeds germinate. Light and heat will also be needed. The way we provide all three of these elements is to build a wooden box approximately 2 feet wide by 4 feet long, with stainless steel hoops, over which poly film is pulled. Attached to the hoops is a shop light with two 40-watt fluorescent tubes. This set up provides space for 24 tomato boxes of seed. Place your seed containers under the lights, close the poly film, and turn the lights on.
Until germination it is wise to leave the lights on 24 hours a day. The heat from the transformer in the light fixture helps maintain the temperature needed in the box; the temperature should be between 70° and 80°F. The poly film maintains the humidity, which should be 50% or better. Germination should start taking place in as little as two weeks, but it will more likely be between three and seven weeks before some of the slower seeds germinate. After eight weeks, you should cut the lights back to 13 hours per day, but keep humidity and heating conditions the same as before.
After your seedlings have formed their second set of leaves, you may start fertilizing with a dilute solution of liquid fertilizer. I use Miracid (30-10-10) fertilizer, diluted at one-third the regular strength, every two weeks for the next two months.
At this time, you may transplant the seedlings into individual pots or flats, spacing them one inch apart. Grow them on until late spring, at which time you can plant them outside in raised beds to grow on into who knows what?
Germinating Rhododendron And Azalea Seed
Gary Webb, Fonthell, Ontario
Reprinted from Bulletin Rhododendron Society of Canada
Rhododendron and azalea seeds germinate easily. Their simple requirements can be met in many ways and the choice depends on the time and/or money the prospective grower wishes to invest.
For example, this genus' seeds can be germinated at any time during the winter or spring. Sowing in November or December allows two years' growth in one (the plants go through their "second year's growth" the following spring). However, if the propagator lacks the time, facilities, or indoor gardening experience to care for the seedlings over the winter, the seed can be sown in late winter or early spring to minimize the seedlings' time indoors. Either method produces new plants; the choice depends upon the grower's preference.
Seedbed preparation and sowing are quite straight forward. For each batch of seed, a 4" pot is filled to within 1" of its top with a 50/50 peat/perlite mix. The remaining inch is filled with milled sphagnum moss. This seedbed is then sterilized by gently running boiling water through it. After 24 hours, the seeds are sprinkled over the surface of the moss, and a label bearing the parents' names, seed source, and date of sowing is attached to the pot.
The seedbed should be kept at 70°F. Placing the pots on a propagating bench with a thermostatically controlled heating cable in it will maintain this temperature exactly. However, the Canadian home's average winter temperatures (65°F to 75°F) are adequate for germination, so such special measures are not necessary.
On the other hand, the Canadian home's winter atmosphere, dried by the heating process, cannot provide the high relative humidity required to germinate rhodo and azalea seeds. Installing automatic misting systems or building Wardian cases (miniature greenhouses) to house the seedbeds are costly and time-consuming solutions. A much simpler approach is to cover each pot with a piece of glass or clear plastic; to remove excess humidity (Indicated by condensation) which could lead to damping off, the covering should be turned over daily or positioned to leave ¼" spaces at two opposite edges of the pot to allow air movement (if the seedbed begins to dry out, it should be watered by gentle misting so the seeds are not disturbed). To avoid heat build up, the covered pots should be kept away from direct sunlight and the heat of lighting fixtures.
Although germination requires only low light levels, obtaining good seedling growth indoors during winter necessitates artificial lighting. "Cool white" fluorescent tubes 12 to 16" above the medium's surface, turned on for 14 to 16 hours a day, are adequate for this purpose.
Germinations occurs 15 to 30 days after sowing. From this point on, standard indoor gardening techniques, proper hardening off, and protection during the first winter out doors will produce plants the grower can be proud of.
Propagating From Seed
Marie Tietjens, Blue Bill, PA
I take a clear plastic container about shoe box size and put some moistened fine milled sphagnum moss into it. I then put in plastic dividers so that I have about four different sections. I sow the seed on top of the sphagnum moss with labels in each section. I put the lid on but do not make any holes in the bottom of the container. I leave the container in the cellar for about two or three weeks in the dark. I then bring the container upstairs to my all purpose room which has a northern exposure and put the container on the window sill indoors. The seeds will make growth slowly. I do not water at all while the lid is on. When the seedlings reach the top of the lid, I remove the lid and water as necessary. Around May, June or July, I transplant these seedlings into peat pots or plastic or clay pots and put them into the cold frame. The medium I use is a mixture of soil, peat moss and sand. I cover the cold frame by a screen to keep out debris such as pine cones, leaves, etc. The seedlings must be watered. Sometime in December, after a hard freeze, I cover the cold frame with a heavy black plastic cover. The cover remains on until all danger of frost is past. No watering is necessary until the plants are uncovered in the spring. After the plants have made sufficient growth, they are moved to another bed, more exposed, but still protected by overhead slats. The plants remain here for a year or two and are then moved into the garden permanently, or into the nursery bed. This past spring, for the first time, I encountered the worst possible disaster. When I uncovered the cold frame, I was horrified to see that all but ten of approximately 250 seedlings were drowned out from the unusually heavy rains we had. These seedlings were special. They were from seed Lanny Pride had sent to me. After swallowing hard, I gathered up the surviving seedlings and transplanted them into the other bed with jars over top for protection. Hopefully, these will survive and become really, really exceptional.
Growing Rhododendrons From Seed
Jonathan Shaw, Newton, Massachusetts
Reprinted from Massachusetts Newsletter "The Rosebay"
An article in the October 1973 issue of the Quarterly Bulletin of the American Rhododendron Society concerning a modern method of growing rhododendron from seed was of especial interest to me, as I, too, have been growing such seed for the past six or seven years. While I cannot claim any innovations in the germination of seed, I thought it might be of interest to record my own method. I believe I have found a simple, useful method of growing on seedlings from the first transplanting.
SEEDS: I suggest that you use seed from your own crosses. Experience reveals that such seed has greater vigor. I commence my seed January 1, or even as early as October 1, hence the seed is fresher. Perhaps that is the reason seed that arrives from the A.R.S. Seed Exchange in March or April, in my hands, germinates less well. In addition, I prefer to sow a greater amount of a cross than is available in a packet received from the Exchange.
I recommend two or three hundred seeds as a minimum. Perhaps a third of these will not germinate at all, or will be weak, small seedlings that will not transplant successfully. Perhaps another third will die during the first winter outdoors. Others will succumb in later years. The result may be that fifty or fewer plants will be brought to blooming age. The January 1 date is a good one in that it allows plenty of time for growing to a reasonable size prior to transplanting the seedlings.
MEDIUM: I use European peat moss (any will do, however) which I wet by throwing it into a bucket half filled with water. I scoop out the resulting "peat soup" and place it in 6 x 8 inch flats, smoothing the mixture by patting it gently. Avoid squeezing, as the air left in the mixture is important to the seedlings.
The flats are filled to about one inch of the top, and over the peat moss I place a one inch layer of "No Damp", a commercial brand of sphagnum peat moss. Apparently milled sphagnum is more resistant to fungus and mold than ordinary peat. The seeds are scattered on the top of this layer, trying to obtain a spacing of one-eighth of an inch or more between the seeds. Finally, I dust a layer of milled sphagnum on top of the seeds. This is easily done if one uses a sieve from about a one foot height. A pane of glass is now placed on the flat and it is moved to a window. The window I use gets about two hours of sun in the late afternoon. Sunlight appears to kill mold, and I consider some sun essential.
The medium is carefully watched for mold, and if it appears the glass is removed for a day or so. It is also necessary to mist the medium every day or so. This, too, seems to prevent the growth of mold. As the seeds germinate, the edges of the glass are lifted with matchsticks so that air gets at the seedlings and they become accustomed to lower humidity. Finally, the glass is entirely removed.
SEEDLINGS: A careful watch of the flats is now necessary, lest they dry out. It is necessary to mist them every day or two, and to water the flats when they seem dry. My method is to take them to the sink and let them float until almost submerged. I then drain them by tipping. After the seedlings have been up about one month, I fertilize with a fish type fertilizer, which I mix in a watering pan as described above. From then on, this is done every other watering.
I have begun to experiment with fluorescent lights. My experience so far suggests that although this produces excellent growth, the seedlings are sensitive to sunlight and are not as tough as seedlings which have not had artificial light.
TRANSPLANTING: About May 15 I transplant the seedlings directly into outside beds. As far as I know, this is not the usual and accepted practice. I use beds made out of 1 x 6 inch redwood set edgewise on the surface of the ground, and about three feet on a side. The exact size is chosen to hold an old window screen to be placed on top of the bed. Inside the bed, the ground is covered with three inches of peat moss, which is mixed into the soil. The result is a bed slightly raised above surrounding soil, to provide drainage. The seedlings are inserted two inches apart, and the screen is placed on top of the bed. The screen is absolutely necessary, as it breaks the force of strong rains, provides shade and blocks the wind. When the seedlings are first transplanted, even the screen does not provide sufficient shade. Therefore, on top of the screen I scatter pine needles, dense enough so that almost no direct sun falls on the seedlings. These needles are gradually removed, beginning in a week or two. In September, the screen itself is removed, so that the seedlings can harden off. The seedlings require frequent watering during the entire summer, and this is done through the screen. In November, pine or juniper boughs are placed over the seedlings, enough to cover them, but not so thick as to smother them.
In April of the following year I remove the boughs, but do not replace the screen. Perhaps 20% to 50% of the seedlings will have died during the winter, or will die within the month, but the remaining seedlings are very tough. It may be of interest to know that my beds get about two-thirds sun during the middle of the summer, with shade only in the late afternoon and morning. Also, my beds are on Cape Cod, a climate suitable for growing rhododendrons. Perhaps the method described would not be suitable for a more severe climate.
I have tried in the past to keep seedlings in flats, and store the flats in the shed in the winter. The losses were virtually total, and were probably the result of drying out, both in winter and summer.
I can however, offer a final recommendation: experiment and find something that works for you. I am convinced that many conditions not mentioned in an article of this type (kinds of soil, micro-climate, special idiosyncrasies of the grower) all have a strong bearing as to whether suggestions such as mentioned in this article succeed. Other hazards, such as children and dogs, take an equally high toll! Nonetheless, persevere, and, as one famous English rhododendron enthusiast suggested, "When you see your own crosses blooming for the first time, you will have had six years of happy waiting and only one day of disappointment!".
Raising Rhododendrons from Seed
Michael J. Zimmerman, Bellevue, WA
It is reported that only 15% of our ARS membership raise Rhododendrons from seed or at least order seed from the seed exchange. I am sure that these 750 people find as I have that raising seedlings to blooming stage is a most rewarding experience. My interest in writing this article is to encourage others to try it too. What follows is a step-by-step description of the growing methods I have used over the last ten years.
SEED
Your primary seed source is the ARS Seed Exchange. The Seed Exchange is an incredibly valuable source of species and hybrid seed. Second, ask someone in your Chapter whom you know raises seedlings if they have some spare seed. Those of us who grow from seed usually have extra seed packets tucked away in the refrigerator. Chances are you will get good seed that is the result of hand pollination. As a last resort you can get open pollinated (i.e., the bees did it!) seed from your own or friends' plants if all have not been deadheaded. I don't recommend this though because you have little or no idea what you are going to get in the way of bloom or plant habit in the years ahead. My own beginning was with open pollinated seed from some of my parent's
R. decorum
plants and from a University of Washington Arboretum plant of Fortorb (
R. fortunei
x
R. orbiculare
). The result is that I have 50 or so plants of good foliage, but undistinguished bloom.
PLANTING MEDIUM
A 50/50 mixture of Sphagnum 'No Damp-off' peat and perlite has given the best results. This mixture is coarse, retains moisture and resists fungus development. Dampen the dry mixture with warm water and then squeeze it with your clean hands to assure that it is moisture saturated. You will be amazed at how much water peat can hold!
PLANTING CONTAINERS
The regular 11" x 21" x 3" nursery flats have worked well for me. Plastic refrigerator containers are also good. Be sure to clean the container thoroughly to prevent later development of seedling killing fungus.
PLANTING
Fill the container with the peat/perlite mix to within an inch of the edge. Smooth the surface with your hand, but do not press down or compact the mix. It should be light and airy to allow development of the fine roots. Next, sprinkle the seed gently and evenly on the surface. Use a hand mister to settle the seed into the peat. Stretch Saran Wrap tautly over the container and tape it to the sides. Finally, attach a label to the container giving the name, date and source of the seed.
GERMINATION
Seed germinates best at a temperature of 68-72 degrees coupled with high humidity and the seed should sprout within a week or two after sowing. Should you notice a white spider web-like fungus appear on the surface of the mix, hand spray it with a solution of Benomyl and water. It will soon disappear. When the first true leaves appear, you can gradually reduce the humidity in the container by poking increasing numbers of holes in the Saran Wrap with an ice pick. After two sets of leaves have developed remove the cover since you are now ready to transplant the young seedlings.
FIRST TRANSPLANTING
For this stage of seedling development you will be "pricking out" the seedlings individually and transplanting them to a new container. My preference is to use two standard 11" x 21" x 3" flats, one with drainage holes containing the planting mix placed inside a flat without holes. An alternative is to use flats that consist of a number of individual compartments for each of the seedlings. It has been my experience, however, that these compartments retain too much water in the mix, thus restricting oxygen and hence good root development.
For the planting mix this time you can continue to use the 'No Damp-off' peat and perlite or change to normal sphagnum peat, which is much less expensive, and mix 50/50 with perlite. Some East Coast friends successfully use fine grind pine bark at this stage.
After you have put your moist planting mix in the flat you are now ready to begin transplanting.
1. With a pencil, dibble a hole in the mix wide and deep enough to receive the roots of the seedling. The holes can be spaced about two inches apart.
2. Using a toothpick, gently tease and lift the seedling out of the soil and apart from the roots of the other seedlings.
3. Place the seedling roots and stem deep in the planting hole. Gently firm the soil to anchor the seedling.
4. After filling the flat with seedlings (one flat can hold up to 66 seedlings!), use a hand sprayer to individually water the seedlings and further anchor them in the soil.
5. Place Saran Wrap over the flat, pull taut and tape to the sides. This is an important step to provide continued humidity and ease transplant shock.
6. Again, attach a label to the container giving name, date and source of seed.
7. After one week, remove cover and you are ready to grow seedlings on.
GROWING ON - THE POLYTHENE TENT
For those of you who have greenhouses, we without one envy you, because you have an ideal environment in which to grow the seedlings before transplanting outside. For those of you who do not have a greenhouse, and I suspect there are many, what follows is a technique for you to successfully and easily grow on the seedlings in your house or garage. It is called the "Polythene A Frame Tent." The tent is a testament to the adage that necessity is the mother of invention. My job requires a fair amount of travel, so I am unable to devote daily attention to raising seedlings. Prior to creation of the tent, I was always concerned about adequate light, temperature and humidity for the plants. The soil would dry out or it would be too cold in the garage in winter and I'm sure seedling growth was set back. The tent was thus designed to assure consistently even temperature, humidity and light. The following is a reprint of an article I wrote in 1983 for "Seattle Rhododendronland," the monthly newsletter published by the Seattle chapter of ARS and edited by Bob Badger.
INDOOR GREENHOUSES
"A major consideration in raising rhododendron and azalea seedlings or starting cuttings is to provide adequate light, warmth and humidity. Over the years I have experimented with raising seedlings inside our home or in an unheated garage. Both locations have given problems - too warm and dry in the house and too cool and drafty in the garage during the winter.
Not wanting to go all the way to a closed case propagating system, and in the interest of using my existing Gro Light stands, I devised a compromise technique that should be of interest to those of you who want to or are propagating plants indoors. The device is a simple polythene plastic "A" frame tent which can be placed directly over your Gro Light stand under which sit the flats of seedlings or cuttings. The plants are thus guaranteed the light, humidity and warmth needed for continuous growth with minimum attention. Following are the materials and tool list to construct this small indoor greenhouse.
MATERIALS AND TOOLS
(1) roll of 4 mil polythene plastic
(10) 1⅜" 'x 5/16" lath boards - 35" minimum length
(1) ¾" x 1¾" oak or other heavy hardwood board, 40" minimum length
Stapler (I used an Arrow T-55 with ⅜" staples)
|
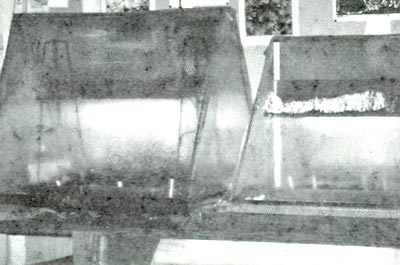
|
Figure 1 is a picture of tents with front flap closed.
Photo by Michael J. Zimmerman |
CONSTRUCTION
To construct the "A" frame first staple together four lath boards to make a rectangular base sufficient to surround the Gro Light stand with two flats under the lamp. Next, staple two pieces of lath on each end to make the triangular "A" shape. Then staple a cross bar to connect the "A"'s. Be sure the "A" frame is tall and broad enough to completely cover the Gro Light.
Now that you have the framing done covering it with polythene follows. Cut a rectangular sheet fit to cover the back side of the frame. Staple to the frame starting from the crossbar down. Next, cut triangular pieces and staple to each end of the frame. The final step is to cut another rectangular sheet for the front of the frame. This sheet should extend about 2-3 inches beyond the lath on each side. Staple to the top crossbar only (not the sides) because you want to have access to the inside of the tent. After stapling to the top, staple the bottom of the sheet to the oak board. The board should hang below the edge of the bottom front of the frame to keep the plastic taut and sealed. Similarly, the 2-3" of excess material on each side of the front will overhang the side to make a tighter seal, especially when moist. When you want to water or mist the plants, all you have to do is lift the oak board up and place it on the crossbar. You are done!
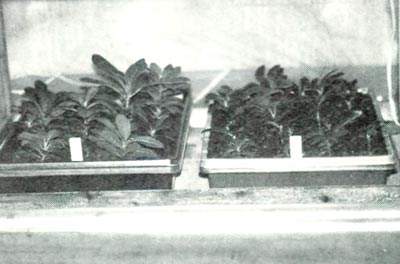
|
|
Figure 2 shows the seedlings inside growing under light.
Photo by Michael J. Zimmerman |
Any of you who try this will be pleased with the warm and humid atmosphere inside the tent. Moisture literally drips down the inside of the plastic and the plants luxuriate in this microclimate. I use a hand mister connected to a faucet and find a thorough wetting of the plants and medium is required only once a week. Occasionally the plants are misted with a solution of Benomyl to ensure no fungus or diseases get started due to the humid atmosphere. In addition, I leave the grow lights on 24 hours a day to maintain the warmth they provide. To further increase humidity I place a small jar full of water in each corner of the tent. The humidity level is thus between 90 and 100 percent. In my unheated garage the Gro Lamps sit on a bench about 3½ feet above the floor. This winter the temperature inside the tents (I have two) averages 65-70 degrees F. A real cold snap outside will reduce the temperature to just above 60 degrees.
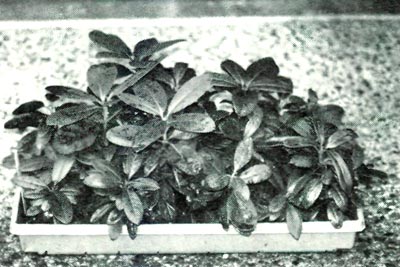
|
|
Figure 3 is a flat of one year old
'Naomi Nautilus' x 'Dido' seedlings. Photo by Michael J. Zimmerman |
As an experiment, water is never poured directly on the planting medium. Only a mister is used (periodically with a diluted solution of fish fertilizer). This is to avoid compaction of the medium (peat and perlite) so as to allow a porous and airy environment for the fine roots. I'll have more to report later on the success of this approach."
Your "indoor greenhouse" will assure steady growth of your seedlings to the point where seed can be sowed in October/November and fine young seedlings planted in pots or directly into the ground outside in mid-May. The tent method has succeeded for me well beyond expectations and it will for you too! Order some seed from the ARS and give it a try. How would you like to have a hundred or more seedlings of R. yakushimanum or R. lacteum x 'Crest' growing in your yard?
Collecting and Storing Rhododendron Seed: Sources
Jack Cowles, Wellesley, Massachusetts
Reprinted from Massachusetts Newsletter "The Rosebay"
One of the most intriguing and yet deceptively simple things by which one can be bitten is the rhododendron seedling bug. While probably eight out of ten of us are perfectly happy to have and succeed in growing some plants of 'America', 'Roseum Elegans' or 'PJM', there are always a few who are different.
There are many reasons for growing seedlings, once you qualify on the basics. To get the basics you just try each step in turn. Get the seed, sow it, grow and plant out the seedlings. Eventually you find out what the results are. Behind the excitement of planting and producing lies the dream of bedazzling the world with something new. The challenge comes when you realize what the tremendous possibilities are, and how much needs to be done. We in New England can only turn green with envy at what is being grown on the West Coast, in England and in the rest of the "Rhododendron Climates".
One nice thing about being a seedling grower today is that much of the pioneering work has already been accomplished. Charles Dexter and Tony Consolini in our area, and within the same era Gable and Nearing, are recognized for their accomplishments. They produced hybrids that are important in the nursery business today, as well as providing material for further hybridizing. Fortunately, all those really dedicated to rhododendron improvement have been remarkably generous with their materials and knowledge.
The real "moon landing" in rhododendron research, in my opinion, happened with the formation of a "seed exchange" by and for members of the American Rhododendron Society. Most of us don't realize how important this step is, but it can and already is beginning to open up tremendous possibilities. It speeds up what used to take a lifetime to accomplish to a matter of relatively few years. If enough people participate in the effort, lack of imagination will be the only limit in bringing about improved forms.
If you intend to try some seedling rhododendrons, you must either have a seed supplier or produce your own. Each approach has its advantages. Usually there is quite a wait involved when you depend upon another source. If you harvest your own, you can process the seed and sow it in only a few days.
With the arrival of Octobers cool nights, the seed pods seem to accelerate their ripening. The first sign of maturity will be the pedicel turning yellowish and wrinkled. (The pedicel is the short stem at the base of each capsule, which connects it to the main truss.) The pod will not develop any more, and can be picked at this stage. If left too long, the valves of the fruit capsule open, spilling out the seed to the wind. Usually it will be found that large-flowered types produce large (2 inch) fruits, as in the case of R. fortunei . R. racemosum , which has small flowers, has correspondingly small (¼ inch) fruits. Evidently there is a correlation between flower and pod size.
While one is picking the pods, a system is needed for recording the identity of the different kinds. It is simple to use an envelope for each, writing on the envelope what it is. Sometimes it is well to include the field label with the pods, if it is legible.
The pods, kept in half-open envelopes, will dry out and become crisp after three to five days in house atmosphere. They can then be lightly crushed with a block of wood or a pair of pliers. The seed can then be teased out of the valve segments or strained through a tea-strainer. It is well to work over a piece of stiff white paper, and pour the seed from this into labeled envelopes. One word of caution: some people are allergic to the resin in the dust, so if you have never handled seed before be on guard against a sneeze.
The seed itself varies from very fine and dark, as in R. carolinianum and R. racemosum , to the relatively large, winged and buff-colored R. fortunei
Once it is processed, dry seed can either be stored or planted immediately. Longevity in storage depends on two factors: cold and dry. Ordinary room storage is all right for six months. If you plan to store the seed for a longer period, make sure it is thoroughly dry, put it into glass jars with tight lids, then place it in the freezer. I have had excellent germination from some seed after five years of freezer storage.
Generally one seed pod can supply several hundred seeds. It is well to consider the space and time that will be needed in caring for the subsequent progeny. But the most important consideration should be given to getting seed which stands a chance of producing what is expected of it. In the case of a species, it should be the finest form that approaches what you might be seeking. There is always a certain amount of variation in seedlings, so don't expect absolute uniformity.
When growing seedlings of hybrids, one should expect great variation, because that is what hybridizing is all about. In general, the closer one stays to one's own yard for seed source, the better is the probability of survival. The exotic sorts often do not stand the rigors of our climate.
For the first two seasons the seedling is very vulnerable to extremes in temperature, light and water. After two years the average seedling can be grown the same way rooted cuttings are. Seedlings make up for this two-year handicap by the promise of variety and uniqueness. It is the lure of something new and perhaps superior which challenges the seedling grower. Also in favor of seed is the fact that the initial cost is relatively low.
The question is: what is available for crossing, or else where can one obtain seed? A few seeds men offer some. The American Rhododendron Society publishes its seed exchange list yearly. In it are seeds of rare and elite forms of species, plus hybrids seed promising some of the most advanced "models" off the line.
One word of advice, before you start: this habit is a hard one to break, and once you succeed, you're hooked for life!
Growing Rhododendrons And Azaleas From Seed
Sandra McDonald, Ph.D., Hampton, VA
There are many methods of growing rhododendrons and azaleas from seed. Best germination and growth for me results from seed sown as soon as available in early December through January. Seedlings resulting from later germinated seed seem to have growth restricted somewhat by heat in late spring in the conditions under which I work.
GERMINATION METHOD I — One method is to use sphagnum moss (not peat moss) for germination of seed. Wear rubber gloves to soak the sphagnum moss in warm water for several minutes to let the moss absorb water. Then squeeze out excess water, fluff up the moss and put it into small flats or containers with drainage holes. Leave at least one-half inch of head space between the top of surface of moss and the top of the container for growing room. Try to level off the surface as much as possible. A thin layer of dampened milled sphagnum moss can be put on the surface, but is not absolutely necessary. Sow the seed evenly over the surface; place a pane of glass or clear plastic over the top of container and place container under fluorescent lights. Lights can be on a day-night schedule or can be on continuously. Temperature should be between 65 and 75 degrees F. Seed trays can be put in a north facing window if lights are not available, but direct sun should not shine on the nearly "sealed" containers or the seedlings will be cooked.
Damping-off mold is seldom a problem with this method, but if it does occur it can be picked out and the surface treated with Captan.
Only an occasional watering is needed with this method. Check surface every day and water with a fine spray when surface starts to look dry.
GERMINATION METHOD II — An alternate method is to use clear plastic boxes and lids with no drainage holes. Use 60% barely damp peat moss and 40% perlite. As with Method I, do NOT cover seed with medium. Mist lightly every day.
HARDENING OFF AND TRANSPLANTING — When seedlings are starting to touch glass or plastic cover, start letting in a little more air every day by propping glass cover up about half an inch or so. Let in more air every day until glass can be taken completely off. This hardens off the seedlings for transplanting.
Seedlings can be transplanted after they have their first set of true leaves. Use flats or containers with drainage holes. A medium composed of 50% peat and 50% perlite works well, but many other ingredients such as compost, composted bark, coarse sand, etc. can also be combined in various proportions as long as the ingredients do not harbor disease organisms, are not toxic and drain well.
Carefully lift out seedlings, pulling gently on one true leaf while gently teasing out the roots with the point of a sharpened wood lead' pencil (or toothpick) in your other hand. Gently place roots in a dibble hole made by your pencil and firm the mix around roots. Make the holes for transplanting about one inch apart.
Water in the seedlings. If you have excessively disturbed the roots, you will need to cover the seedlings loosely or place them under mist for a day or so. Otherwise a shady spot away from excessive air movement and perhaps an occasional misting should get the seedlings through the critical first couple of days. If you fertilize, use a very dilute solution, approximately ¼ strength or less of the recommended rate on fertilizer container.
Larger seedlings can be planted out to cold frames, lath house or sheltered location after danger of frost is past. If the seedlings are small, window screen over the top will protect them from heavy rains.