JARS v39n3 - In Vitro Determination of Hardiness of Rhododendron
In Vitro Determination of Hardiness of Rhododendron
Pat Halligan, Langley, WA
Introduction
Before I got to my first backcross of F2, the thought occurred to me that I needed some way to assess the hardiness of my seedlings. My parent species differed greatly in hardiness; and although the primary crosses would be expected to be fairly uniform in hardiness, the backcrosses and F2's probably would show a large variation. In order to select relatively hardy hybrids as parents for further crosses I needed some way to find out which plants were hardy. Waiting years for the right cold snap to come along seemed like a poor way to accomplish this.
The botanical and horticultural literature is full of articles describing ways to assess hardiness of plants and plant parts. Unfortunately, they all depend on expensive equipment not generally found in one's home or at K-Mart (Alexander and Havis, 1984; Havis, 1964; Lumis, 1972; Pellett and Holt, 1981). Thus I set out to devise a way to assess hardiness without spending a lot of money. I needed a way to cool plant parts to any desired temperature between 32°F - 10°F. Also, I needed to decide what plant parts to test and the time of year to test them.
The various parts of rhododendrons are not equally resistant to cold. The stems generally are most resistant, followed by the leaves and flower buds in that order. The roots usually are much less resistant than the above ground parts (Alexander and Havis, 1984; Sakai, 1984). Naturally, I picked the most readily available plant parts, the leaves. Generally but not always, the plants with most resistant leaves will also have the most resistant stems, buds and roots. Obviously this does not apply to deciduous or semi-deciduous species. Cold resistance is at a maximum in midwinter. Not even hardy rhododendrons are cold resistant except during late autumn and winter (Alexander and Havis, 1984; Lumis et. al., 1972; Pellett and Holt, 1981).
The Ice Box
After pricing freezers, especially those with the capacity to cool to any desired temperature between 32¤F and -10°F, I decided that I needed an inexpensive alternative. I constructed a small ice box out of plywood and Styrofoam (Fig. 1), designed to use dry ice as the coolant. Although dry ice may appear to be expensive and difficult to obtain, it is readily available for free. I obtained mine from a local supermarket. Some of the truck drivers who deliver frozen foods were happy to part with some of their dry ice.

|
|
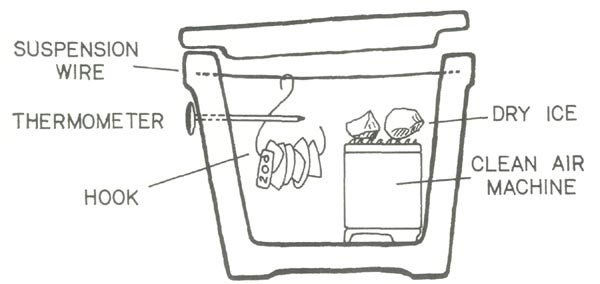
Figure 1. View of the test chamber of the ice box. The
Norelco Clean Air Machine is on the right. Two suspension wires cross at mid left. Three hooks loaded with leaves hang from the suspension wires. The holes at the bottom of the test chamber provide communication with the dry ice chamber. |
Dry ice was stored in a separate ice box which was wrapped in blankets and a trash bag and kept in an unheated garage. A 10" chunk of ice kept for several days when stored in this manner. The ice box used to test the plants had two chambers, a lower one for the dry ice and an upper one for the plant material. Holes covered with sliding wood slats provided connections between the two chambers, and a Norelco Clean Air Machine provided positive ventilation between the two chambers. The filter had been removed from the clean air machine, which now functioned as a vertical lift fan with closed housing.
By adjusting the opening with the slats or opening the lid of the test chamber, the temperature could be controlled. Placing small chunks of dry ice onto the top of the clean air machine added considerable cooling power when needed. A refrigeration repairman's thermometer with 5" probe and circular 1 " dial was placed so that the probe extended into the test chamber while the dial was on the outside. Testing of the elaborate construction showed me that it was unnecessary, and that a much simpler design was possible.
|
|
Figure 2. Diagram of a simplified ice box suitable for testing leaf cold tolerance.
An explanation of the various parts is provided in the text. |
To construct a simple hardiness tester obtain the following: 1) Styrofoam cooler about 1 cubic foot capacity. You may have to add extra insulation and aluminum foil to the outside of the box to obtain low temperatures. 2) Norelco Clean Air Machine or similar vertical lift fan with horizontal grid on top. (You will have to place the dry ice on top of the clean air machine.) Take the filter and deodorant out of the machine and discard. 3) Refrigeration repairman's pocket thermometer. These are inexpensive but hard to find. I got mine from a refrigeration parts supply house, but I would guess that any refrigeration repairman would get one for you the next time he ordered supplies. 4) Two gauges of galvanized wire, #14 (coat hanger wire) and #22 (fairly thin wire).
Place the clean air machine in one corner of the cooler (Fig. 2). Punch the thermometer through the other side of the cooler so the probe is inside and the dial is outside. Push the thick wire into the sides of the cooler so that it extends across the chamber of the cooler. Fashion hooks out of the thin wire. The leaves are impaled on the hooks and the hooks are hung on the thick wire. The temperature is controlled by varying the amount of dry ice on top of the clean air machine and by varying the width of the opening of the lid of the cooler. The temperature needs to be monitored almost constantly since this is a manually contolled device.
Method
Leaves were collected from the plants on 10-27-84, 1-7-85, 1-9-85, 1-18-85 and 1-25-85. The leaves were labeled, misted, and put in plastic bags. Where many siblings were tested each plant was numbered and labeled. Two leaves of each test plant were placed on each hook. Large leaves were cut into 1" squares, two of which were placed on each hook. Each hook was labeled according to the minimum temperature to which it was to be subjected. Several hooks were used, each loaded with a large number of leaves, and each with a different minimum temperature. The actual temperatures were chosen according to the expected tolerance of the test material. Leaves were arranged loosely on the hooks so that air could circulate freely between the leaves. Care was taken to avoid damaged leaves, and only fully mature leaves of the current year's growth were used. Leaves were kept moist throughout sorting and placement by misting. The leaves of every fifth plant were clipped to provide reference points in case a mistake was made in loading leaves.
|
|
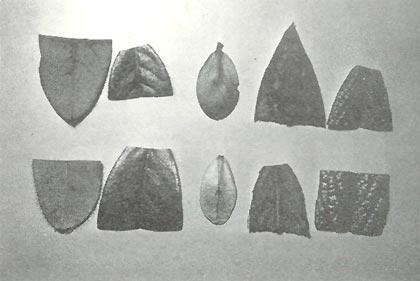
Figure 3. Leaves of tests (upper) and controls (lower) of
R. 'Snow Lady' (left), R. commonae (middle), and R. edgeworthii (right). Lower leaf surface of R. commonae is shown while both leaf surfaces are shown for the other two plants. Test leaves were subjected to killing temperatures and demonstrate changes seen when leaves are cooled beyond their tolerance. |
|
|
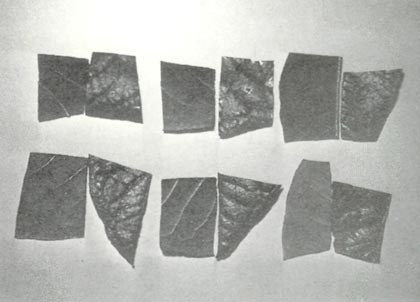
Figure 4. Leaves of tests (upper) and controls (lower) of
siblings of R. lindleyi x nuttallii F2, showing variations in changes seen between siblings. Test leaves were subjected to killing temperatures. Lower surfaces show much more dramatic changes than upper surfaces of leaves from this hybrid grex. |
The control hooks with leaves were placed in plastic bags and placed in a refrigerator at 35°F. These served as a basis of comparison to the tests and were indispensable. All the test hooks were hung on the suspension wire. The temperature was lowered to 25°F for 10 minutes, then to 20°F for 20 minutes. Then the 20°F hook was removed, sealed in a plastic bag, and placed into the refrigerator to avoid excessively rapid thawing. Then the temperature was lowered to 15°F and the process repeated. Cooling for 20 minutes at each temperature seemed to be adequate, but cooling for 10 minutes seemed to give uneven results.
After all the tests had been completed and all hooks had been in the refrigerator for at least an hour, the bags containing the hooks were removed from the refrigerator and left at room temperature for about 24 hours. Over this period those leaves cooled to beyond their tolerance proceeded to die. (Next year I plan to leave the bags out for 48 and 72 hours to see if the dead leaves change further.) A solution of Crescent Red Food Coloring and ivory liquid in water was used to dip the hooks full of leaves. The coated leaves were set out for 5 minutes, then washed. The dye seemed to be absorbed more by the dead leaves and seemed to accentuate the difference between live and dead leaves.
The leaves were lined up in rows and columns on a table according to plant and treatment. They were misted often enough to keep them wet. The upper surface of each test leaf was compared to its control. Then the leaves were turned over and the lower surfaces were judged (Fig. 3 and 4). Finally, the leaves were each put onto the lens of a powerful flashlight so that each could be compared to its control in transmitted light (Table 1).
| Table 1. Appearance of leaves after testing for cold tolerance using three parameters, the upper surface, the lower surface, and the appearance with light transmitted through the leaves. The descriptions are intended only as a general guide, and considerable variation between species exists. It is important to have control leaves for each plant tested. | |||
| Alive | Dead | ||
| Reflected Light | |||
| Upper Surface | Green like control | Slightly browner and darker, water soaked appearance | |
| Lower Surface | Green like control | Considerably browner and darker, water soaked appearance | |
| Transmitted Light | Bright greenlike control | Brownish or yellowish | |
The condition of each leaf at each minimum temperature was recorded. Usually the changes were not abrupt at a single temperature, but graded over a range of temperatures. For example, at 20°F the leaves might be green. At 15°F they might be dead except near the mid-veins. At 10°F they might be dead all over, and at 5°F they might be nearly mush. The temperature that you call their limit of tolerance is a matter of personal judgment. You just try to use the same parameters to judge all the siblings of a particular cross. It seemed like it was easier to tell the differences by one method with one group of plants (e.g. transmission for the Choniastrums) and by another method with another group of plants (e.g. lower surface for the Maddeniis). I relied most heavily on the method that showed the most definite differences for that particular type of plant. I found that it was safer to run tests on siblings twice (from start to finish on two separate occasions) so that I could be sure that the results were for real. That way I could feel confident that the plants I chose as parents really were more cold tolerant and were not plants picked through experimental error.
| Table 2. Comparison of tested hardiness of various rhododendrons with their rated hardiness. Species ratings taken from the R.S.F. Plant Distribution List(1983-1984). Hybrid ratings taken from Greer (1982). | ||
| Species | Tested Hardiness | Rated Hardiness |
| or Hybrids | (°F) | (°F) |
| laetum | >20 | 32 |
| commonae | 20 | 30 |
| stenaulum | 20 | 20 |
| stamineum | 15 | 15 |
| edgeworthii | 5, 10 | 5, 15 |
| ellipticum | 15 | 10 |
| ovatum | 5 | -5 |
| wilsonae | 5 | -5 |
| 'Snow Lady' | 5 | 0 |
| 'Elizabeth' | 5 | 0 |
| 'Mary Fleming' | -5 | -15 |
| 'Windbeam' | -15 | -25 |
Results
Leaves collected in October were tested at 5°F. None of the leaves were tolerant to that temperature, even though some of the plants ('Mary Fleming', 'Patty Bee' and 'Snow Lady') should have tolerated that temperature. I concluded that October was too early to test for hardiness and waited until January.
Plants of known hardiness were tested to see if the experimental technique produced results which correlated with reality. The tested leaf cold tolerances corresponded reasonably closely with published hardiness ratings (Table 2). Leaf cold tolerances of several greenhouse plants were tested and are shown in Table 3. The greenhouse was kept above freezing but was otherwise kept at the ambient temperature. Plants of R. stenaulum x wilsonae showed greater cold tolerance when grown outdoors than in the greenhouse. The range of tolerance for the primary cross R. nuttallii x taggianum was quite narrow, but the range for the F2 cross of R. lindleyi x nuttallii was wider. The hardier plants are identified by their numbered labels. When they flower (this year and probably next) I will select the best ones for further breeding.
| Hybrid | Tested Hardiness (°F) |
|
R. stenaulum
x
R. wilsonae
(greenhouse grown) |
15 |
|
R. stenaulum
x
R. wilsonae
(grown outdoors) |
10 |
| R. stenaulum x R. stamineum | 15 |
| R. stenaulum x R. westlandii | 10 - 15 |
|
R. amamiense
x
R. ellipticum
(one year old plants) |
15 |
| R. ellipticum x R. stamineum | 15 |
| R. moulmainense x R. stamineum | 15 - 20 |
| R. nuttallii x R. taggianum | 20 - >20 |
| R. lindleyi x R. nuttallii F2 | 15 - >20 |
Discussion
Plant breeding can be compared to fishing. Patience can be rewarded by great success. Sometimes, though, waiting can just be stupid, especially when the fish are somewhere else. In this case, waiting for the right cold snap to come along allows the genetic traits for cold tolerance to remain needlessly hidden for years, or forever.
An especially important application of cold tolerance testing is with backcrosses and F2's involving mixtures of hardy and tender species where further generations are required before the plants will be fully hardy. In this case, all of the intermediates could easily be killed in a cold snap and their eventual contribution lost forever. Yet, the proper parents for future generations cannot be selected without making their genetic trait for cold tolerance visible. This technique allows plants to be tested for cold tolerance with no risk to the plants. Although this technique is reasonably accurate, it should not be used to establish the hardiness of plants intended for release. Many factors enter into plant hardiness of which leaf cold tolerance is only one. The hardiness of plants can be determined only by actually growing them outdoors under the weather conditions they must endure. However, this technique will find good application in selecting likely plants for further breeding or for selecting plants to send to the Eastern States for outdoor trials.
References
Alexander, L.A. and J.R. Havis (1984) Cold acclimation of plant parts in an evergreen and a deciduous azalea. J. Am. Rhododendron Soc. 38(4): 180-181.
Graham, P.R. and R. Mullin (1976) The determination of lethal freezing temperatures in buds and stems of deciduous azalea by a freezing curve method. J. Am. Soc. for Horticultural Sci. 101(1): 3-7
Greer, H.E. (1982) Greers Guidebook to Available Rhododendrons Species and Hybrids. Offshoot Publ., Eugene, OR.
Havis, J.R. (1964) Freezing of Rhododendron leaves. Proc. Am. Soc. for Hort. Sci. 84: 570-574.
Lumis, G.P., R.A Mecklenburg and K.C. Sink (1972) Factors influencing winter hardiness of flower buds and stems of evergreen azaleas. J. Am. Soc. Hort. Soc. 97(1): 124-127
Pellett, N.E. and M.A. Holt (1981) Comparison of flower bud cold hardiness of several cultivars of
Rhododendron
spp. HortScience 16(5): 675-676.
Rhododendron Species Foundation (1984) Plant Distribution List 1983-1984. List No. XIII. Rhododendron Species Foundation, Federal Way, WA.
Sakai, H.E. (1984) Freezing resistance of Rhododendron and Azalea. J. Am. Rhod. Soc. 38(4): 192-195.
Acknowledgement
I wish to thank Chad Caldwell of Pay-Less Foods for supplying me with dry ice.