JARS v49n2 - Tips for Beginners: Photographing Rhododendrons, Part I
Tips for Beginners: Photographing Rhododendrons, Part I
Bill Heller
Enumclaw, Washington
What are your goals in photographing rhododendrons? Do you want a record? Do you want true colors? Do you want a picture to frame? Do you want to capture a mood? Your photography can do all of this and more. We will start with some basics to help you obtain your goal.
Equipment
Start with equipment! Most cameras today are pretty good. Since the invention of the computer, cameras have been designed with better and better optics. You would have to pay an exorbitant price for your equipment to get a real noticeable difference in quality. And even then most of the quality improvement is technique. Any of the major brands will do a very good job: Minolta, Olympus, Cannon, Nikon, etc.
Your camera should have manual override so you can adjust it for flowers as you get more experienced with using your camera. Get your standard camera with 50 mm lens - no need for elaborate equipment. A telephoto lens, with zoom and macro capability, should be your first accessory. Get to know your equipment, whatever it is.
Flash
A flash is not needed for outdoor rhody photographs, but it will help eliminate some problems. A flash will stop motion due to wind, balance light and dark areas, add light to shadow areas, increase contrast between subject and background and brighten the subject on a dull day. If you have one, try it out. If not, a tripod and shutter release will be more helpful for outdoor rhododendron photographs.
Filter
Few filters are needed since we are usually going for true colors, but filters are useful for the following reasons:
1) Polarizing filters deepen and brighten colors that may be washed out from glare of harsh sunlight.
2) Filters protect all your lenses, a UV (ultra violet) or skylight filter usually. These filters are a cheap protection for your expensive lenses.
Tripod & Shutter Release
This equipment is a real necessity to get good photos of rhododendrons. There are many advantages in using a tripod:
• Adds stability to shot.
• Can focus better.
• Composition improves.
• Gives you time to set up your shot.
Pick a tripod you can carry. Go for one as stable as you think you want to carry. If you do a lot of backpacking you may want to get two different tripods, one very light for packing and a heavy duty one for carrying around the gardens. You need something that is stable in the wind and that will hold all of your heaviest cameras and lenses.
Note: A ball head or pistol grip ball head gives best maneuverability as the adjustable head on top of the tripod.
Film
In films the shutter speed (speed which the shutter opens and closes; speed setting on your camera 1/125, etc.) and aperture or F-stop (how wide the aperture is open on your lens, f1.2, f8, f16, etc.) are connected. The higher the speed of the film for a certain lighting condition the smaller the aperture can be to let enough light in to expose the film. Film speed is measured by the ASA number. The smaller the ASA number the slower the film, meaning a slower film takes more light to expose it. Old films used to be very slow, taking a lot of light to expose them. Film speeds of ASA 25 take a lot of light, such as a very sunny day. Whereas films with speeds of ASA 200, 400, or even 1000 take very little light and can take pictures indoors without a flash. In general, the faster the film speed, ASA 200 or 400, the grainier your picture will be. The size of the image grains on the film help determine how sharp and clean a picture is; the finer the grain the sharper the picture. ASA's of 64 and 100 give the best balance of speed and fine grain size and a sharper picture. If you have enough light and a tripod try some ASA 25 film. You will love how sharp the images are.
Color Slides
It is best to use slides so that you can show them at rhododendron meetings, and it is now easy to get prints from slides. Slides are cheaper too! 99 percent of all of the film I use is slide film. There are some good print films, but why use prints when it is so easy to get prints from slides, whereas it is very difficult and expensive to get slides from print film?
If you still want to shoot prints, find a cheap processor or have the negatives developed and have only the good ones printed. Lots of pictures turn out to be not what you want. By developing the negatives and choosing only the best you will save a lot of money.
Films vary in the way they render color, in their tolerance to different light intensity, in grain size and in sensitivity to specific light sources. Certain films render different colors better than others. Kodachrome records the warm spectrum - red blossoms, autumn golds, Fujichrome renders bright yellows, greens and Ektachrome renders the blues and cooler colors. Choose a film and get to know it; shoot it under many varied conditions. Choose the film that you like best. Go out and shoot all three and see if one pleases you more than the others. They are all good films so try them and see. I use mainly Ektachrome 100 for my rhododendron slides because I like how it works. I've been using it for years and I know how it is going to react in most situations. In fact, I've used it so much sometimes I don't even have to look at the meter to know which speed and aperture to set to get a shot.
For good clear photos of rhododendrons use the lowest ASA film you can. Kodachrome ASA 25, Kodachrome ASA 64 or Fujichrome and Ektachrome ASA 100 are standards and easiest to find. For recording your new hybrids and special rhododendrons never use ASA 200 or ASA 400 films, for they are too grainy and won't print or project as clearly. When you are recording your new hybrids you want good clear pictures. If you are out on vacation or a trip, the conditions are dark and you may never get another chance to take the picture, then use the faster films. But it is still best to use your tripod and a slower film.
|
|
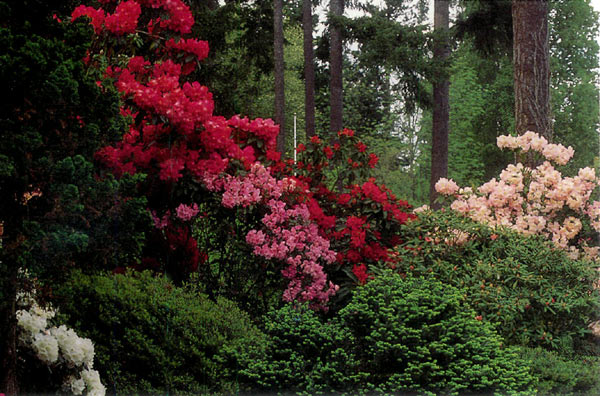
Landscape at Ned Brockenbrough's Garden, Bellevue, Wash.
Compose your landscape so that it is framed and contains no detracting components. Photo by Bill Heller |
|
|
|
|
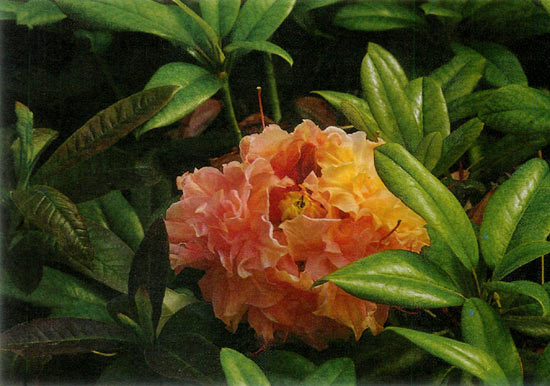
Puyallup Centennial azalea.
Compose your shot so there are no distracting components. Photo by Bill Heller |
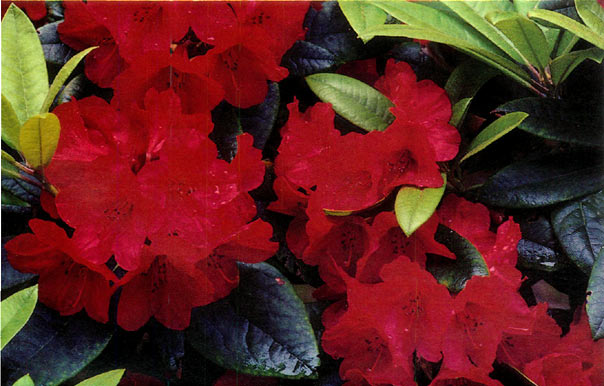
Vulcan's Flame'
A prime example of using only three prime colors in your composition. Photo by Bill Heller |
Composition
You have the tools; now let's look at some technique. You have your camera, you've chosen a film and you've chosen your subject — rhododendrons, of course! Use your tripod, especially to start out. A tripod will give you more time to compose and get your picture right. When you're just starting you have a lot of things to think about because it is not yet second nature. The tripod gives you the time you need, and in most cases your subject will not run away. Most rhododendrons will be there for you to photograph for a while at least. You may be loosing your light, but let's start out when you have enough time to try a few things.
You first need to decide what type of picture you're going to take: landscape, specimen plant, group of trusses, a single truss or just parts of a floret. In some gardens it is very difficult to know where to start because there is so much to take in. Well, as you are entering the garden and trying to decide, take some landscapes to record where you've been. In a landscape there are a few things to consider. Do you want people in the picture or not? If the people are not moving too fast they can add scale to a landscape. Make your decision. If you don't want people in the picture, the tripod comes in handy if you have to wait for them to move out of the frame. In most landscapes you want as much of the picture in focus as possible. This means you will want to use the smallest aperture, largest F-stop - F16 to F32 or such, to utilize the very center of your lens, its best and clearest part. When you are using a very small aperture, large F-stop, you are not letting much light in to expose the film so you will need a slow shutter speed. Most people cannot hold a camera still enough to avoid blurring a picture at shutter speeds of less than 1/60th of a second. At these slow speeds your tripod will hold it steady for you.
After you've set up to make as much of your picture as clear as possible, the next thing you want to do is compose your picture. How many of you have taken what you thought was a great picture only to be disappointed when you got it back because there was something very distracting in the picture. Lots of people have, and 90 to 95 percent of John Q. Public's pictures turn out like that. We're going to try to show you how to avoid that. You are on the right track since you have your tripod. As I said, the tripod will give you time to do things and one of those is compose. Take your time and really look at your subject through the lens to see everything. Most cameras have what is called a "preview button." By pushing the preview button you will see everything that is in focus and that will show up sharp. With preview, you will be closing down the aperture to the proper setting and the image will get darker. With most cameras the lens stays open all of the way until the shutter is released. What may have been just a fuzzy spot of color can become that unwanted distraction when you have the greatest depth of field at a small aperture. (The depth of field is that portion or depth distance of your picture which is in focus.) Now that you see the distraction either move to eliminate it or change your depth of field so it does not show up. Once again, with the tripod you had time to see the distraction and take corrective action.
In landscapes you don't want to make the picture too cluttered, both in subject number and in major color number. In studying great art you will notice that all great pictures have three basic colors and three or an odd number of subjects. Say your colors are green grass, blue sky and a red rhododendron. For best results do not let any more than these three major colors be dominant. The fourth color will be a distraction. It is all right to have other colors as muted colors or minor colors as long as they do not distract. You do not want too many things in your picture or your eye won't know where to focus. This does not mean that you cannot have a bed of hundreds of flowers; groups of similar things count as a single object if they are of the same color scheme.
Take particular notice of the sky. If the sky is too bright it will influence your meter too much and underexpose the rhody you want. Don't use too much sky, unless it is a very special or beautiful sky. Generally put in only enough sky to accent or complement your subject. If the rhody plant is your main focus, take a spot light meter reading off the leaves. This will give you the proper exposure for the rhody. In doing the metering from the rhody leaves you will compensate for the over brightness of the sky.
There are several things you can do for the sky. You can use a couple of filters to correct for the over brightness. The first filter is a polarizing filter that you rotate until you have the effect you need or want - sunglasses for your camera. The other filter is a split screen Cokin filter. The Cokin split screen (I use a blue one) changes shade intensity from the top of the filter to the middle, where it is clear. The bottom is all clear. If you take the Cokin, a square filter element, and lower it down to your sky line, you have brought the sky down into the exposure range of your rhody.
Part II of "Photographing Rhododendrons" will appear in the summer 1995 issue of the Journal.
Bill Heller, president of the Seattle Chapter, has been active in the Seattle Chapter's Photography Group for many years and has won numerous prizes for his photographs. His photograph of 'Naselle' appeared on the cover of the fall 1994 issue of the Journal.