JARS 49n3 - Tips for Beginners: Photographing Rhododendrons, Part II
Tips for Beginners: Photographing Rhododendrons, Part II
Bill Heller
Enumclaw, Washington
Part I of "Photographing Rhododendrons" appeared in the Spring 1995 issue of the Journal
Getting the Right Color
You have the tools. You have your camera, you've chosen a film and you've chosen your subject, rhododendrons, of course! And now you want to get the color right on these rhododendrons you've chosen to shoot. Now let's look at some techniques.
The color palette in rhododendrons is very complex. Any of you hybridizers can attest to that. Most of the colors are mixtures, so how and when you take the picture can and will make a difference. For the best rendition of the true colors of a rhododendron, shoot your pictures on an overcast day. The defused light coming through the clouds will give you a soft light where all of the colors show up, especially your pastel colors, which many of the rhododendrons are. On a bright sunny day most of your colors will wash out. Most rhododendrons are shiny enough to reflect the bright sun and wash out or overexpose your picture. So pick a nice cloudy day to get your colors right. In Seattle that's not a big problem. Just wait a while and it will be overcast again.
In bright sun you have other problems. Your shadows are much deeper and higher contrast. With this high contrast you will lose most of your detail in the shaded areas of your picture, whereas on a cloudy overcast day you do not have these harsh shadows so you can pick up the detail in the shadows. On a bright sunny day even the leaves are a problem. Many leaves are glossy and shiny so they will also reflect the sun and give you white or bright spots, definitely not the true green color you want.
Of course, if you're going to shoot on an overcast day it's best to use your tripod. You don't have as much light, so you will have to use a slower shutter speed to properly expose your film. Try the overcast days and you will see much better color saturation in your pictures. But if you can't wait for overcast days, if you're on a trip and will only be there that day and it is a bright sunny day, there are a few things you can do.
On a bright day you can shade the subject from the sun. The best things to use are white umbrellas; they let soft light through and give you soft shadows to work with. A white sheet held up or a white shirt will even do, but for these you may need some help to hold them up. Even your own shadow will help if there is nothing else. Any way you can use these items, such as a white cloth to defuse and soften the light, will help.
Most colors of rhododendrons will reproduce on film all right under the defused or overcast days. But there is one rhododendron color which does not come true very often - blue. The pigment in rhododendrons is not a true, pure blue. It has red in the background. This red in the background shows through on film with the ultra violet light from the sun. For example, blue R. augustinii comes out pink or purple but definitely not its true color. Some filters will help, but the best results have been to take the picture with a flash, especially after sunset. By waiting until after sunset you get rid of most of the ultraviolet light and flashes produce pure white light. Try these ideas out and see if your colors don't come out truer.
|
|
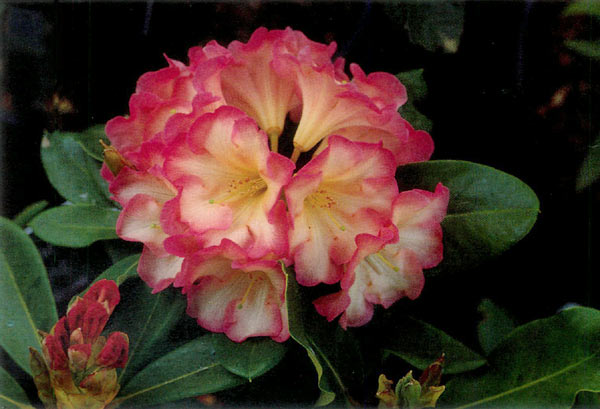
Use buds and leaves to give a better composition and
record a new hybrid. 'George's Delight' Photo by Bill Heller |
Depth of Field
The depth of field is that portion of your picture which is in perfect focus. The general rule is that the smaller your F-Stop, F1.2 or F2, the smaller your depth of field. The larger your F-Stop, F22 or F32, the larger your depth of field.
Typically, if you were shooting a flower truss which was 10 feet away from your camera at F4, only 1 foot in front and 2 feet in back of your subject would be in focus. At F16, 4 feet in front and 15 feet behind your subject truss would be in focus.
When you squint to see something, you use the center of the lens in your eye that has the best optics. You do the same thing when you close down the aperture and change the F-stop on your camera. When you change the aperture or F-stop from the standard F8 to a setting of F16, F22 or higher, you are reducing the opening. This uses the most perfect optics of your lens, thus the clearest image for the greatest distance. In other words, your depth of field is greatest at the highest F-stop, F16 or F22, which is the smallest hole (aperture) in your lens. But this little hole only lets a little bit of light in so you have to use a slower shutter speed to expose your film properly.
Increasing your depth of field is one of the main reasons for using a tripod. With a tripod you are able to use the larger F-stops (smaller apertures) because the camera is now stable and you are able to use the slower shutter speeds required for regular films. You want to use slow films of ASA 25, 64 or especially the standard Ektachrome, Kodachrome or Fujichrome ASA 100 to get the finest grain film and sharpest images. Many times on these overcast days I find myself shooting at speeds of 1/8th, 1/4 or even 1/2 second to get enough depth of field so that all the truss or all of the leaves with a truss are in focus. On the tripod, with a shutter release you are able to get these shots, whereas under normal speeds and conditions only a small part of the picture is in focus.

|
|
Is this what you see when you enter a garden - a mass of color - and
don't know where to start? Scene of Fred and Jean Minch's garden. Photo by Bill Heller |
|
|
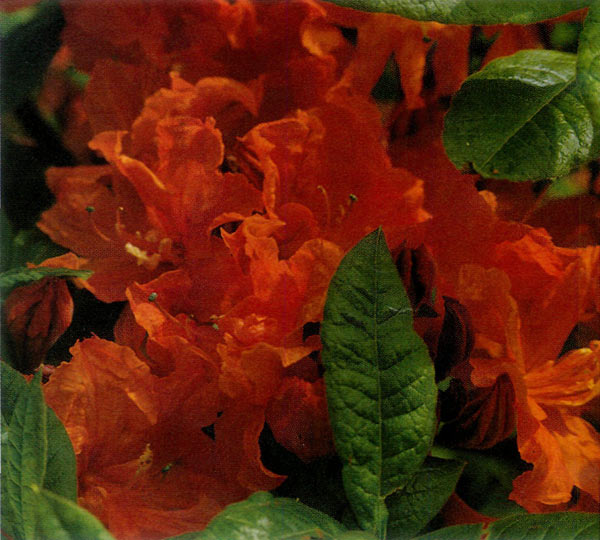
Even a mass of color can be composed if the guidelines of
composing with only three colors and no distracting components are followed. Unnamed orange hybrid azalea at Minch's garden. Photo by Bill Heller |
There are many uses for changing your depth of field. Often no matter how many times you compose your picture there is still something distracting in the foreground or background. By changing your depth of field you will be able either to bring into focus or throw out of focus those things in the foreground or background. It's used most to remove from the field of clear focus distracting objects in the background. With proper use and practice things that would normally ruin a picture can be blurred out of focus to the point where they now add to the picture.
The bad background in a picture, especially specialized pictures such as rhododendron trusses, is the major cause of pictures turning out bad or unusable. When you're taking photographs, especially of rhododendrons, take a second look at the background. Remember the tripod gives you that additional second to check your backgrounds and make sure they fit the picture. Go out and try your depth of field and see what you can do with it.
Other Equipment and Devices
You have the basic tools. You have your camera, you've chosen a film, you use your tripod, especially to start, and you've chosen your subject. Now let's look at some additional extras which from time to time you may want to use. Let's take that tripod, camera and film out and try a few things. Since you're just starting, you have a lot of things to think about because it is not second nature yet. The tripod gives you the time you need, and besides in most cases your subject will not run away.
There are a few extra things you may want to play around with to take care of special situations you may run into. We hinted at flashes in the past, so now we will go into them in a little more depth. Even though I rarely use a flash in photographing rhododendrons, they do come in handy at times. Flashes come in all sizes and configurations. The most common type of flash is the type which attaches to the top of the camera. This type is the easiest to use, but it does have some drawbacks. A flash mounted to the top of the camera gives you light directly at your subject, but this straight-on flash has a tendency to make your subject look flat. A straight-on flash washes out all of the shadows so there are no contrasting shadows to give you a depth to your image, lf you're going to get into flashes at the lowest level on the camera, get one in which you can adjust the power of the flash so that you get just enough light to fill in some areas of the shot and yet get some light from another direction to give you some shadows to show depth in your pictures.
Of course, if your present lighting conditions just won't do it, there are some better options with a flash. If you can put your flash off center of your lens then your flash will create those shadows and contrasts to capture depth in your shot. If you get an extension for your flash cord and hold it out to the side of your camera then you will have the desired effect. Now it's not easy holding your flash out there and taking a picture. If you're on a tripod it's easier, but there are some flash holders you can get which will make it even easier. An adjustable extended flash holder will come in handy. It attaches to the base of your camera and adjusts to where you want it. Or if you really want to get into using your flash you could have a tripod just for your flash and an extension cord long enough to set it up wherever needed for the shot. It may seem a little extreme having another tripod, but in some cases its the only way to fly.
Another type of flash that has come up lately is a ring flash. A ring flash attaches to the end of your lens and surrounds it with a ring of light. The ring flash, as you may have guessed, has some of the same problems as did the flash attached to the camera. The ring flash will flood your shot with light and give it a flat quality if the flash is set at too high a power. But as a fill-in flash it does great for just that little bit of light needed. And for very close macro (close-up) photographs the ring gives you a light right there at the end of you lens - right where the subject is. One of the best uses of a ring flash is as an additional fill-in flash with your main flash off to the side. With a ring flash and a little device called a flash slave, you do not need that cumbersome cable to your main side flash. A flash slave is a photo eye which senses when your ring flash fires its flash of light and triggers the main flash to also flash at the same time. The flash slave is so fast your camera does not see the difference between the slave or an extension cord to your remote flash.
For rhododendron photographs with a flash it is important to add your light at just the right amount and from just the right angle. Remember, too much light straight on will wash out the color in your picture and, if not that, will make your picture look flat, two dimensional and unreal. When using a flash you want to add just enough light to show your subject properly and yet still make it look natural. Set your flash off to the side so you get some shadows to keep your feeling of depth in your picture. And vary the light intensity or power of your flash so that you get just the right amount of light to show off your subject - those rhododendrons.
Even I am still learning about photography. The information about the ring flash just came from a recent Seattle Chapter Photography Study Group meeting in which Chip Muller showed us all about flashes and especially ring flashes. I went out and bought a ring flash after that meeting. I'm still trying new things and new methods, especially with flashes.
Hopefully you've learned a few things about photographing rhododendrons from this and Part I of this series. Go out there and start taking photographs of rhododendrons. If you have any particular questions, problems or such on photography let me know. If I can't answer them we've got others who probably can in the Photography Study Group.
Bill Heller, president of the Seattle Chapter, has been active in the chapter's Photography Study Group for many years and has won numerous prizes for his photographs.